


Codemill is a software development company located in Kajaani, Finland. They specialize in developing software products and services for AEC industry. With Navistools being their flagship product, they offer solutions to visualize, manage, and exchange project life cycle data in Navisworks BIM models and with external databases.
Navistools Clash Manager is an extension (plugin) for Navisworks that was developed by Codemill in late 2019. It provides additional functionality to the Navisworks Clash Detective tool. Clash Manager introduces several novel features to assist the user to manage clashes. One feature includes using clash markers for grouping clashes. Clash markers are spherical elements automatically placed in the model graphical space to identify clashes detected. These clash markers allow users to select clashes directly from the graphical view. Another unique feature of Clash Manager is an advanced grouping option. Users can group clashes automatically based on multiple criteria. The clash reports feature facilitates coordination and resolution of clashes. Multiple view of a clash and the clash data provided in the report help users to identify its location and better understand the clash.
This article provides an overview of Navistools Clash Manager and explains its features and functionalities in detail. It also provides suggestions for the future improvement of the tool.
Using the tools provided by the Navistools Clash Manager (Figure 1), users can assign clashes to the responsible person, provide clashes with comments, change default viewpoints for the clashes, and change status of a clash.

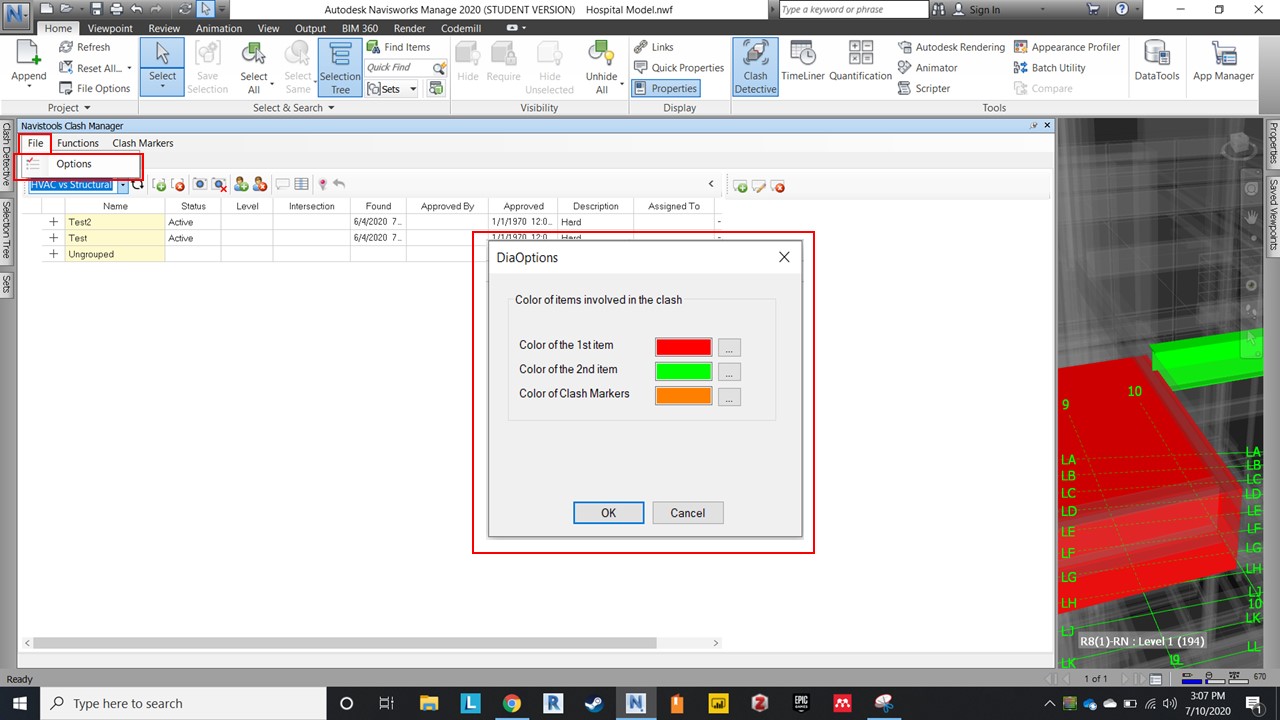
User can change the highlight color of the clashing elements and clash markers through the “File” menu (Figure 2).
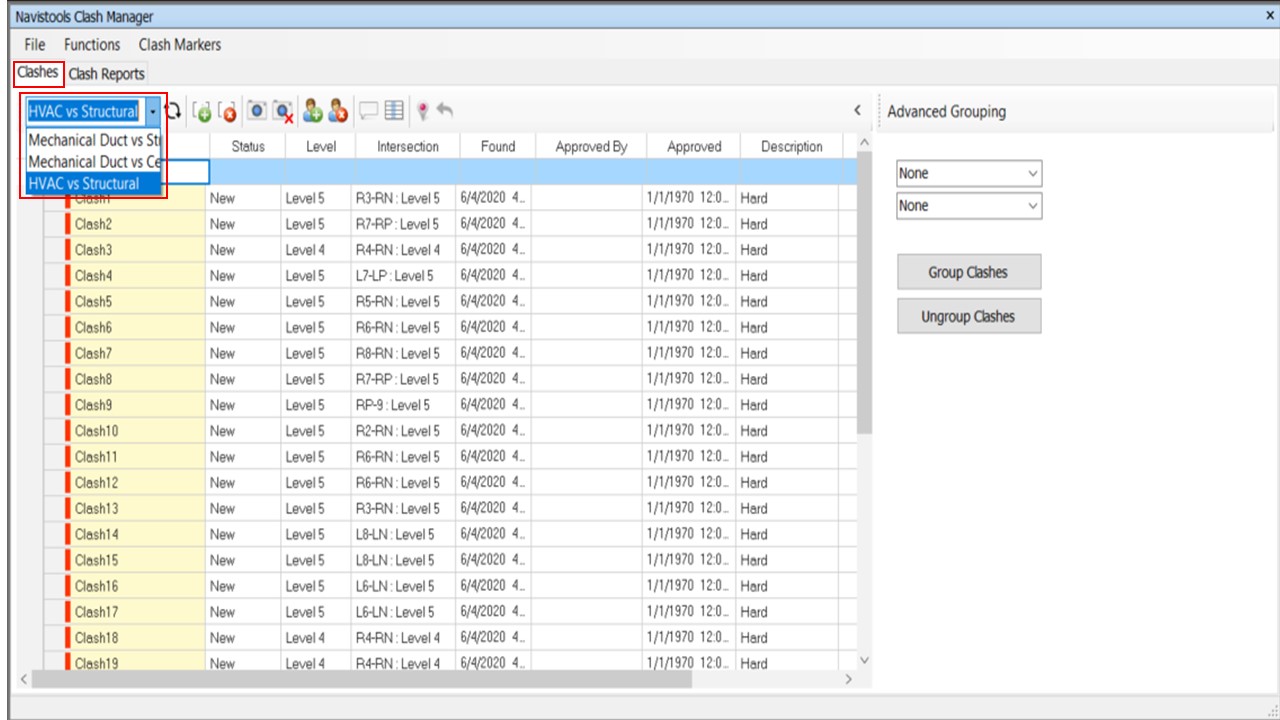
From the “Clashes” tab, users can select which clash test they would like to work on using a drop-down menu showing a list of clash tests pre-defined in Navisworks. (Figure 3).
Default clash viewpoints are created automatically in Navistools Clash Manager. Users have the flexibility to manually change the current view and save it as a viewpoint by clicking on the “Add Viewpoint” button (Figure 4). These viewpoints are also automatically saved in Navisworks’ Clash Detective and can be imported to saved viewpoints using Navisworks Clash Detective’s “Write Report” function. Users can also remove the saved viewpoint by clicking on the “Remove Viewpoint” button in Navistools Clash Manager (Figure 4).

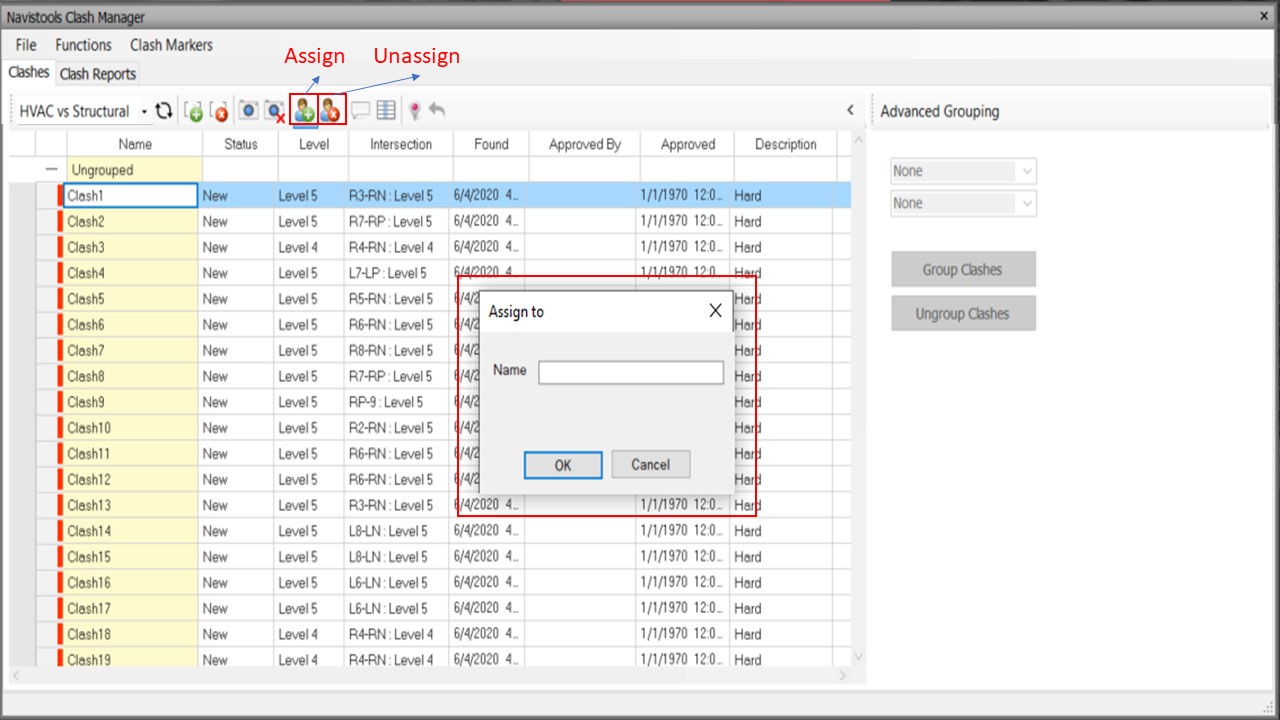
Users can assign a clash to a responsible person using the “Assign” button and enter a name in Assign To dialog box (Figure 5). Navistools Clash Manager allows for assigning responsibility to clashes one clash at a time. Users can also remove the responsible person assigned to a clash by selecting the “Unassign” button.
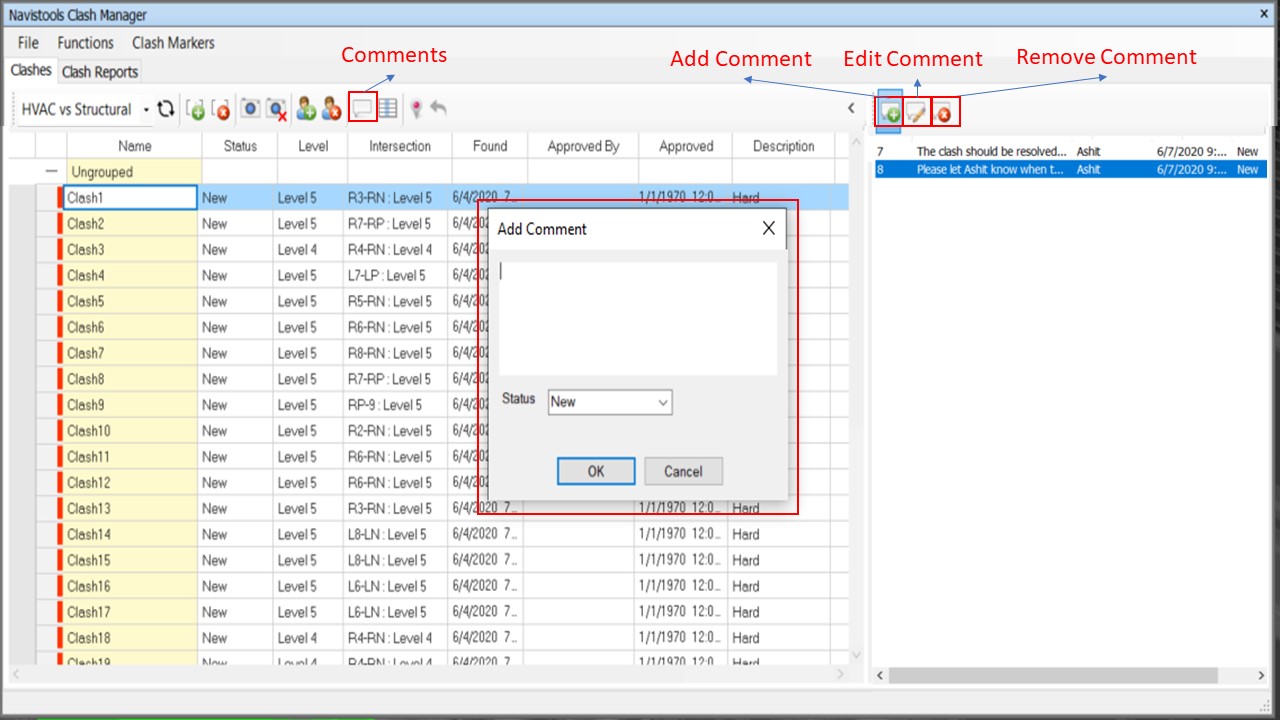
Using the “Comments” Button, users can add comments, edit comments, or remove comments for a clash (Figure 6). Once the user selects the “Add Comment” button, a comment panel will appear, allowing the user to add comments and change the status of the clash. Multiple comments can be added to a single clash. Once a comment is added, the user can edit and delete it using the “Edit Comment” and “Remove Comment” buttons.
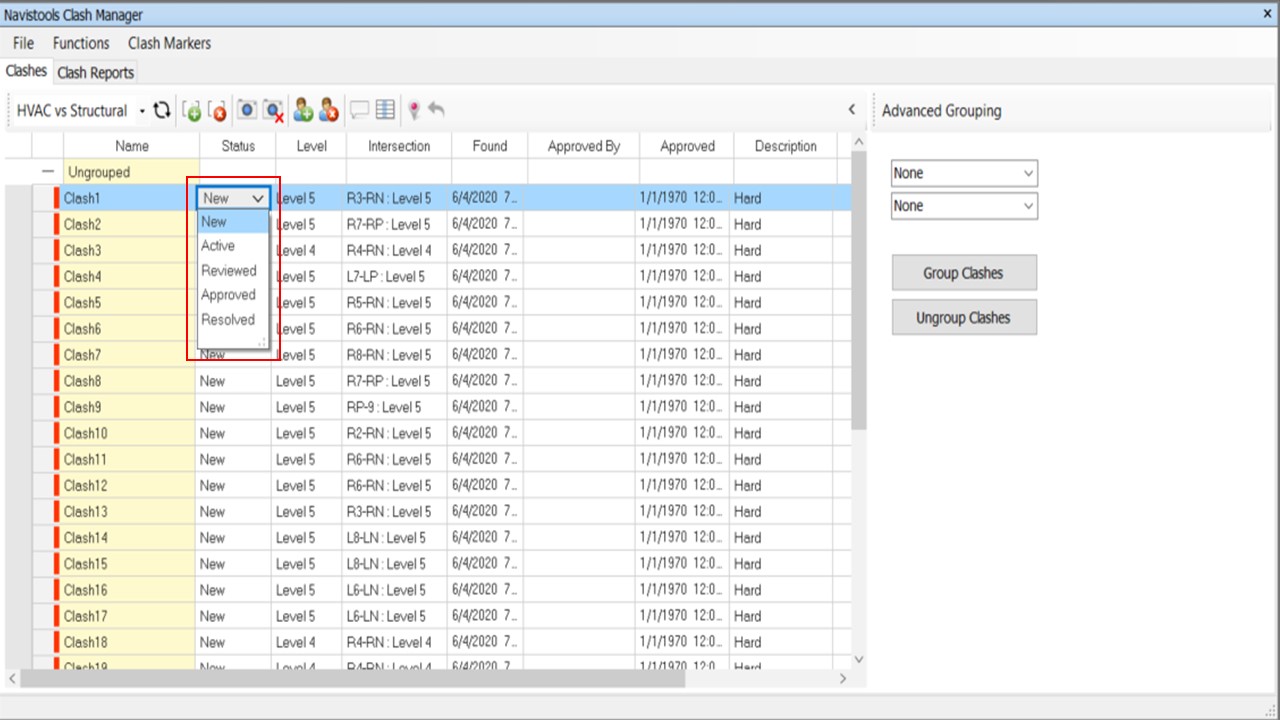
Users can change the status of a clash from a drop-down status list menu for each clash (Figure 7).
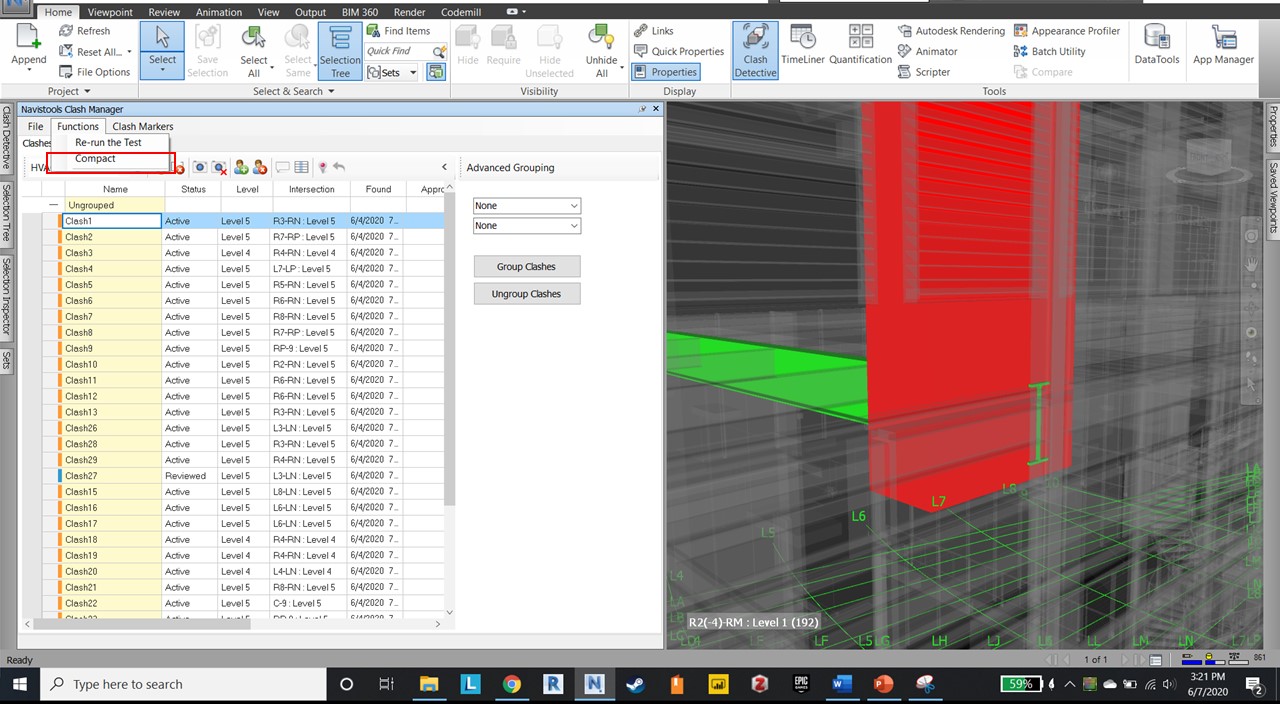
Using the “Functions” menu, users can re-run the selected clash test by selecting the “Re-run the Test” option (Figure 8).

Selecting the “Compact” option in the “Functions” menu allows users to remove all resolved clashes from the clash test (Figure 9).
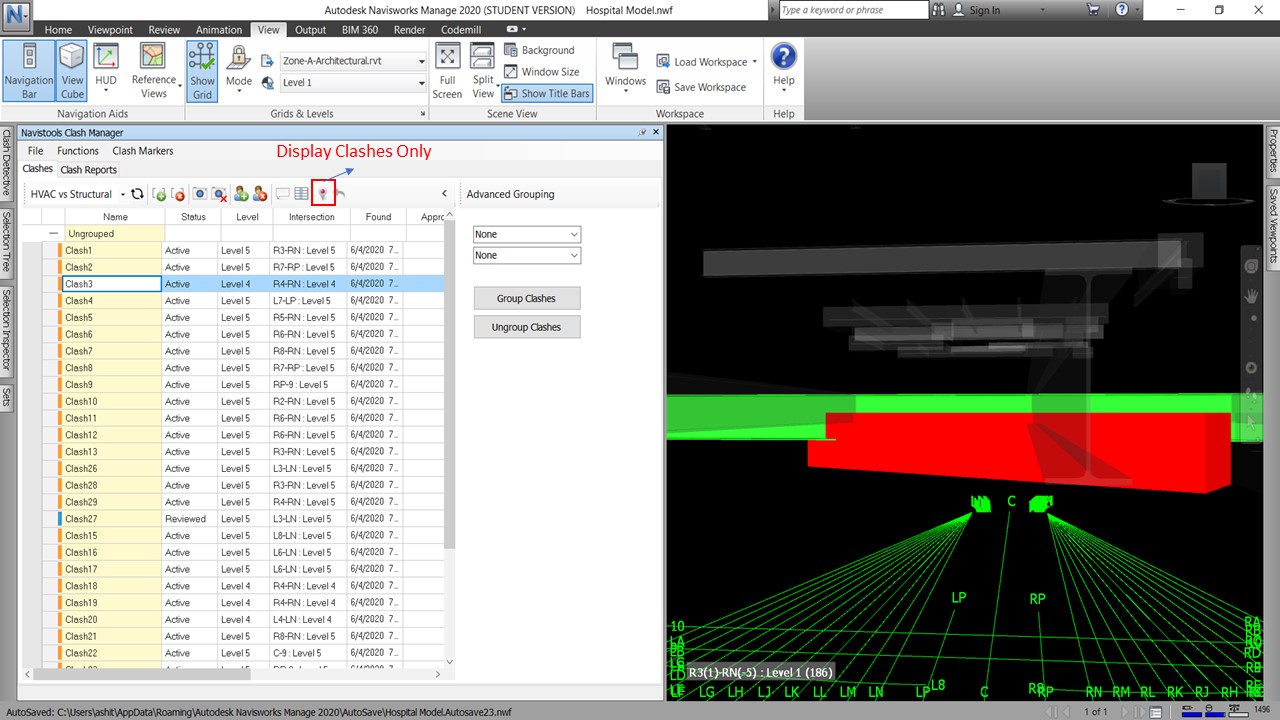
From the “Clashes” tab, selecting the “Display Clashes Only” button allows users to hide all elements not involved in a clash while displaying only the elements involved in the selected clash (Figure 10).
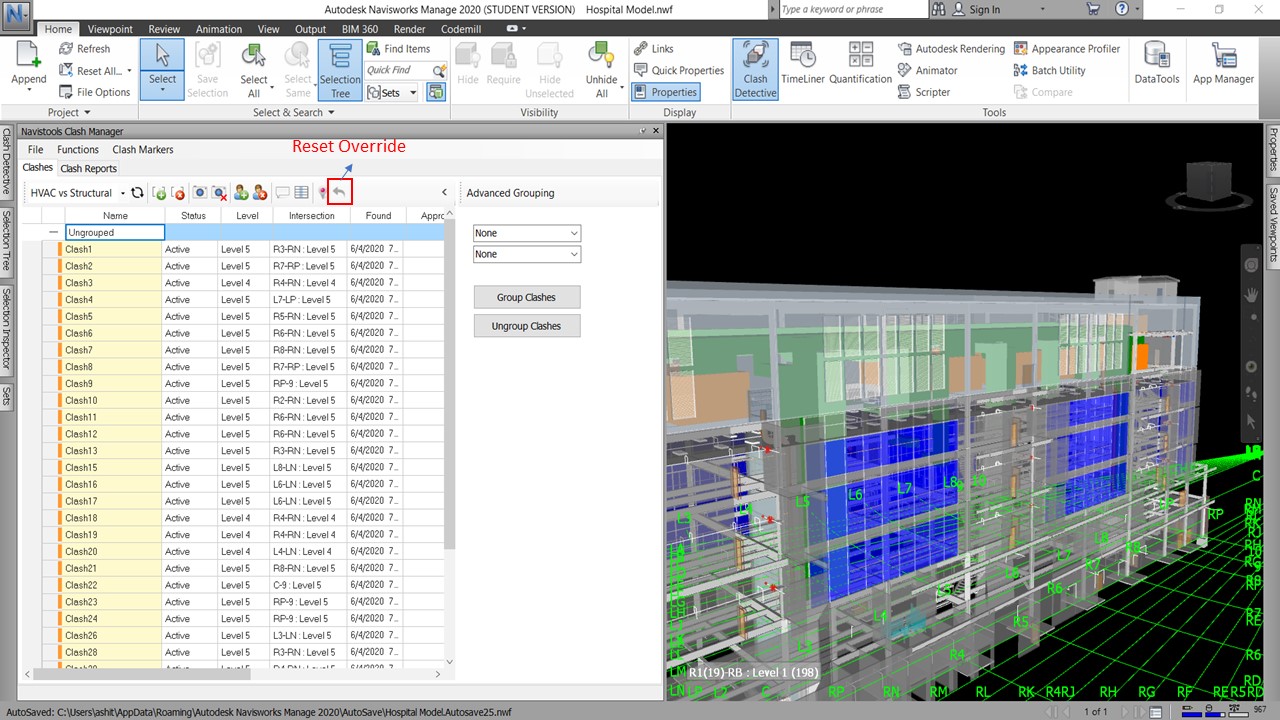
From the “Clashes” tab, selecting the “Reset Override” button will unhide all objects in the model (Figure 11).
Navistools Clash Manager allows users to group clashes either automatically or manually. Clash grouping functionality can be used to manage clashes based on the status, assigned to, and approved by properties. Any changes made to these properties are applied to all the clashes within the group.
Navistools Clash Manager allows users to group clashes automatically by selecting up to two criteria from a list. These criteria help users group clashes based on clash location, responsible person, and clashing elements. The automatic grouping of clashes facilitates a streamlined clash coordination and resolution process. Users can quickly assess if a clash is unique resulting from a conflict between two objects or if the clash is part of a group of clashes resulting from conflicts between multiple objects. This grouping feature helps to accelerate the clash resolution process by quickly identifying the total number of unique clashes in the model.
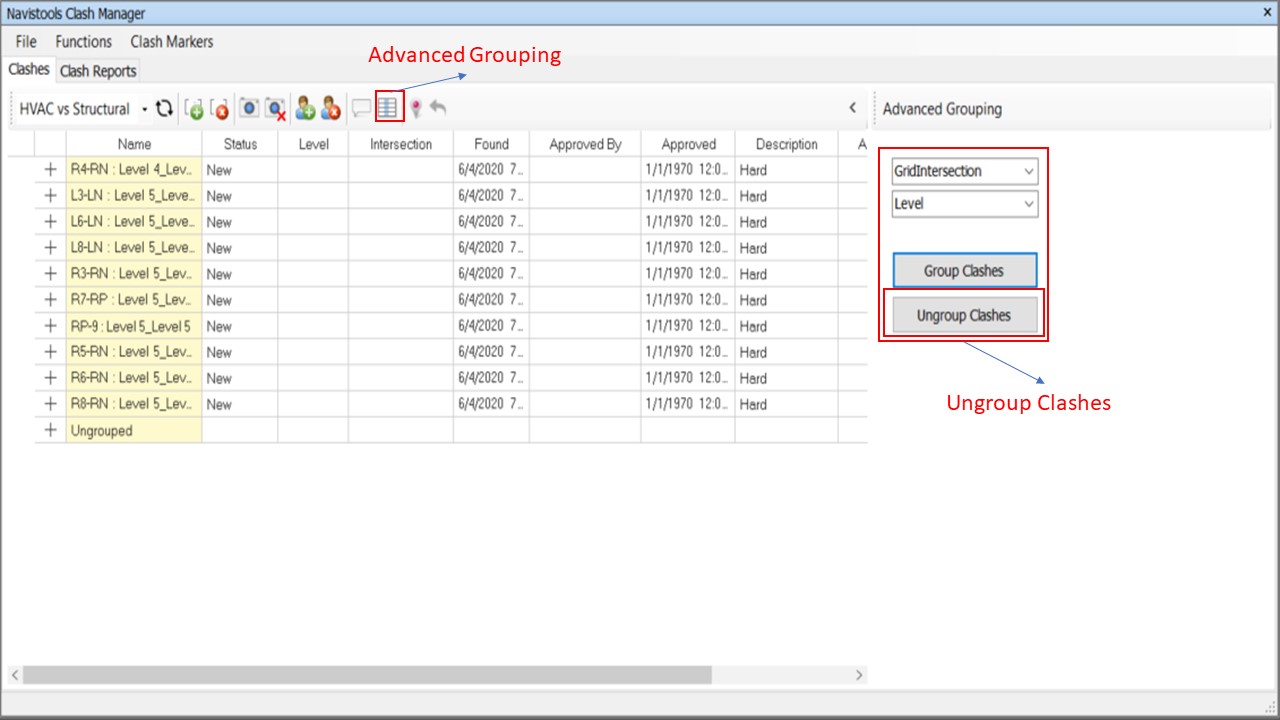
Using the “Advanced Grouping” option from the “Clashes” tab, users can automatically group clashes using one or two criteria. For each criterion, the user can select from a drop-down menu of several criteria to group clashes. These include: Level, GridIntersection, SelectionA, SelectionB, AssignedTo, ApprovedBy and Status. SelectionA and SelectionB denote the two elements that are being tested against each other during a clash test.
To group the clashes automatically, a user must select the “Advanced Grouping” button in Navistools Clash Manager (Figure 12). This will open the Advanced Grouping panel on the right side of the dialog box. Users can select the parameter by which the clashes should be grouped from the drop-down list. Once selected, the user can click on the “Group Clashes” button to group the clashes (Figure 12). They can subsequently ungroup the clashes by selecting the group and clicking the “Ungroup Clashes” button.
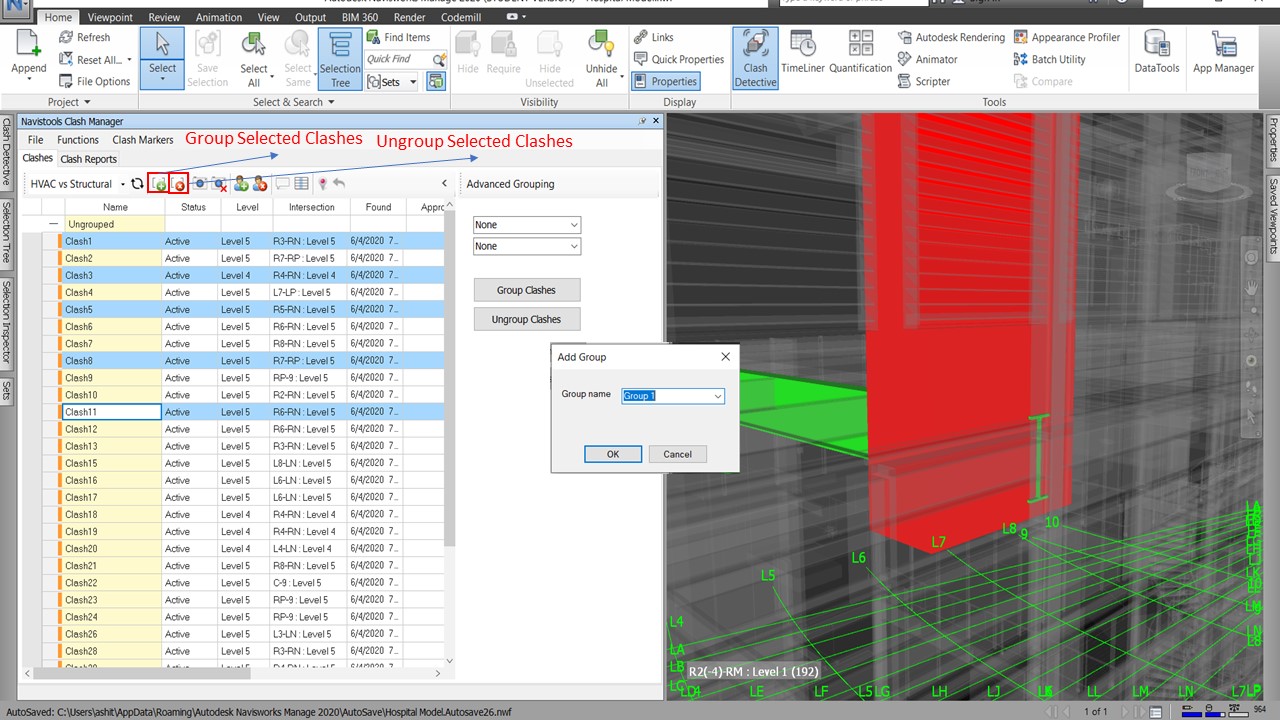
There are two distinct ways of manually grouping the clashes. The user can either select multiple clashes from the clash list and group them together using the “Group Selected Clashes” button (Figure 13). Once the user selects the “Group Selected Clashes” button, they can provide a name for the clash group created. (Figure 13). Ungrouping clashes can be done using the “Ungroup selected group” button.
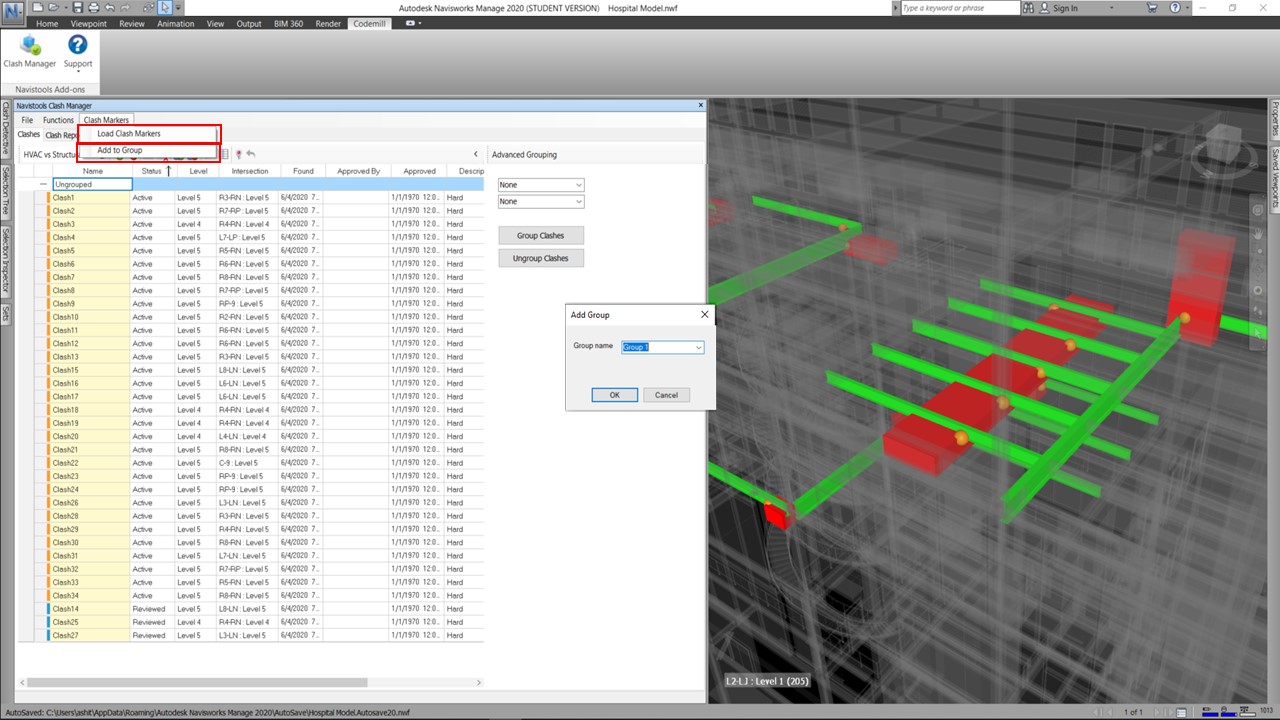
Another way to group the clashes manually is by using the clash markers feature. From the “Clash Markers” menu, users can load clash markers to the Navisworks model. User can then select multiple clash markers in the model and group them together by selecting the “Add to Group” option under the “Clash Markers” menu (Figure 14).
Through clash markers, Navistools Clash Manager has introduced a new method of selecting and visualizing clashes. Though clash markers are currently being used only to manually group clashes, their use needs to be expanded. Expanded use can include clash markers being used to automatically group clashes based on proximity. This will allow users to see how clashes in an area affect each other and how clashes can be resolved. Creating a section box around clash markers can be another expanded use to allow users to identify the elements surrounding a clash. Users can use this information to resolve clashes.
Navistools Clash Manager allows users to generate clash reports for any clash test produced by Navisworks. The clash report contains views and data that improves the identification and understanding of a clash. Though the clash report in Navisworks’ Clash Detective can be generated in multiple formats, these formats do not combine visual guides to identify the clashes and clash data into a single clash report. Another drawback of the Navisworks Clash Detective tool is the lack of portable formats for generating the clash report. Navistools Clash Manager’s overcomes these limitations by allowing users to generate a clash report in PDF format and provides users with clash data and multiple clash views in a single clash report.
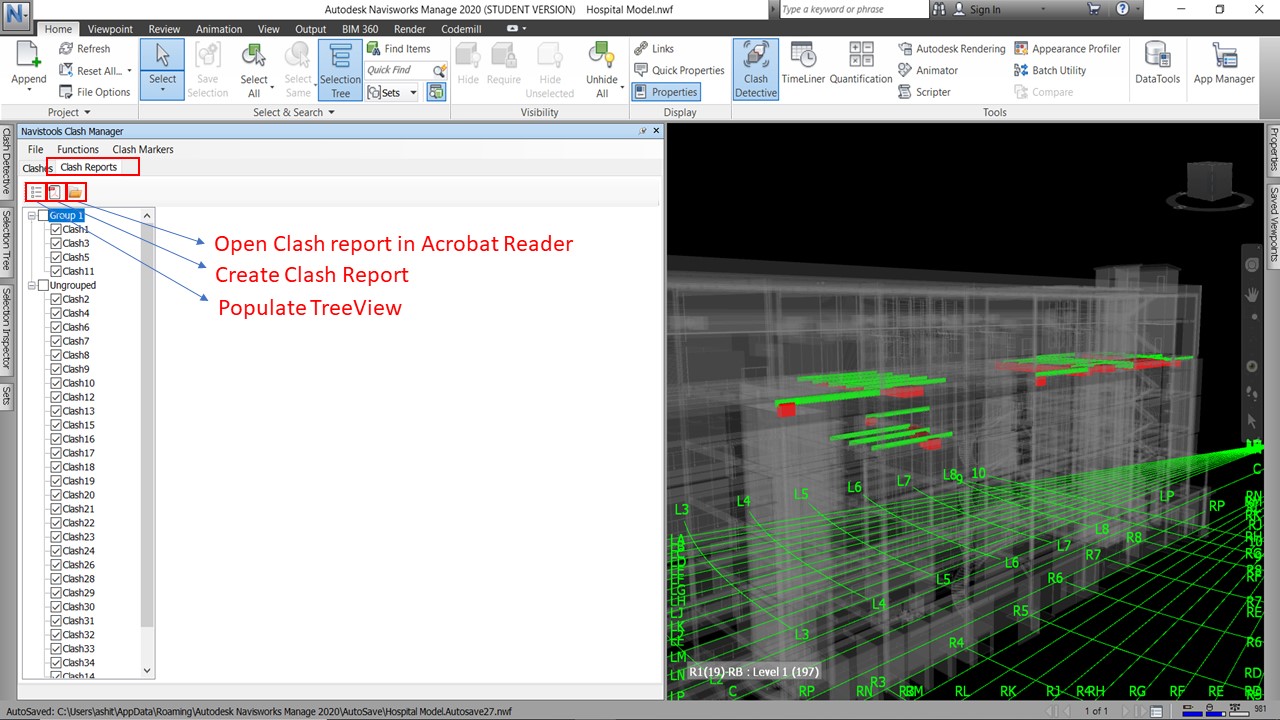
Using the “Clash Report” tab (Figure 15), the user can select “Populate TreeView” to view all the clashes in the clash test, then select the clashes they want to use to generate a clash report from the tree view. The tree view will mimic the group structure for the clashes in the “Clashes” tab. Once the desired clashes are selected, the user can click on the “Create Clash Report” button to create the report. Users also have the option to view the clash report directly in Acrobat Reader by selecting the “Open Clash report in Acrobat Reader” button.
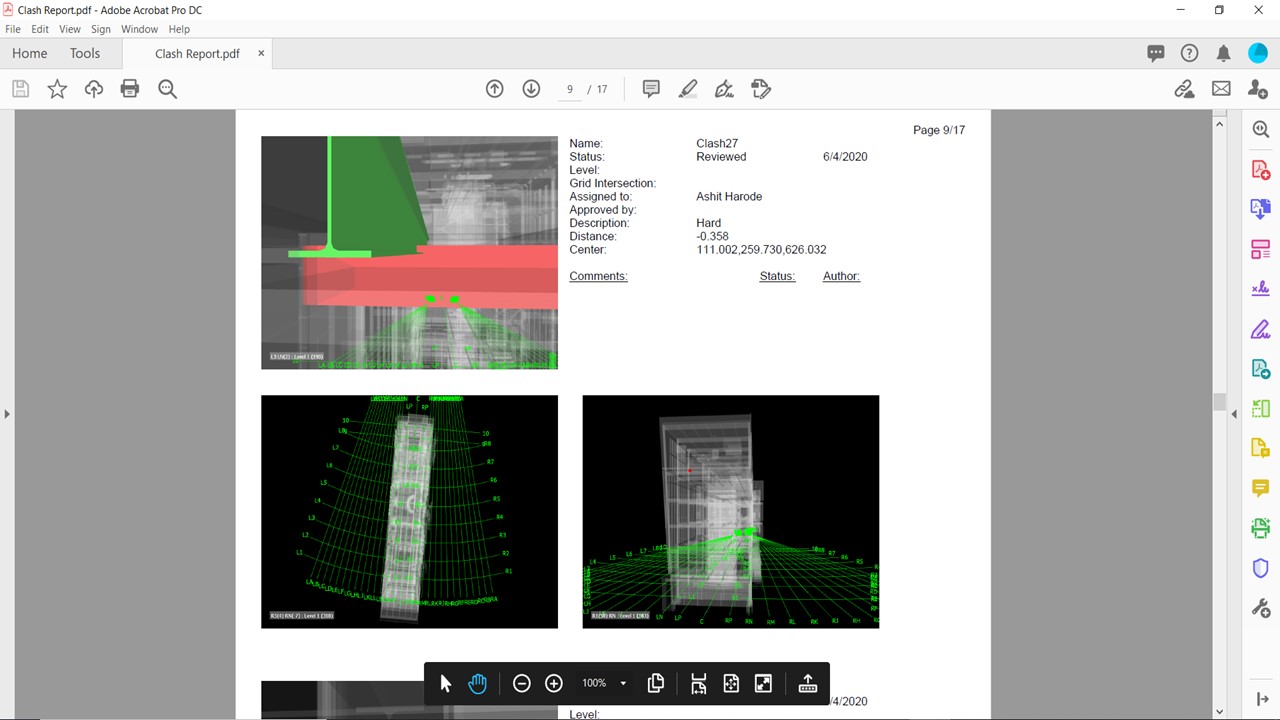
The generated clash report (Figure 16) will include all the data related to the clashes along with three different views for a clash. The first view is either a default clash viewpoint or user-defined clash viewpoint, the second and the third views will be the top and elevation views of the clash. The second and the third views also indicate the location of the clash using the clash markers. Clash markers will only be shown in the clash report if they are loaded in the model using Navistools Clash Manager. If the user turned on the grid option in the Navisworks model, the grid will also be shown in the clash report. The addition of the grid in the clash report helps to better identify clash locations.
Some suggestions for the future improvement of the tool are listed below.
Currently, Navistools Clash Manager does not allow users to add comments to multiple clashes through a batch selection. Comments to each clash needs to be individually added. The ability to add comments to clashes through a batch selection will save time for the user.
Currently, when the “Display Clash Only” button is selected, the Navisworks view displays the clashes with the currently selected clash being highlighted, and the other clashes displayed in an x-ray view. However, this view resets and changes to the Navistools Clash Manager’s default view as soon as another clash is selected. It would be helpful for the user if the “Display Clash Only” option, once selected, becomes permanent unless the option is turned off.
Currently, the “Reset Override” button has similar functionality as the “Unhide All” function in Navisworks. Additional functionality such as resetting the clash views to default, removing load markers from a clash view, and resetting the “Display Clash Only” option can be added to the “Reset Override” button.
The clash markers are a great and smart way for grouping clashes. But their use is restricted to manual grouping of clashes. The use of clash markers can be expanded to automatically group clashes in the vicinity or in the radius of a clash. This functionality can be useful in cases where the user wants to see if similar clashes exist around a clash and assess the effect of each clash on its surrounding clashes.
Currently, no visual distinction exists between clash markers for grouped and ungrouped clashes. Visual representation would be beneficial to distinguish markers of grouped clashes from those belonging to ungrouped clashes. This could assist users in better identification of clash markers while manually grouping clashes.
After saving viewpoints, the Navistools Clash Manager has no functionality indicating if a clash already has a saved viewpoint. This functionality should be added to the Navisworks Clash Manager.
Navistools Clash Manager currently lacks any functionality in terms of filtering clashes. Filtering clashes based on current selection can be an effective tool while handling a large number of clashes. Filtering functionalities such as showing only the clashes that includes all the currently selected elements or showing only the clashes that includes at least one of the currently selected elements can be a useful filtering option.
 Ashit Harode is a Ph.D. student in the Department of Building Construction at Virginia Tech. He holds a Masters Degree in Construction Management from Virginia Tech. His research interest includes Building Information Modeling (BIM), Machine Learning, and its application in construction automation.
 Walid Thabet, Ph.D., is a 22+ year faculty member of Virginia Tech and has been teaching and developing construction and construction management courses at the undergraduate and graduate levels. His current research agenda focuses on Virtual Design and Construction (VDC), Construction Innovation and BIM for Facility Management (BIM-FM). Dr. Thabet leads the Virtual Facilities Research Lab (VFRL), offering emerging CRE leaders hands-on experience in technology development and practical application as well as access to industry through both corporate and academic partnerships. His recent projects involve collaborative research efforts with several A/E/C industry partners to expand knowledge of BIM and explore emerging software tools and technologies including Augmented Reality.
AECbytes content should not be reproduced on any other website, blog, print publication, or newsletter without permission.