


It is that time of year, when flowers are blooming in the Northern hemisphere, and Autodesk is rolling out its annual software releases. With the new version of Autodesk® Revit® now out, we get to talk about what’s new and improved. This is my eighth annual AECbytes “What’s new” article, and we appreciate the value you find in this resource. You may want to sit down, get comfortable, and maybe grab a coffee first … because Revit 2024 is packed full of exciting new things!
Be sure to check out the 30-minute YouTube video linked at the bottom of this article and subscribe to my channel while there.
Let’s start with my top three favorite features in Revit 2024. Please keep in mind that I am a registered architect (WI) and work at Lake|Flato, which is a top-ranked architecture firm, so this article mainly focuses on the platform and architectural features.
I want to start with my personal top three favorite features in Revit 2024.
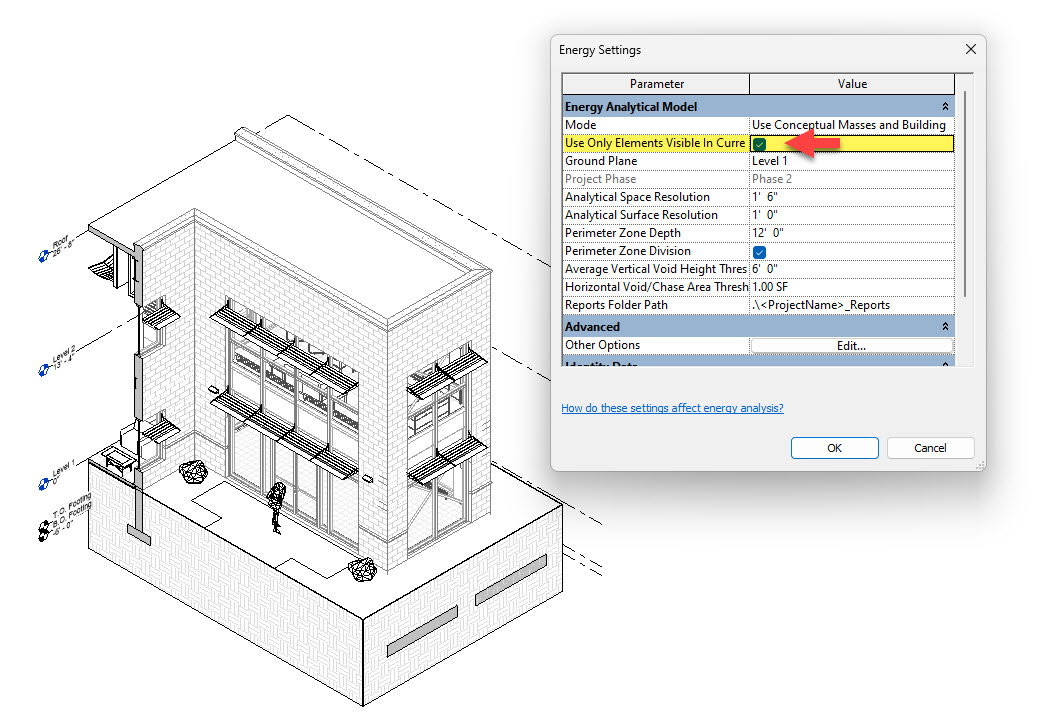
For those who use Revit’s energy modeling workflow, as we do at Lake|Flato, you will like the new ability to create an energy analysis model (EAM) by view. Previously the EAM was created from everything in the model with the only filtering options being phase or room bounding, which would be considered destructive in most cases to required modeling and documentation workflows.
Why is this helpful? Here are just a couple of examples I have encountered:
This new workflow is still not perfect, but a step in the right direction. For example, there needs to be an option to define some wall(s) as adiabatic when using this new workflow option. The visibility of elements within the view may be controlled by a section box, view filters, visibility/graphic overrides, etc. Note that the “current view” must be a 3D view.
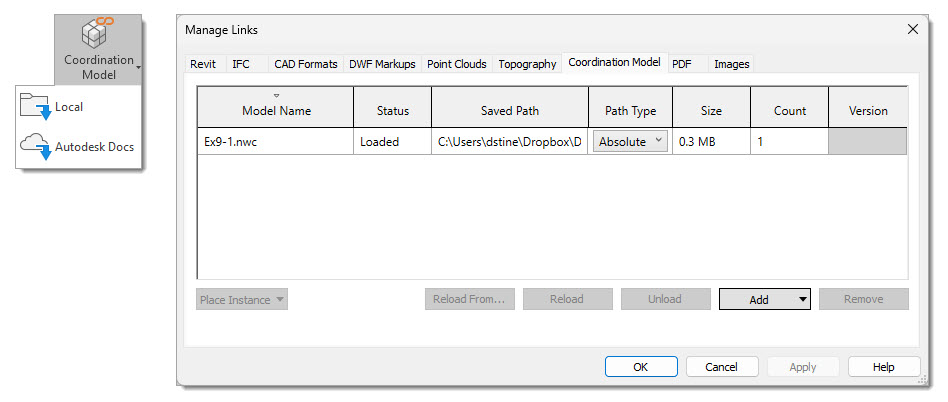
Revit can now link a large number of file formats stored in BIM 360 via a linked Coordination Model. These models are represented within Revit as lightweight geometry and can be easily navigated. Sub-elements can be selected, and their properties are listed in the Properties palette. If it is an IFC file, the IFC element properties will show, whereas Revit element properties show when linking a Revit model.
If you were paying close attention just now, you might have connected the dots that a Revit model can be linked in as a lightweight model. This might be helpful with specific consultant models.
Here is the big news, with this new feature … not only can you link in a Revit model, but you can link different versions of Revit models! For example, your Revit 2024 model can link in a Revit 2022 model without needing to upgrade the 2022 model. This is a brave new world. 😊
One more related item: the linked coordination models are now managed in the Manage Links dialog.
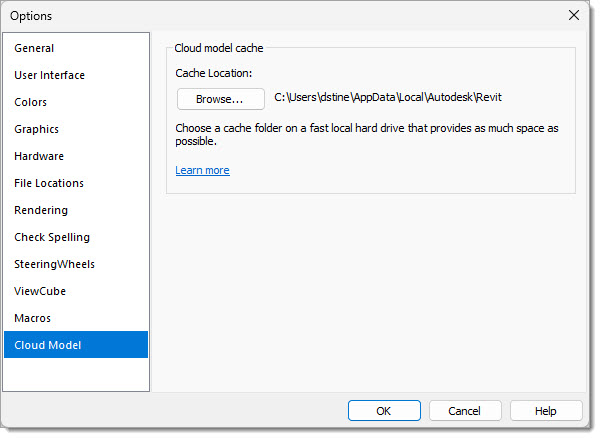
This is a feature I created a Revit Idea for in 2019: Revit Desktop Connector - Change Local Path for Cached Files
When using BIM 360 to host Revit models in the cloud, the files are synced locally via Autodesk Desktop Connector for improved performance (especially the unchanged links). However, until now, the local location was not editable. If you have a laptop, for example, with a smaller SSD C: drive, and a larger D: drive, there was no way to point the local BIM 360 storage to the more spacious D: drive. This could easily cause the C: drive to fill up if you worked on several BIM 360 projects or just one mega project.
Now, it is possible to point the local file storage to a custom location as shown in Revit’s Options dialog below! Thanks, Autodesk.
Two things that almost always stay the same in a Revit upgrade are templates and sample projects. This year, we lose some sample projects and gain a new template and sample project.
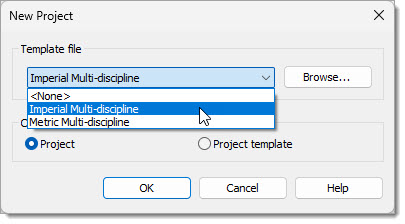
There is a new multi-discipline template. Previously there were only discipline-specific and systems (i.e., MEP) templates. Due to the settings and loaded families required by specific commands and workflows, some tools in Revit would not work correctly depending on which template you started from. With the new all-discipline template, this problem can be avoided.
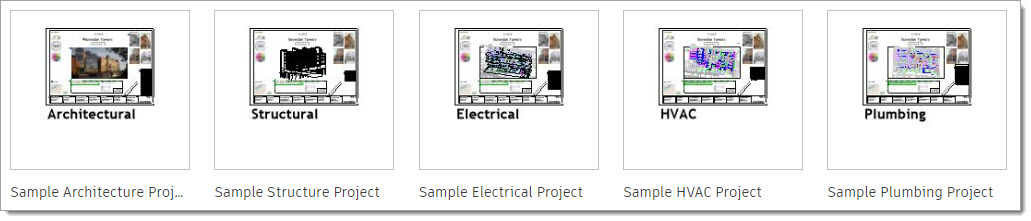
There is a new robust set of sample models which can be used to explore Revit features and model organization. It includes seven linked models and contains phasing and design options. There is even a point cloud file that can be downloaded separately.
One slight downside related to this is that the old sample models are no longer included. So, while this new sample model is a great new resource for those learning Revit, I will miss the easy access to the lightweight residential sample model to open quickly for troubleshooting. Of course, the older versions of these files can still be downloaded per this post I wrote on my blog: Templates and Families Not Installed.
There are several new features in Revit 2024 that are not discipline specific.
The user interface has a number of changes. Most of the icons have been refreshed in support of a new dark theme option. The project browser is also completely updated and now includes a search option at the top.
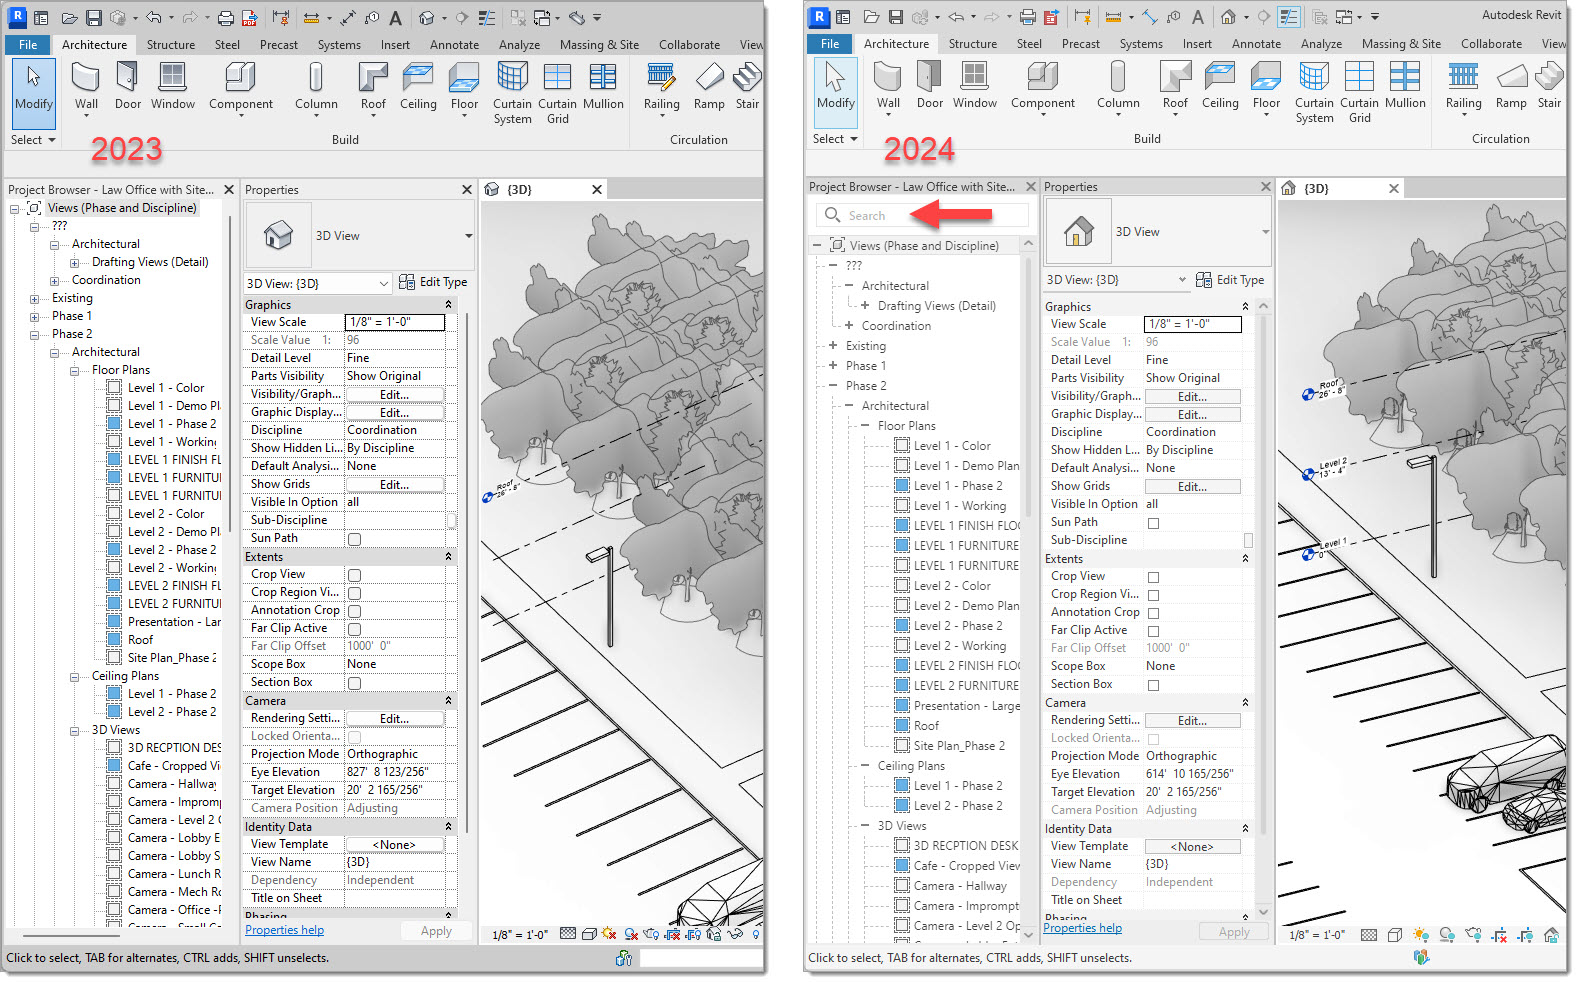 Figure 8. Most icons have been refreshed and the project browser is completely updated.
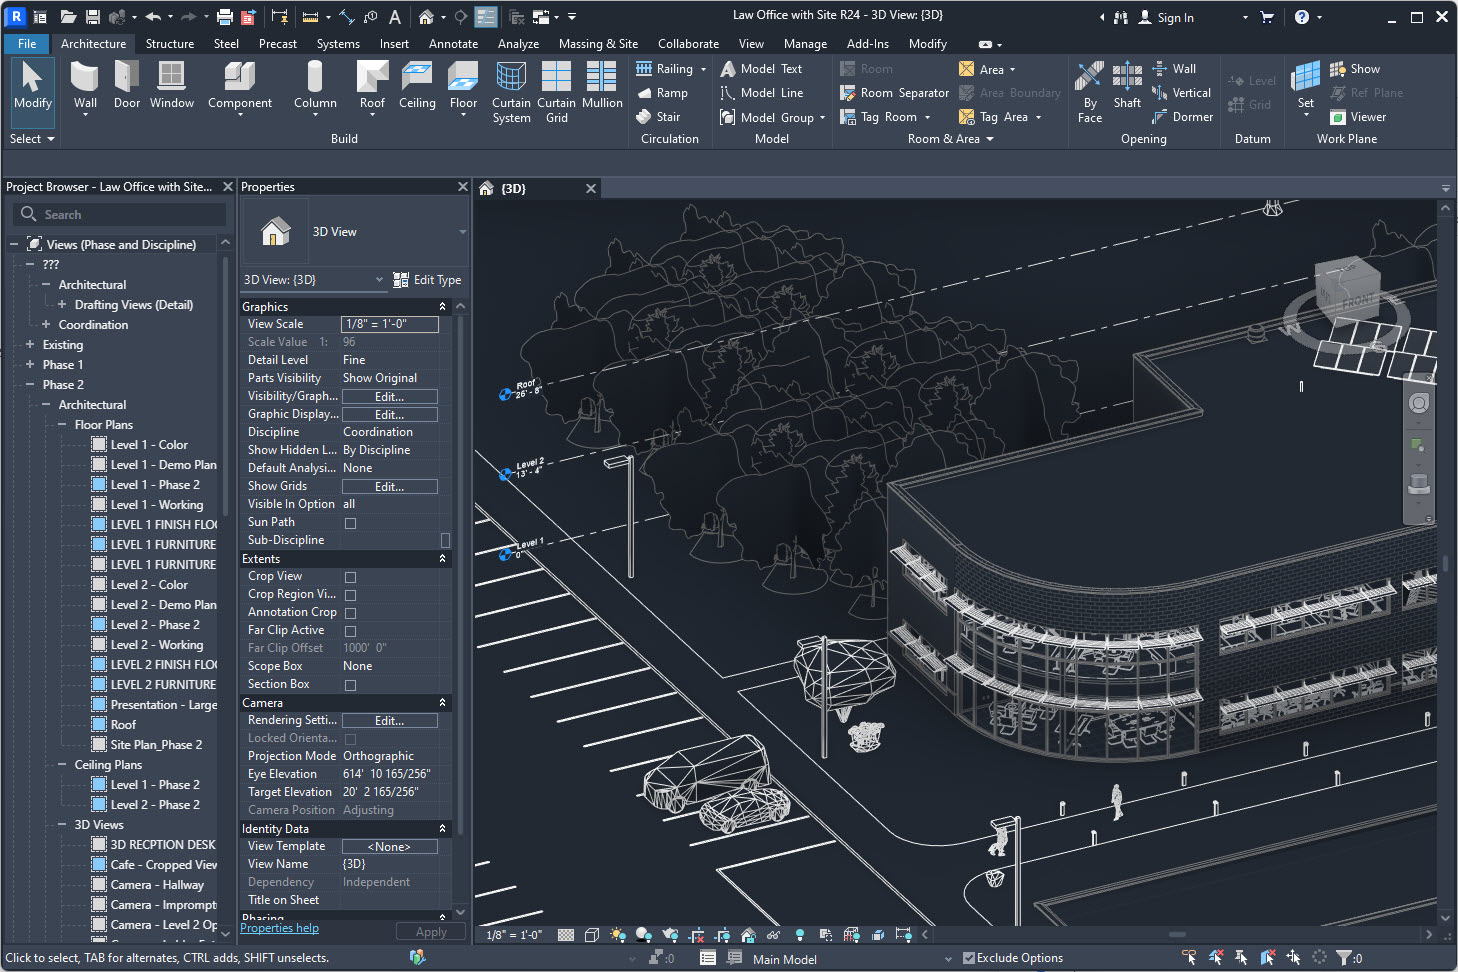
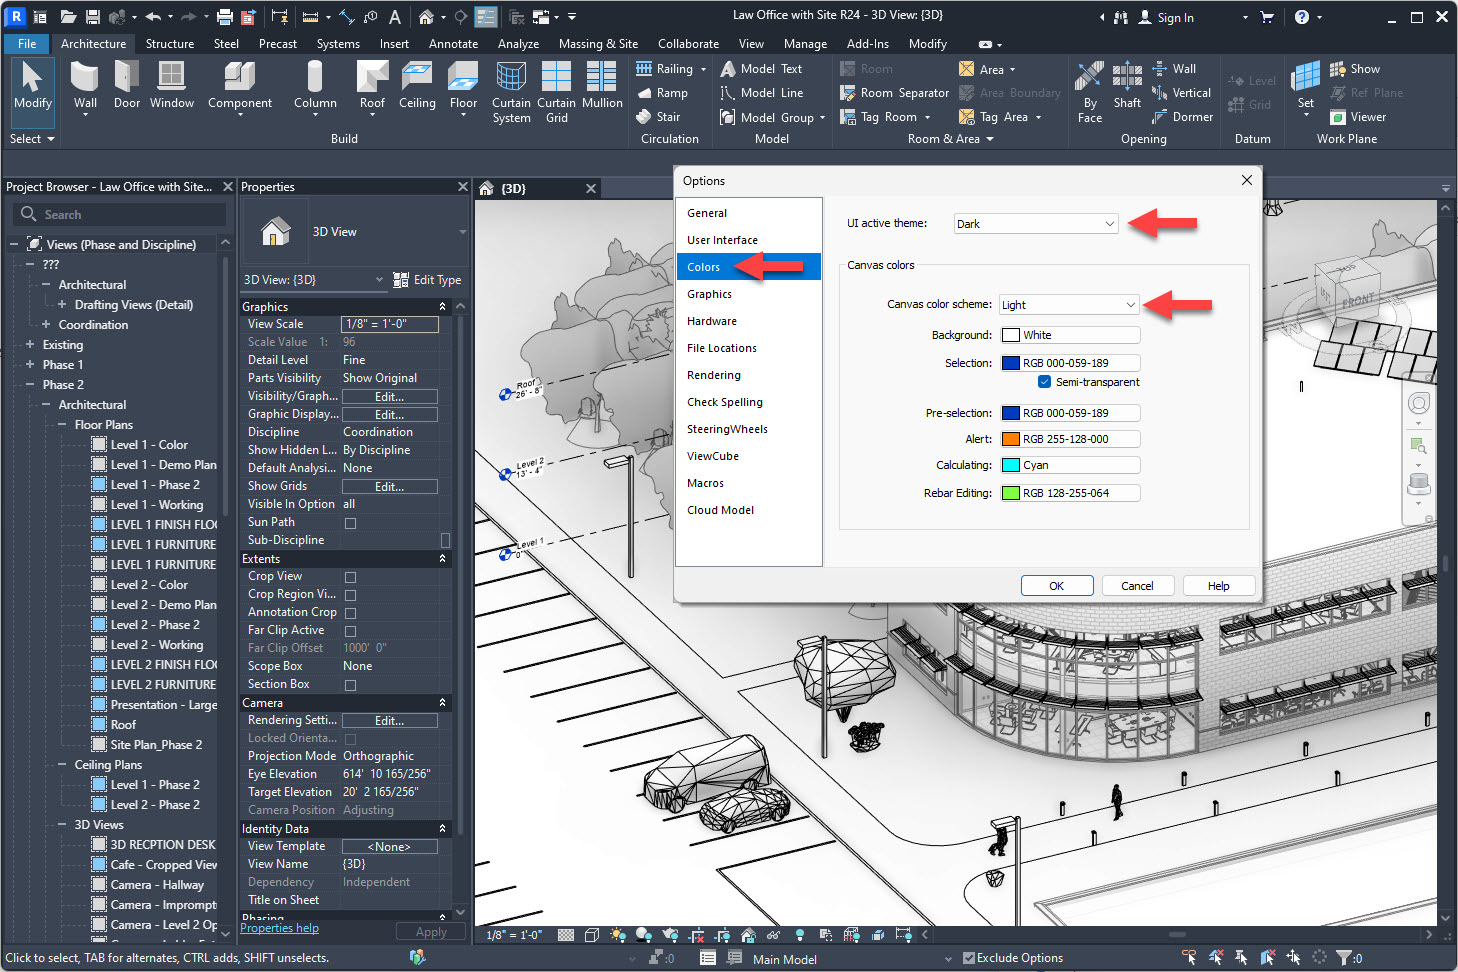
Revit 2024 now has a more legitimate dark theme feature. This new feature can be set to follow the operating system setting. When first used, the canvas area is also set to a dark theme. This can be adjusted back to a light color while still in the dark theme if desired.
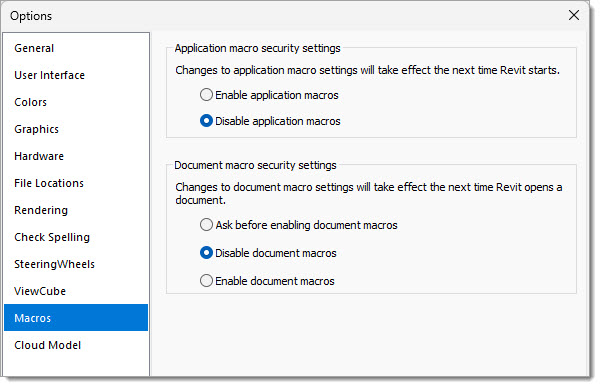
Macros are now disabled by default for enhanced security, as shown in the Revit Options dialog below. Any individual or company can change these by deployment or manually if desired.
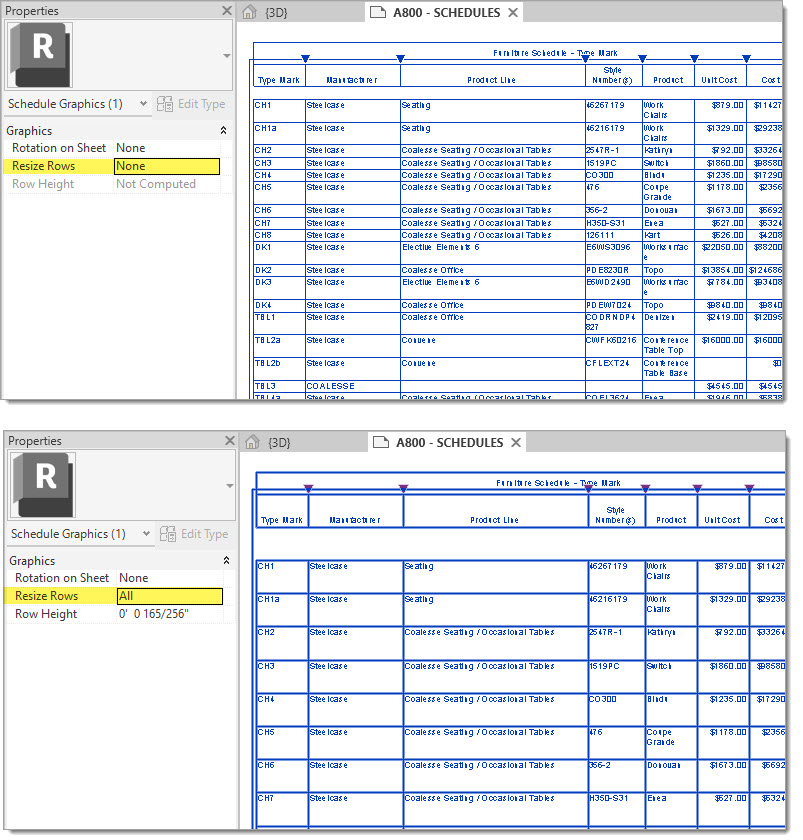
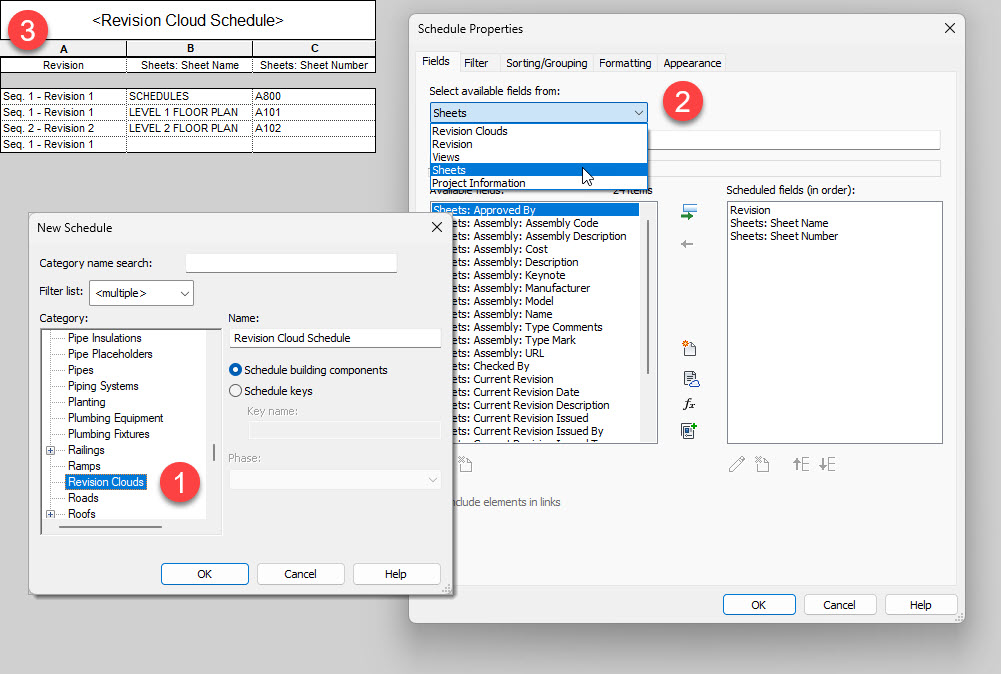
When a schedule on a sheet is selected, there are now a few options in the Properties Palette to control the row height and rotation on the sheet. Selection of All for Resize Rows makes the row height consistent.
Revision clouds can now be scheduled. This includes the ability to schedule related information such as the sheet or view name that the cloud is placed on.
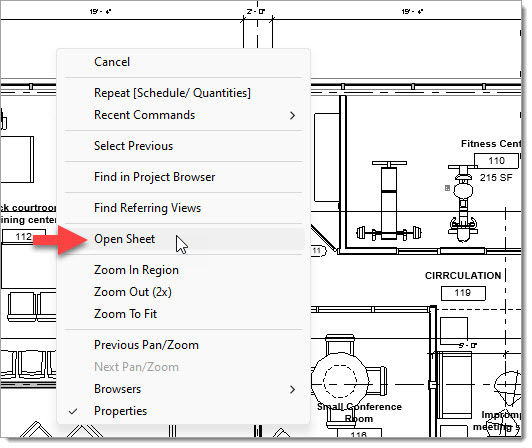
If a view is placed on a sheet, that sheet can now be opened quickly via right-clicking within the view and selecting Open Sheet as shown here.
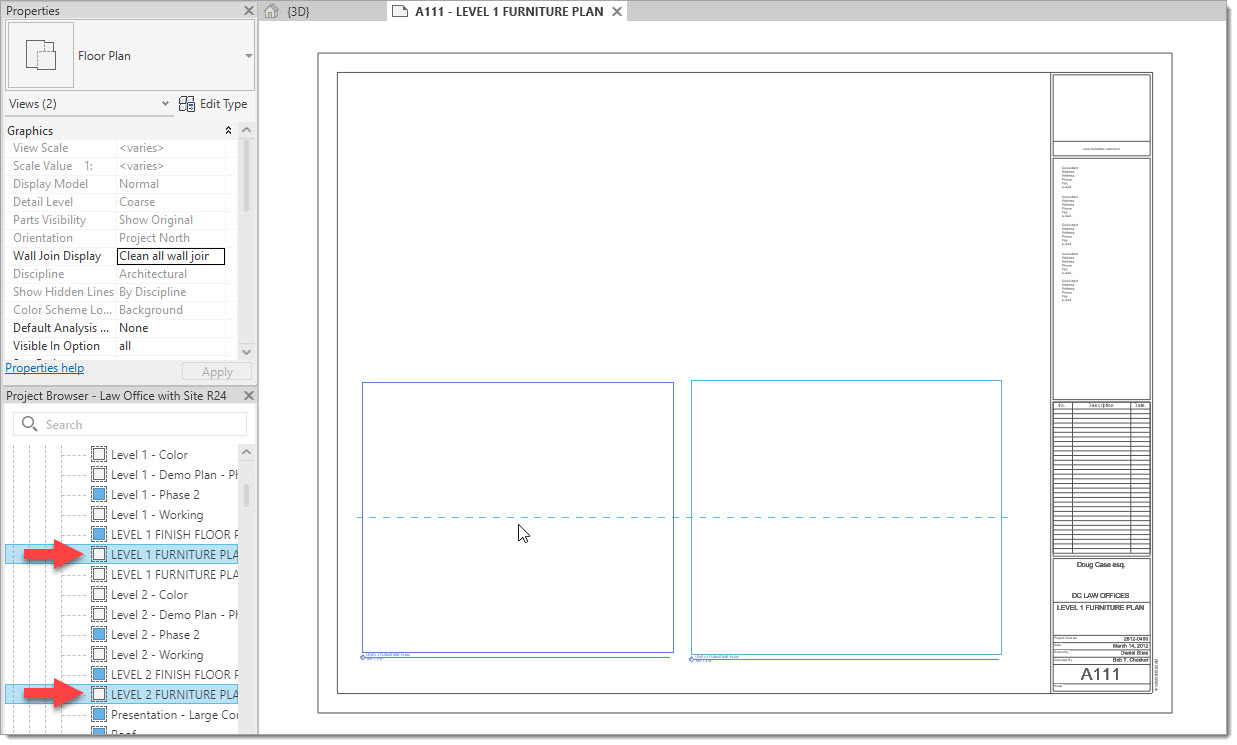
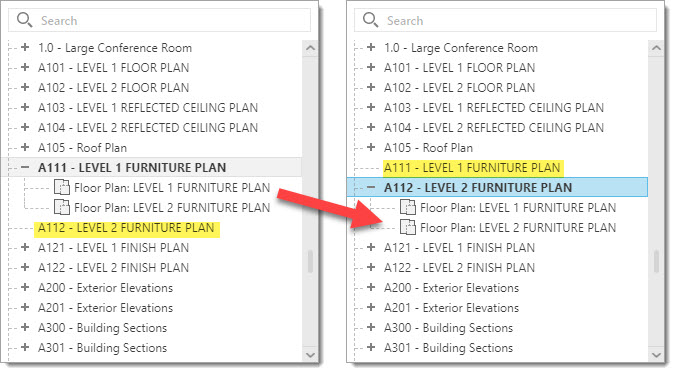
Multiple selected views and schedules can be dragged from the Project Browser onto a sheet. These are spaced out sufficiently so they do not overlap, but they likely require manual adjustment once placed. It is also possible to drag views from one sheet to another within the Project Browser as shown in Figure 16, in which case the views are positioned in the same location.
When adding 2D elements to families, we now have display order controls. Previously, it was inconsistent and depended on the order of creation and looked/printed differently based on raster/vector method and if it was in the family editor or project environment.
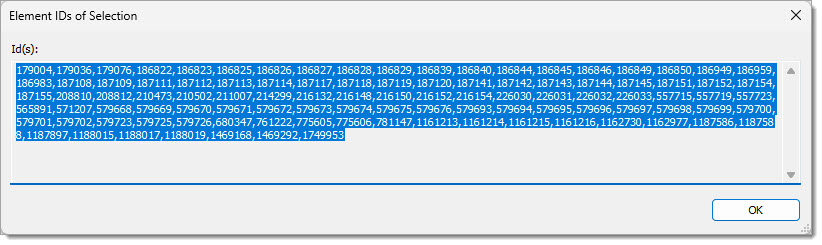
There are over 20 existing dialog boxes that have been enhanced to allow resizing. A few examples are Element IDs of Selection, Starting View, Insert 2D Elements, and more.
Project parameters are now sorted alphanumerically in the instance and type properties dialogs. Family parameters are unchanged from previous behavior.
The architectural discipline has several new features and will make a lot of architects and designers happy. Of course, we will all have wishlist items not found in the update. Be sure to head to the Revit Ideas site and make sure you post or vote for enhancements you want. Here is an example of a much needed enhancement to the Bind Revit Link Revit Idea that would maintain phases – most do not realize that all phase settings are lost when you bind a Revit link until they need to do it!
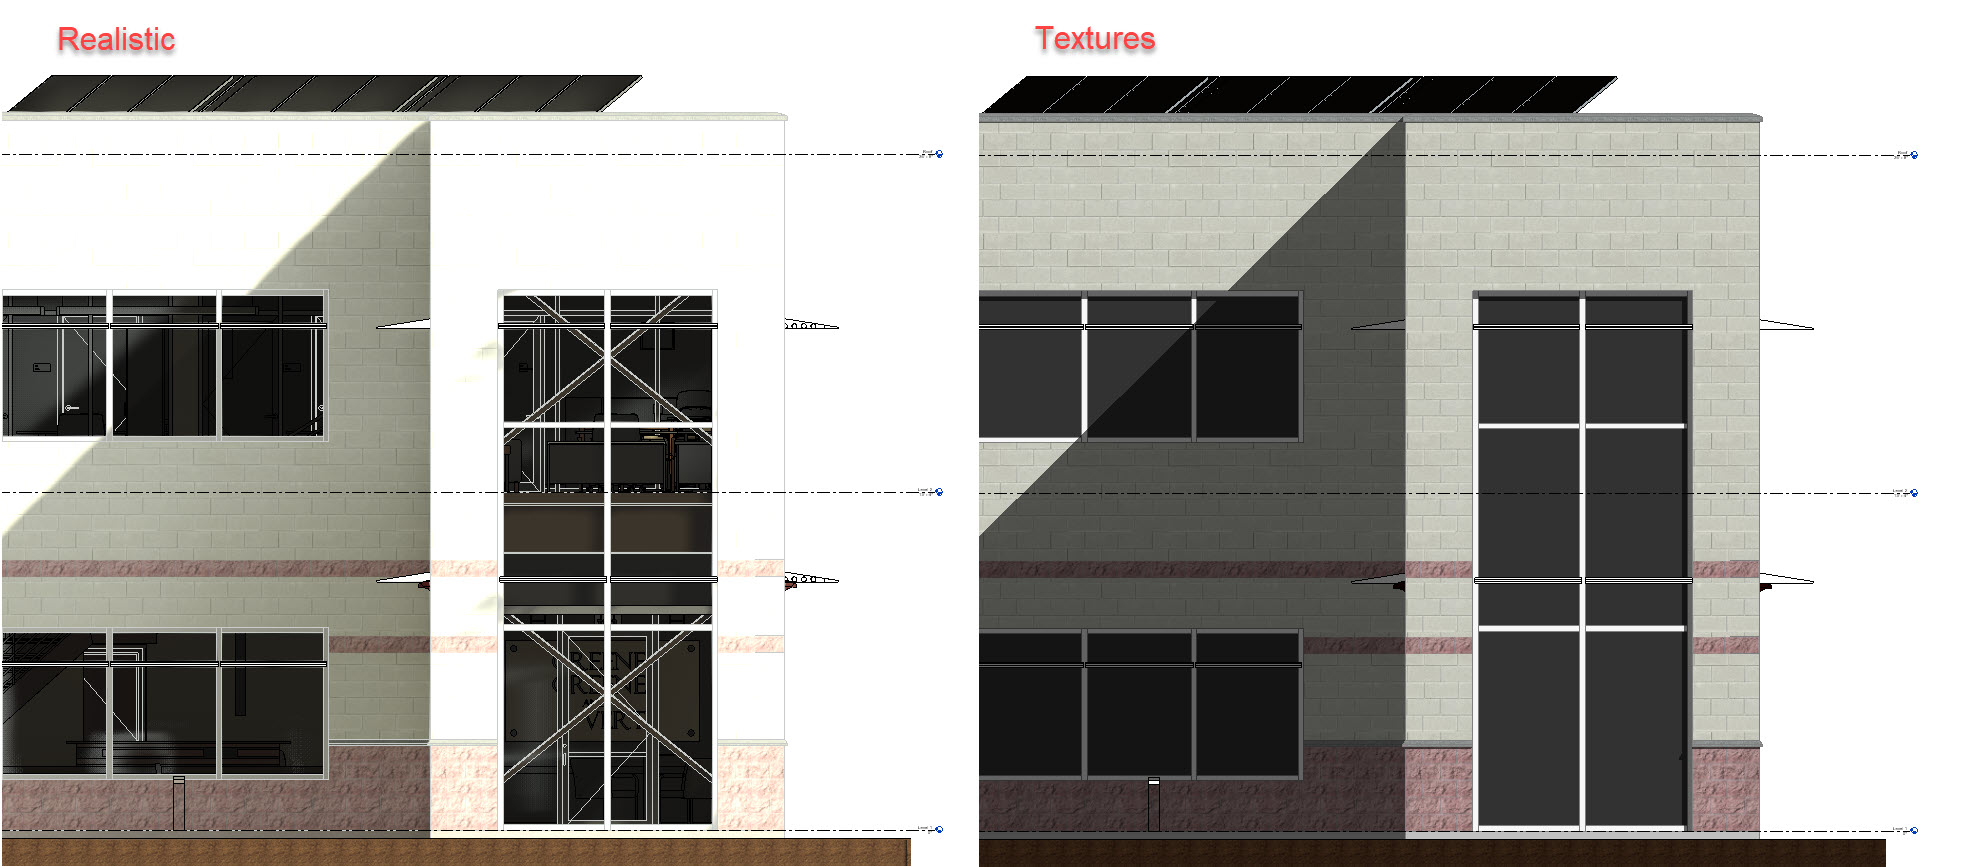
Revit has a new view style called Textures. I was in the beta user group for this one. It is a cross between shaded and realistic. It shows the appearance asset texture but without global lighting, so the materials are a consistent color on all surfaces and at all angles. It is possible to have ambient and sun shadows on in this mode as shown in the examples below.
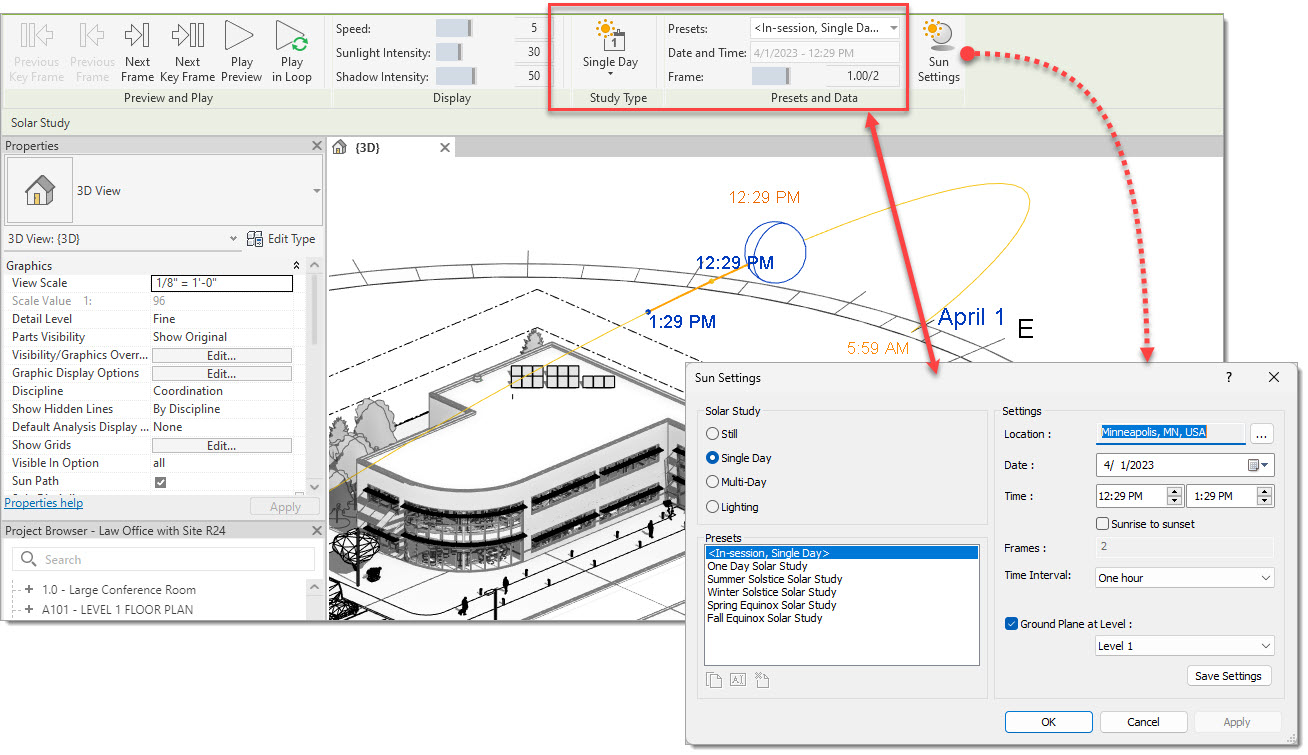
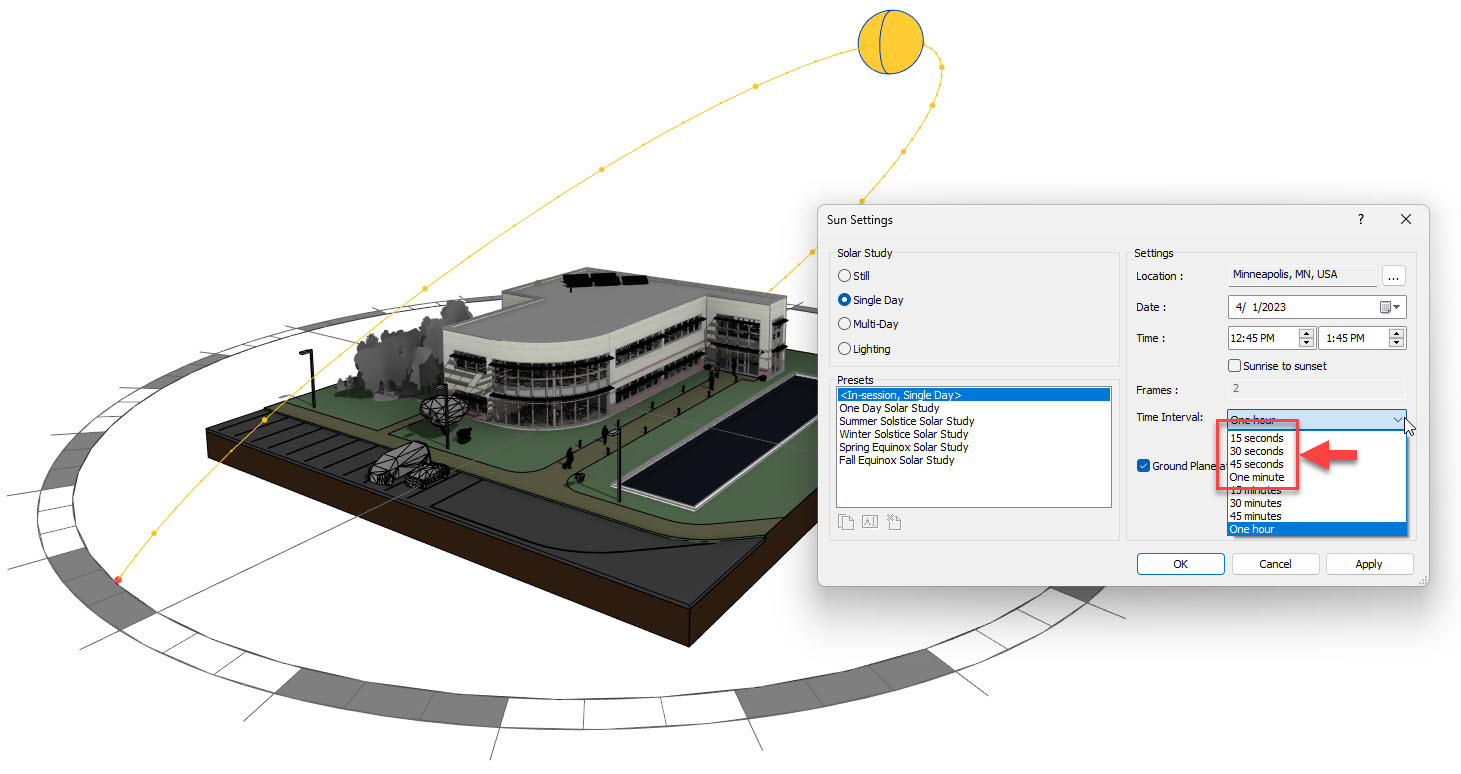
When running a solar study, the sun settings are now presented on the ribbon as shown below. Clicking the sun setting button opens the traditional sun settings dialog with the same settings. Another enhancement includes the ability to select much shorter time increment options.
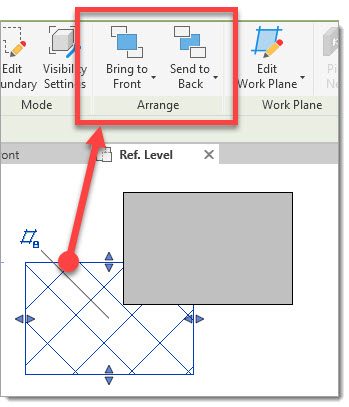
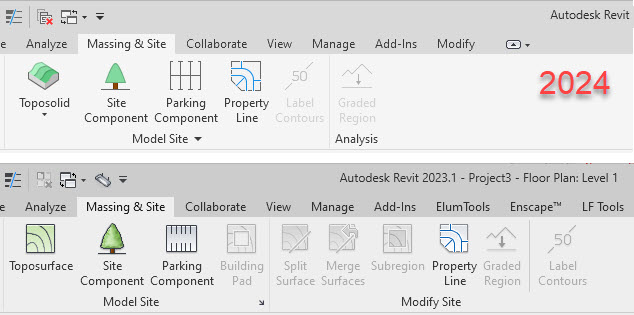
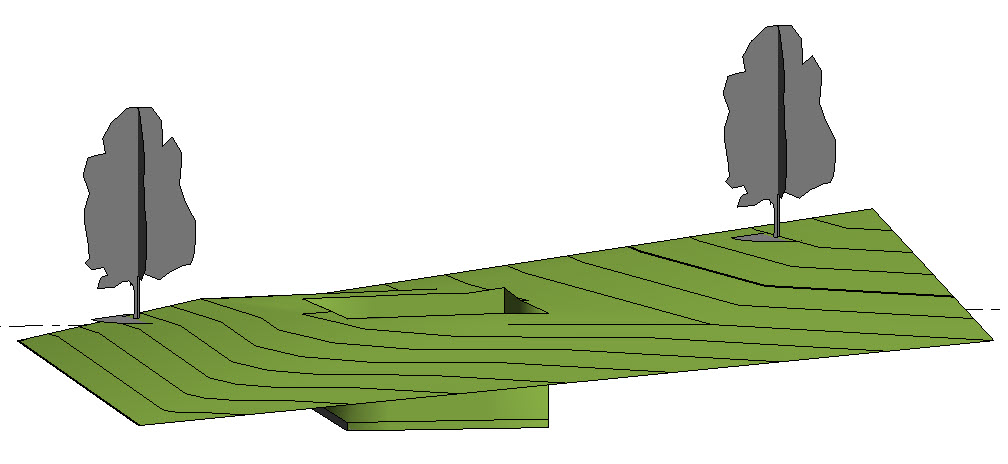
Looking at the massing and site tab below, you will notice a lot has changed. The site tools represent the most significant change in Revit 2024 for architects, which is both exciting and a little scary! We now have a toposolid command rather than a toposurface. As the name change implies, the ground is now represented by solid geometry rather than a 2D surface. This is the exciting part. Missing from the ribbon below is the building pad command, which is the scary part – I will explain this in the next section.
Although the toposurface and building pads are no longer available, they are preserved when a model is updated to Revit 2024. Those elements can be modified and copied. You just cannot create new instances as the commands are gone. Figure 25 shows a toposurface and building pad after an initial model upgrade.
To convert a toposurface, select it and follow the steps shown in Figure 26. Step 2 involves selecting a toposurface family type that can have several surface characteristics preset.
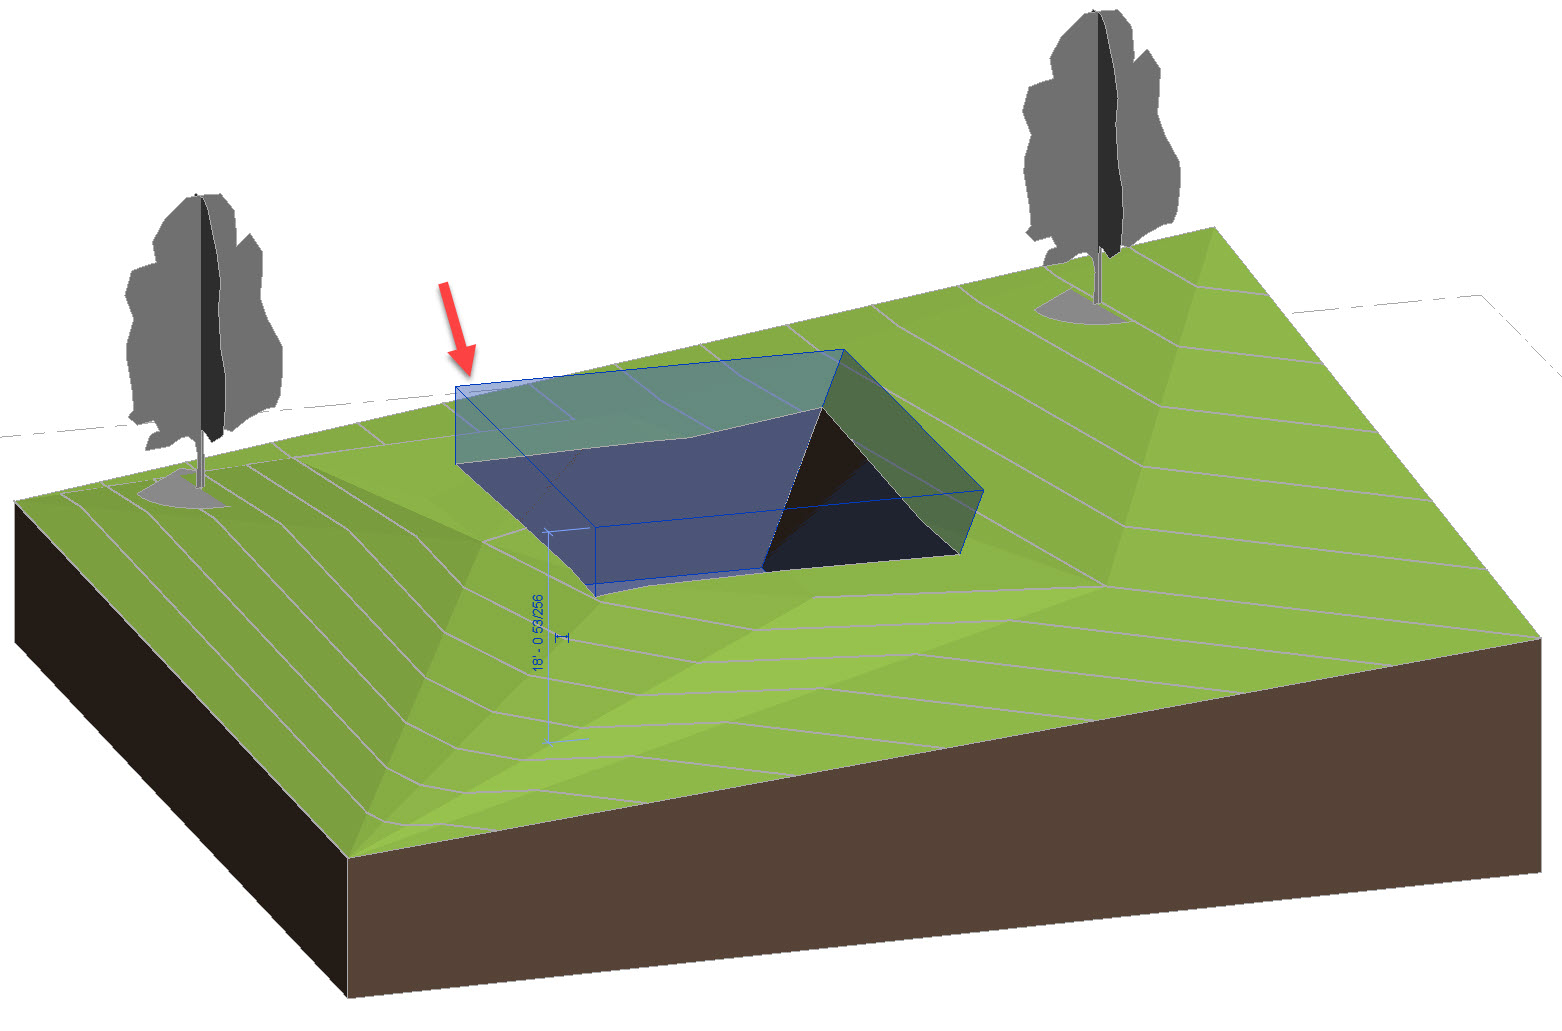
The toposurface is not deleted as this would delete the building pads which need to be recreated manually. Since there is no building pad tool, Autodesk recommends that an in-place mass set to cut the toposolid be created, as shown in Figure 27. This provides a lot more options, like tunnels and sloped edges. The biggest challenge is that the workflow is not as intuitive for the average Revit user, in my opinion.
Sub-regions are automatically converted to sub-divisions.
Figure 28 shows the various type settings for this new element. Notice two things. First, the toposolid is fundamentally based on the floor element. Second, the contour settings are now set per object type rather than globally.
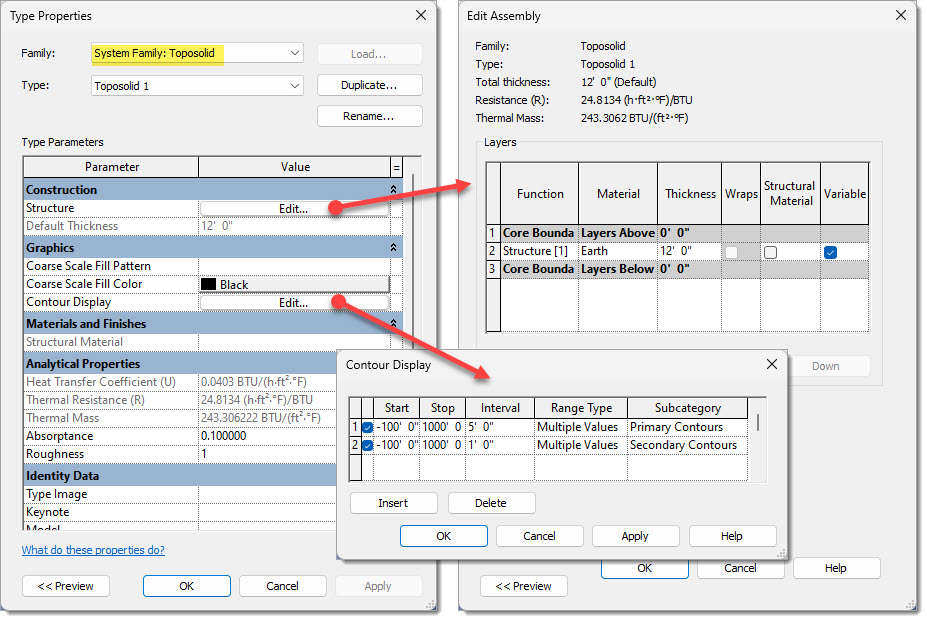
Knowing that the element is essentially an enhanced floor element, note that apply materials is a little odd. In the example shown in Figure 27, I had to select the Earth material so the material AND pattern would be earth. Then I had to paint a grass material on the surface. The tricky part with painting is that the surface is made up of several facets and required several picks to paint the entire surface.
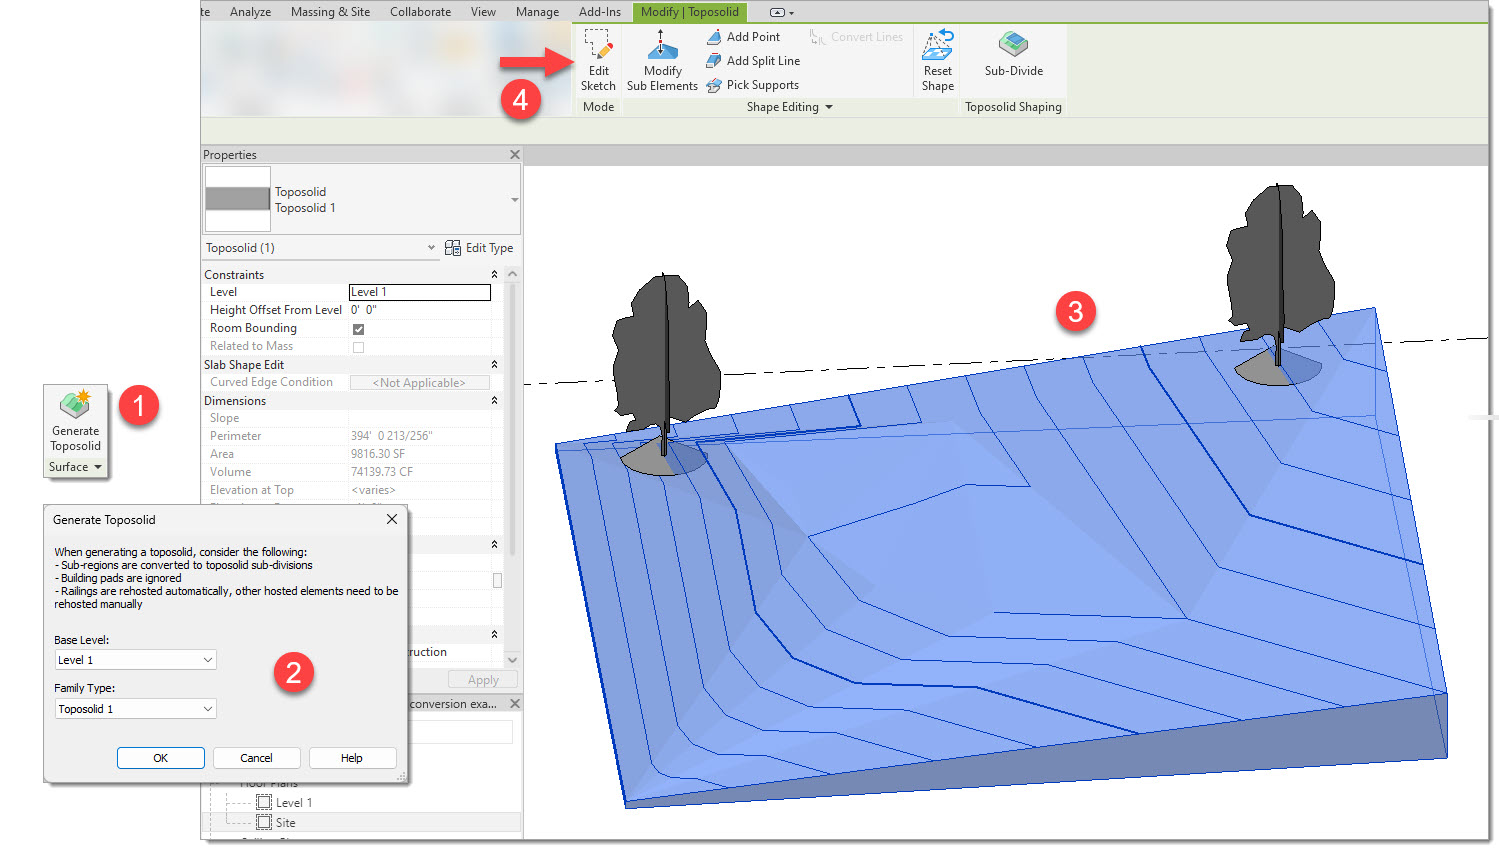
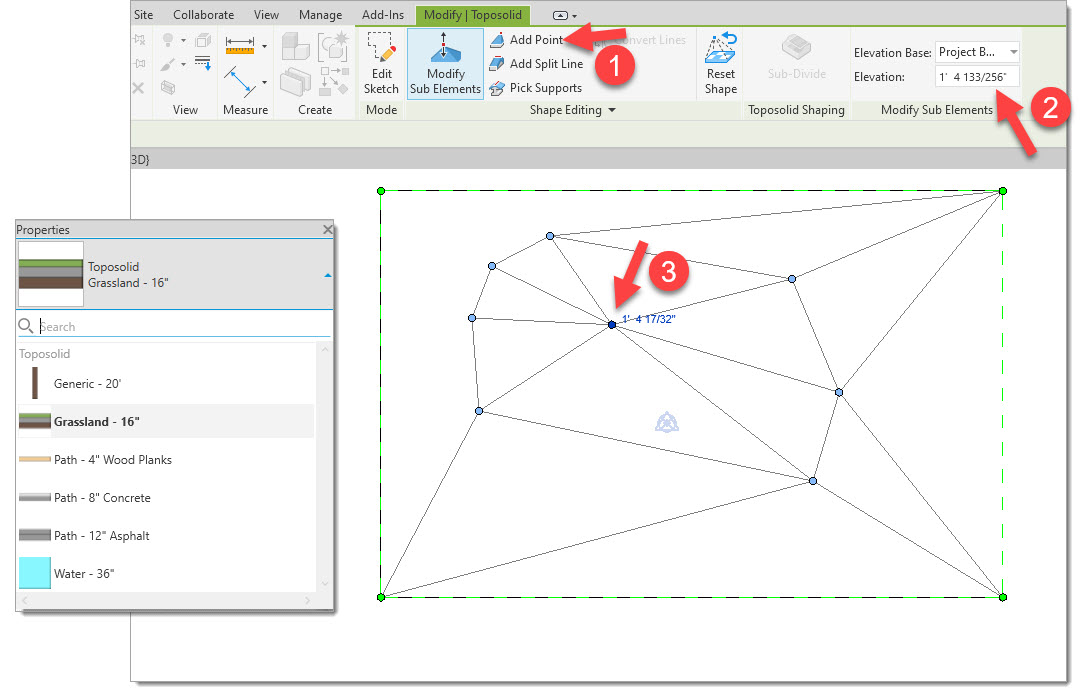
A toposolid is created similar to a floor element. You start by sketching the perimeter of the ground to be defined and then finish the creation mode. Next, you select the toposurface and use the Add Points option on the ribbon, adjusting the offset value also on the ribbon.
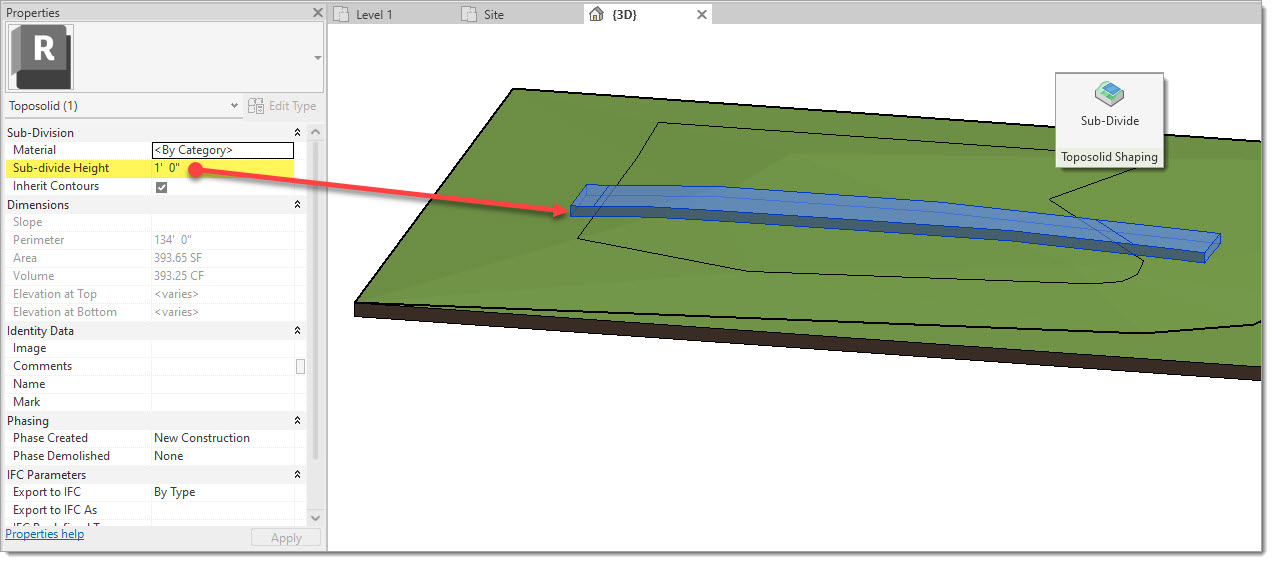
Roads and walkways are created using the Sub-Divide tool found on the ribbon when a toposolid is selected. This is similar to the sub-region tool where an enclosed area is defined within the larger toposolid perimeter. The result is a solid extrusion which conforms to the ground and can be adjusted vertically. However, the sub-divide height cannot be negative.
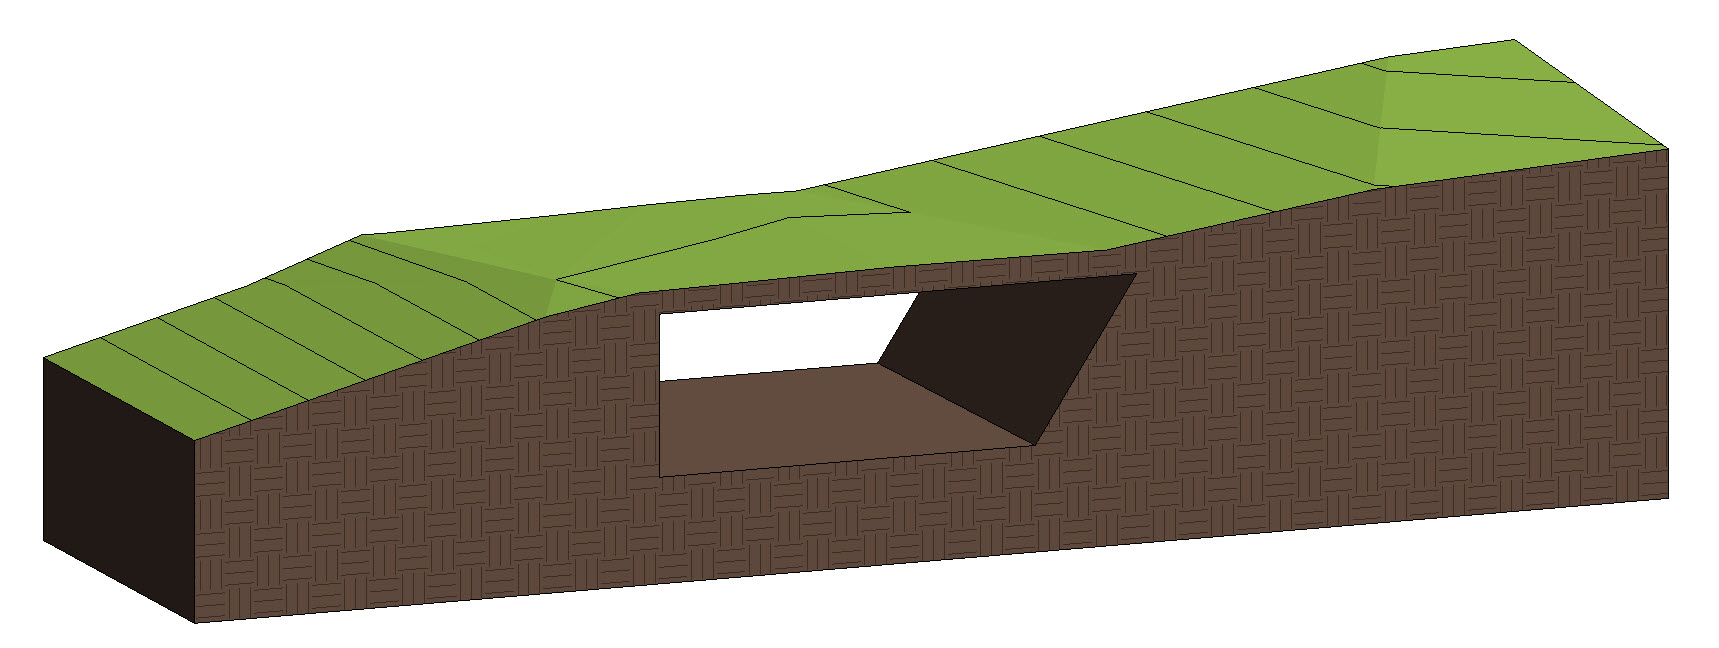
The last image in this section shows how a mass void can create a tunnel in the toposolid. This was not possible with a toposurface.
When a CAD file is available, a toposolid can be generated from it as in the past.
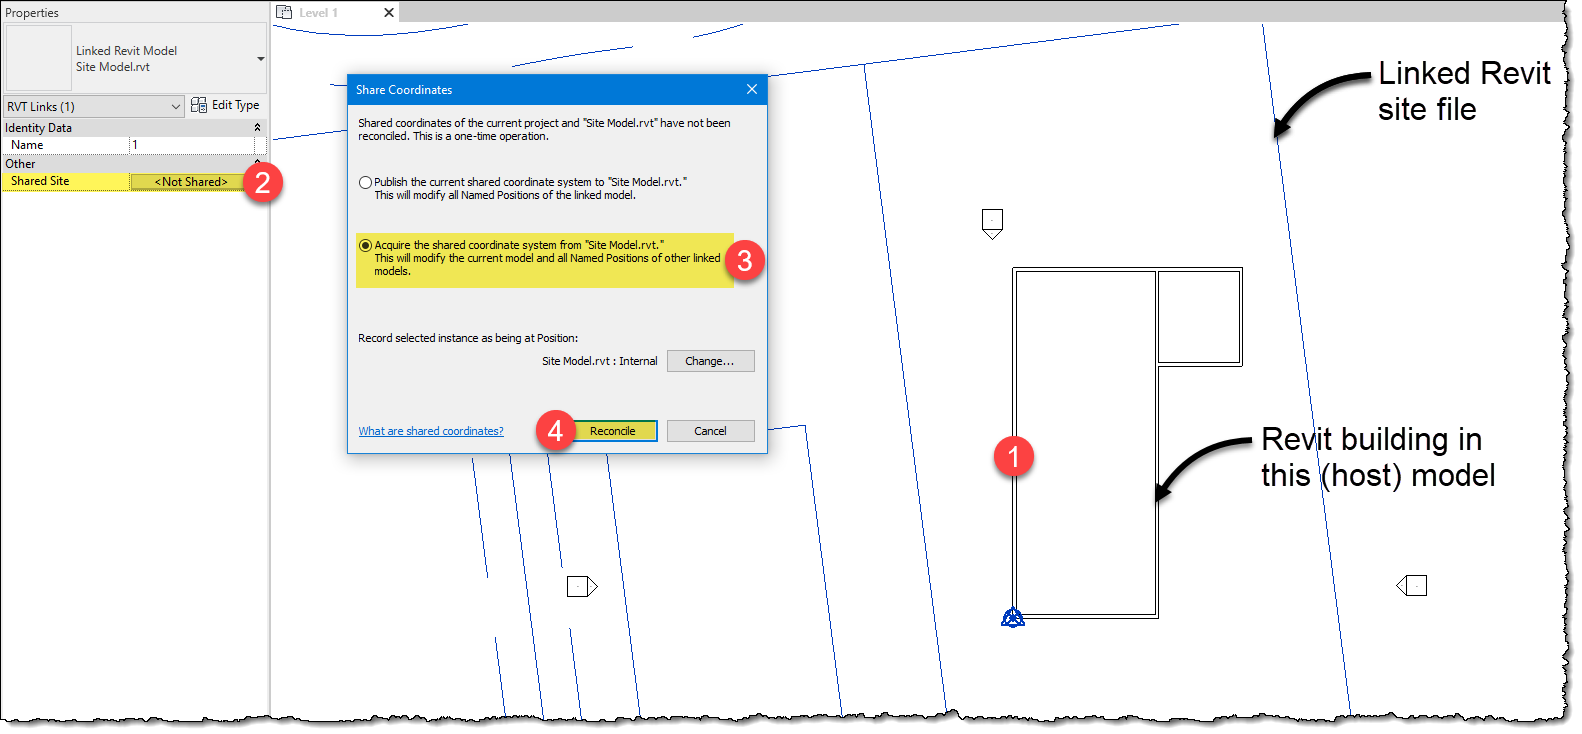
While there is nothing new with shared coordinates, I wanted to share a link to my YouTube series on the topic (Shared Coordinates in Revit) that is easy to understand and covers many of the questions that often come up. This workflow will be the same in Revit 2024, even when using the new toposolid element. This workflow also works on a project hosted in BIM 360.
With the advent of the toposolid, there have been enhancements to what kind of elements can be used to cut other elements. Because the toposolid is a solid, Revit does not know that other elements should automatically cut it. If you have foundation walls going below grade, for example, you now have to use the Cut tool and select the wall and the toposolid to get the correct graphic results in a section.
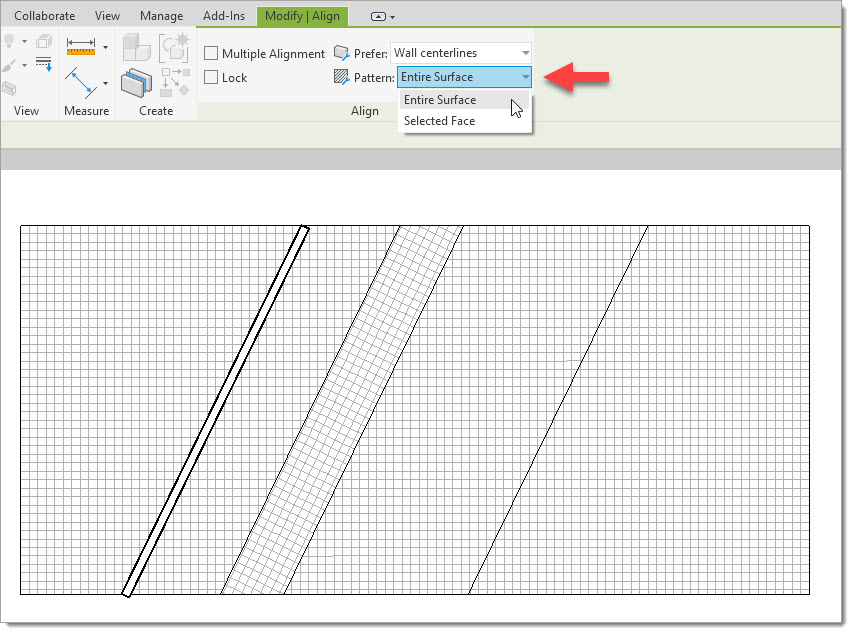
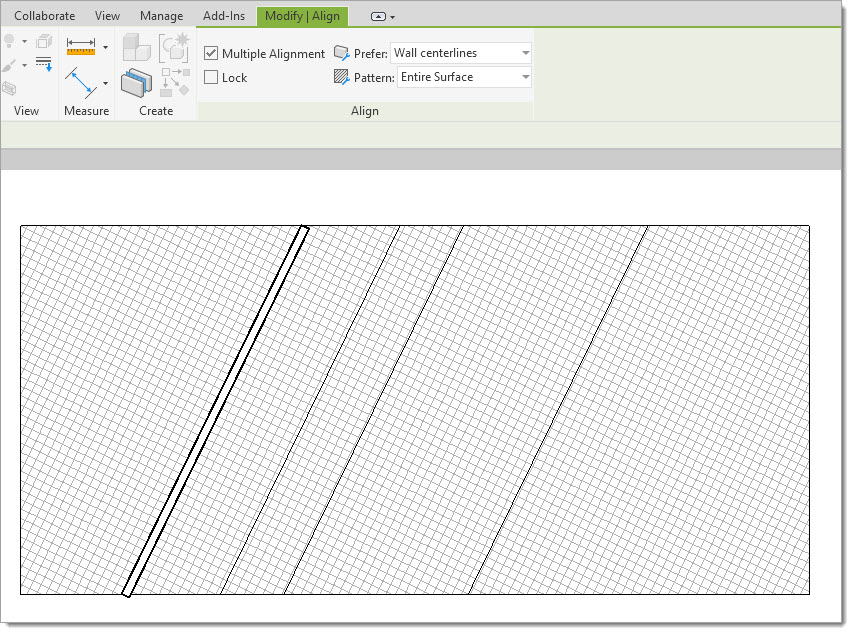
The Align tool now has an option to apply the alignment to the entire surface. In the example below, the surface has sub-elements applied to slope portions of the surface. This can result in the surface pattern not aligned across the entire floor element. This new feature helps with the new alignment, whereas earlier, it only allowed for the selected face option.
Revit 2024 has several non-architectural product enhancements that are listed below. Be sure to check out the official Autodesk blog post for more details on them.
Once again, we have a nice list of features that many will be able to use right away in this new version of Revit. If your firm does a lot of site work in Revit, you should spend some time understanding the feature before using it… especially before upgrading production models.
To see some of these new features and enhancements in action, check out this 30-minute video I posted on YouTube. While there, subscribe to my channel to keep track of new content.
 Daniel John Stine AIA, IES, CSI, CDT, Well AP is a Wisconsin-registered architect with over twenty years of experience in the field of architecture. He is the Director of Design Technology and leads Investigations (an internal research program) at the top-ranked architecture firm Lake|Flato Architects in San Antonio, Texas. He is a co-author of the forthcoming AIA Climate Action Business Playbook and serves on the AIA national COTE subcommittee, Climate Action & Climate Justice. Dan has implemented BIM-based lighting analysis, early energy modeling, virtual reality (VR), Augmented Reality (AR) , and created the Electrical Productivity Pack for Revit (sold by ATG under the CTC Software brand). He has been featured in articles/blog posts by ARCHITECT Magazine, ArchDaily, Dell, NVIDIA, and Enscape.
Dan has presented internationally in the USA, Canada, Scotland, Ireland, Denmark, Slovenia, Australia and Singapore; at the AIA National Conference, Texas Society of Architects conference, AIA-MN Convention, NVIDIA GTC, Lightfair, Autodesk University, RTC/BILT, Digital Construction Week, and several AIA COTE Working Groups. By invitation, he spent a week at Autodesk’s largest R&D facility in Shanghai, China, to beta test and brainstormed new Revit features.
Engaged professionally, Dan is a WELL Accredited Professional, a member of the American Institute of Architects (AIA), Illuminating Engineering Society (IES), Construction Specifications Institute (CSI), Autodesk Developer Network (ADN), Chair of the Illuminating Engineering Society (IES) BIM Standards committee, and is a Construction Documents Technologist (issued by CSI). Dan has also been a guest on several podcasts, including ARCAT Details, Business of Architecture, Inside the Firm, BIM Thoughts, and Simply Complex.
Committed to furthering the design profession, Dan teaches graduate architecture students at North Dakota State University (NDSU) and has lectured for architecture and interior design programs at Penn State, Pratt Institute, NDSU, Northern Iowa State, UTSA, University of Minnesota, University of Michigan, as well as Dunwoody’s new School of Architecture in Minneapolis. As an adjunct instructor, Dan previously taught AutoCAD and Revit for twelve years at Lake Superior College.
He has authored 17 textbooks, including the #1 Autodesk Revit book in North America, within the academic market. Two books are focused on architectural hand sketching, with one containing a sketch from the late Cesar Pelli.
AECbytes content should not be reproduced on any other website, blog, print publication, or newsletter without permission.