


In keeping with the “looking ahead” theme of the AECbytes Building the Future series, this month’s issue takes a look at the application of a sophisticated computational technology to a specific aspect of AEC: the design and development of a building site. The technology is called evolutionary computing, and it is a subset of the field of artificial intelligence that involves combinatorial optimization problems, where optimization is the process of finding the most effective solutions to a problem given a set of constraints. Optimization techniques are being used in many industries such as financial services, pharmaceuticals, automotive engineering, national security, and so on to develop more intelligent and sophisticated problem-solving applications related to those fields.
The application that has been developed to apply this technology to the field of site design and land development is called SITEOPS. It was publicly released in May 2007 by BLUERIDGE Analytics, a start-up company that was founded in 2003 and is based in Charlotte, North Carolina. The product has already gained a lot of traction, and is being adopted by a wide variety of clients, including retailers such as Lowe’s Companies and Target, land developers such as The Crown Companies and Deaton Development Consultants, and a large number of civil engineering firms including Woolpert, Langan Engineering and Environmental Services, MESH Consulting, Freeland & Kauffman, Southern Civil Engineers, Upham, Lincks & Associates, and Bohler Engineering. Let’s explore the application and get a better understanding of how it applies optimization technology for site design. In the process, we can also think about how this technology could potentially be applied to other design problems in AEC.
SITEOPS has been developed to address the three main challenges of site design: an optimal layout for the building(s), roads, and parking on the site; grading of the site; and the storm water drainage. Traditional land development processes typically take 3 to 4 months, and in addition to being time consuming, they are also expensive and prone to inaccuracies. With SITEOPS, land developers and civil engineers can provide a set of parameters, and the application will deliver 3 to 5 site designs in DWG format within 24 to 48 hours, providing the optimal layout, grading and storm water drainage options with accurate and detailed cost estimates. The potential for cost savings is therefore significant, with an average savings estimate of $100K per site. It can be much higher depending upon the size and complexity of a project.
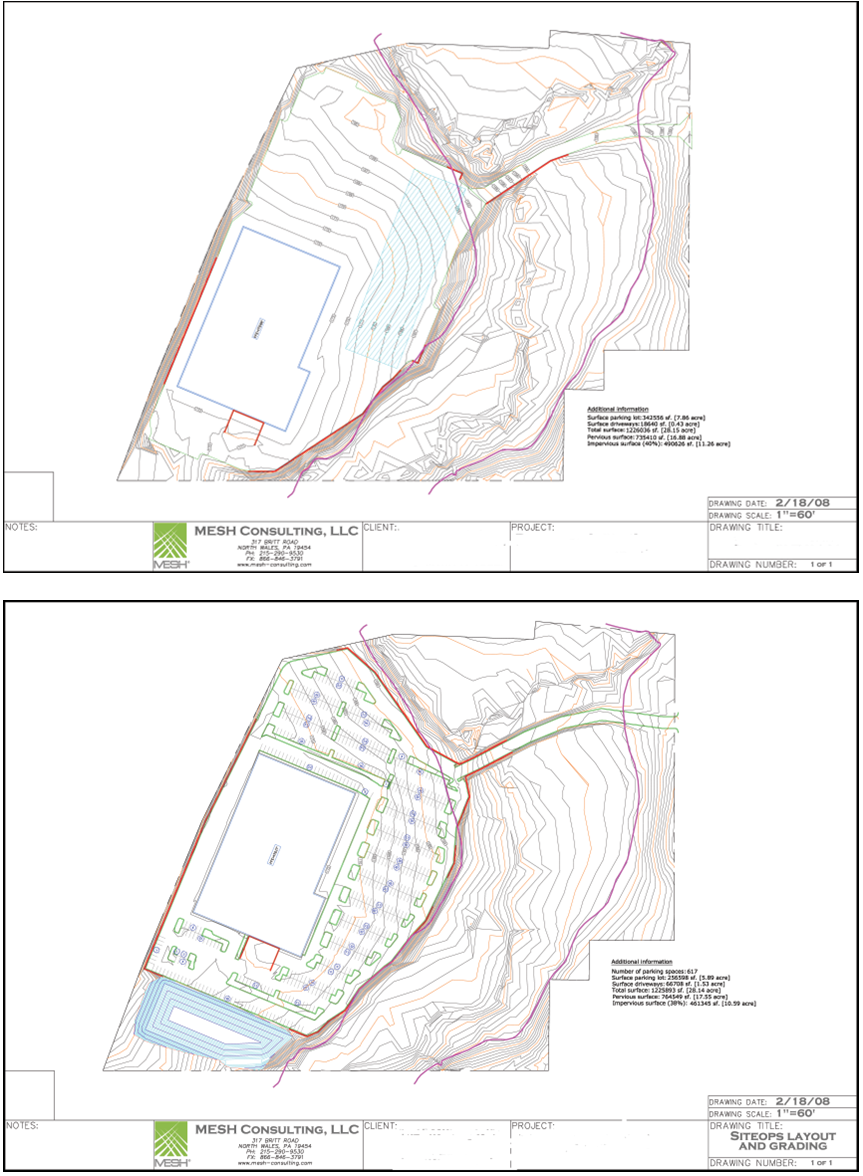
Illustrated below are two examples of the use of SITEOPS by MESH Consulting, a Pennsylvania-based consulting firm that provides land developers, civil engineers, and site work contractors with services such as value engineering, quality control, and constructability reviews. Figure 1 shows the example of a wholesale retail store on a 30-acre site that had many environmental constraints. The original engineering layout (shown in the top image) was optimized using SITEOPS (as shown in the lower image). The optimized layout was successful in eliminating a $1.25 million underground basin on the $3-$4 million dollar project. Another example, shown in Figure 2, is that of a food store project on a 19 acre site. The optimized layout suggested by SITEOPS (shown in blue) was just a slight shift from the original layout (shown in pink), but it was able to save $120,000 in sitework costs.

SITEOPS is available through an on-demand, Software-as-a-Service (SaaS) Internet-based delivery model. This means that there is no software to install and maintain; all that is needed is a browser and an Internet connection. The pricing is based on a “per project” basis, and it is based on the size of the site as well as on the number of projects purchased. For companies using the application for multiple projects, annual subscriptions are also available.
The version of SITEOPS that is currently available is called Single Pad, which means that it can work with a single building footprint on a site. BLUERIDGE Analytics is working on additional versions of the application. This includes SITEOPS Multi Pad, which can handle sites with multiple building footprints such as shopping centers, office parks, college campuses, etc., and is expected to be available by May. Other versions planned for release over the next few years include an international version of SITEOPS, versions focused on highway construction and residential development, as well as a Green Building (LEED) version.
Once you have signed up with SITEOPS and have a username and password, you can start by going to its website and logging in. Users who are designated as administrators within their organizations have the ability to set up and administer projects, including specifying which users can work on them and with full or limited access rights. Once a project has been set up by the administrator, it will appear on the “My Projects” list of all the users who have been granted access to it. Figure 3 shows the “My Projects” interface for my trial account of SITEOPS. While I did not have administrator privileges, a sample project called “Test Project for AECbytes” was set up for me by the SITEOPS team, which I used to explore the application.
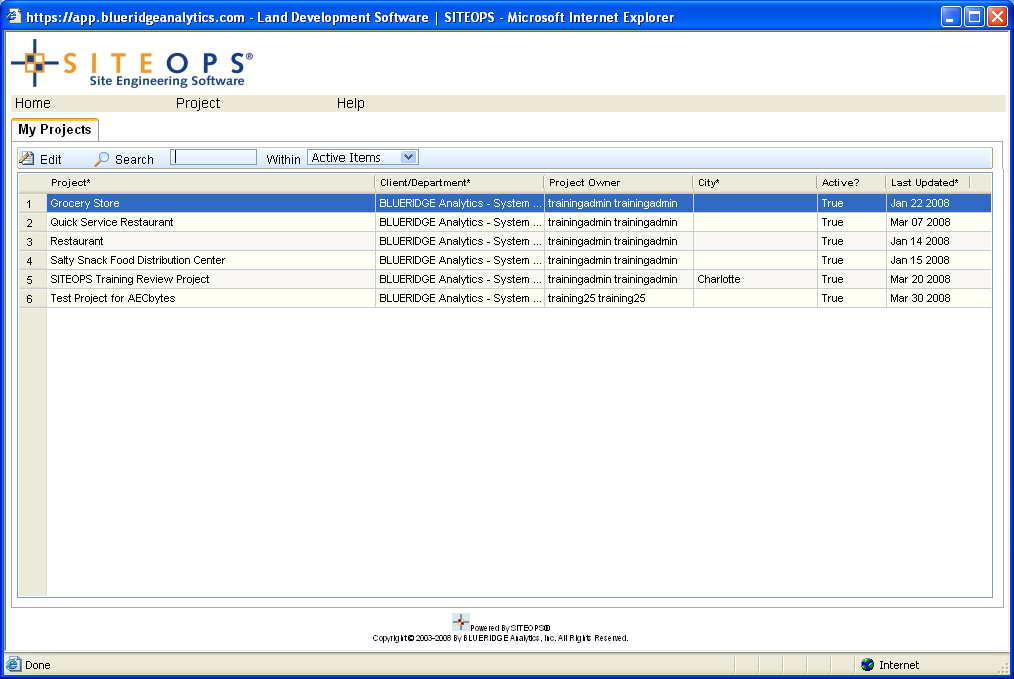
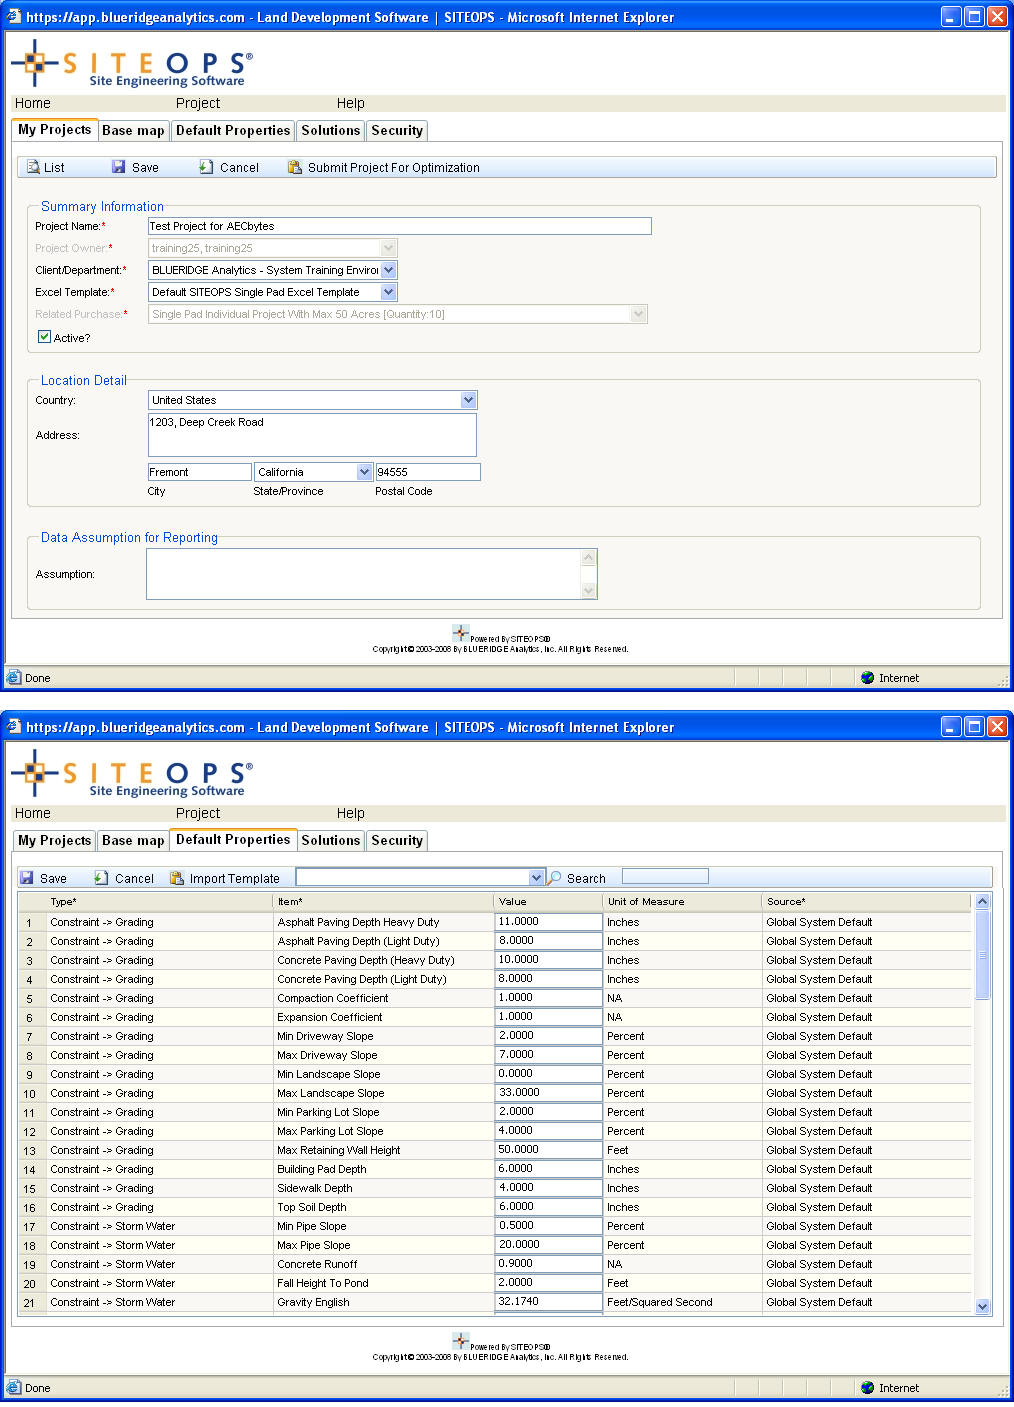
To work on a project, you would select it from the list shown in Figure 3, and click on the “Edit” button. This opens up the main interface of the application, which lists all the details of the project under five different tabs, two of which are shown in Figure 4: the “My Projects” tab which includes the basic information about the project, and the “Default Properties” tab, which lists all the relevant parameters, constraints, and unit costs that will be used in the optimization. While default values are assigned to each one of these parameters, they can be changed to fit the specific needs of the project. For those using SITEOPS on multiple projects, all the settings in the “Default Properties” tab can be saved as templates and re-used in subsequent projects that have a similar location and site properties. The last tab on the project interface, “Security,” shows all the users that have been granted access to the current project.
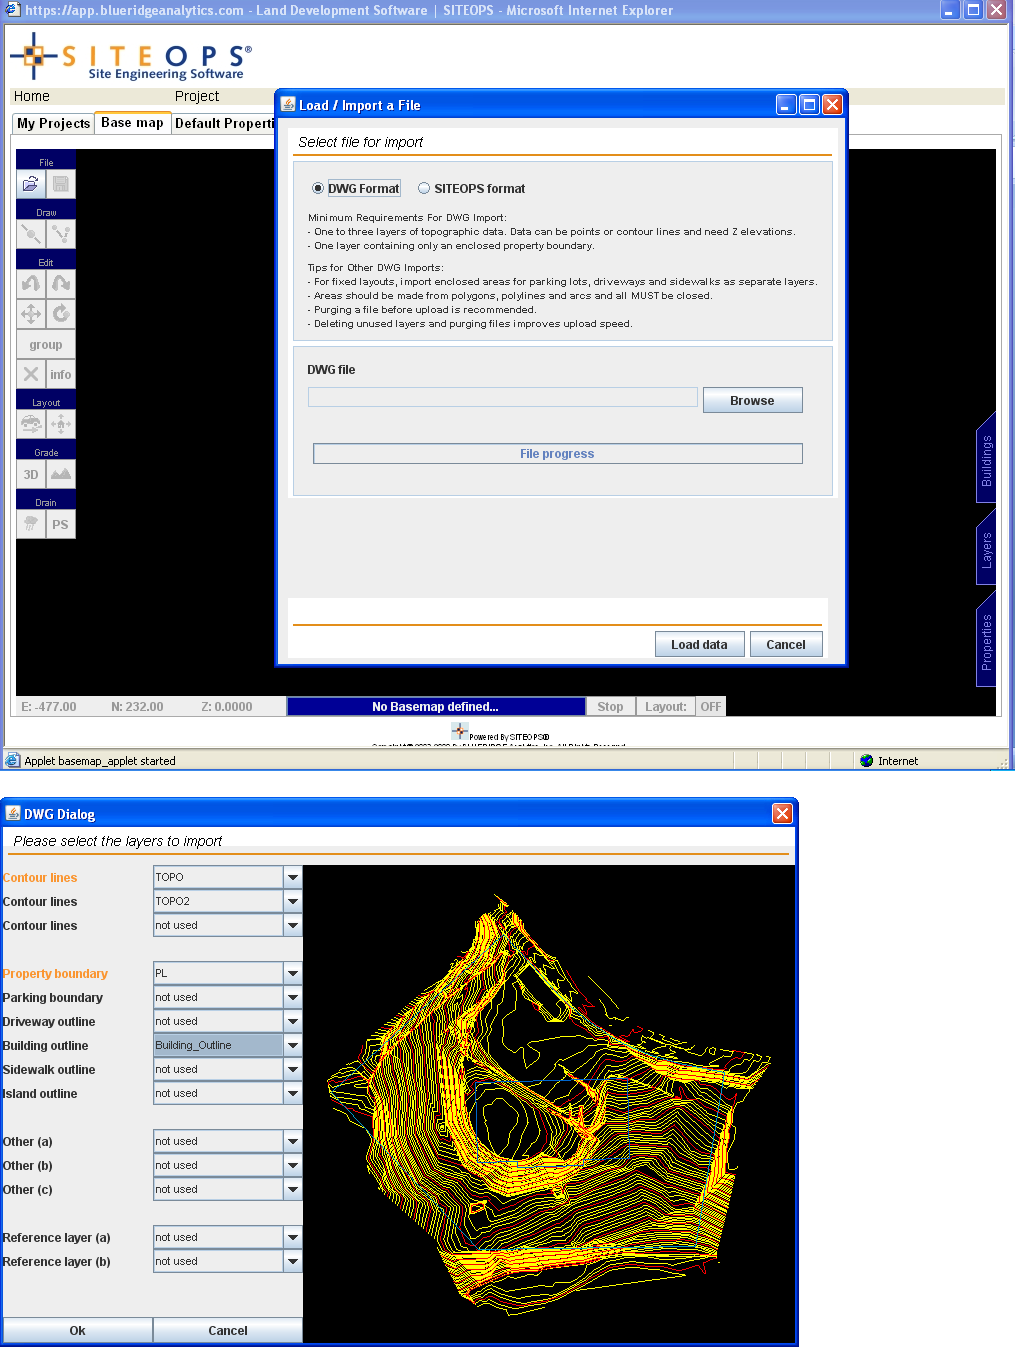
The “Base Map” screen is where the main action happens in SITEOPS. The first step is to import the file of the site, which can be in DWG format or in SITEOPS (XML) format. There are some minimum requirements if the file is in DWG format; these are listed in the Import dialog, as shown in the top image of Figure 5, along with some additional tips. For the purpose of my test, I used a DWG file provided by SITEOPS, which met all of the requirements. After the file is imported, a DWG Dialog opens up, which allows layer mapping from the DWG file to the specific layers used within SITEOPS. Essentially this defines how the selected layers from the imported DWG are to be used within SITEOPS. Once the layers have been mapped as required, as shown in the lower image of Figure 5, you can click the OK button and the site will now appear in the SITEOPS base map interface, shown in Figure 6.
Let’s take a brief look at the base map editor screen where the site now appears. It has a set of three tabs on the right of the display area. The Buildings tab allows you to save and recall building footprint templates that include associated properties and constraints such as number of parking spaces, entrances, etc. This allows different building footprints to be easily explored for a given site, and is especially useful for industries such as retail that often have a standard set of prototype designs. The Layers tab, shown in the top image of Figure 6, shows the layer list and allows them to be turned off or on. The Properties tab, shown in the lower image of Figure 6, allows you to see and edit the properties and constraints of any object, which you can click on to select. On the left of the display area are a set of tools for file import, saving the project, drawing, editing, and getting additional information about an object, as well as for performing tasks related to layout, grading, and drainage, which we will be looking at shortly. If the site file does not include a building footprint, you can import it from another file, or draw it in SITEOPS, using its drawing and editing tools.

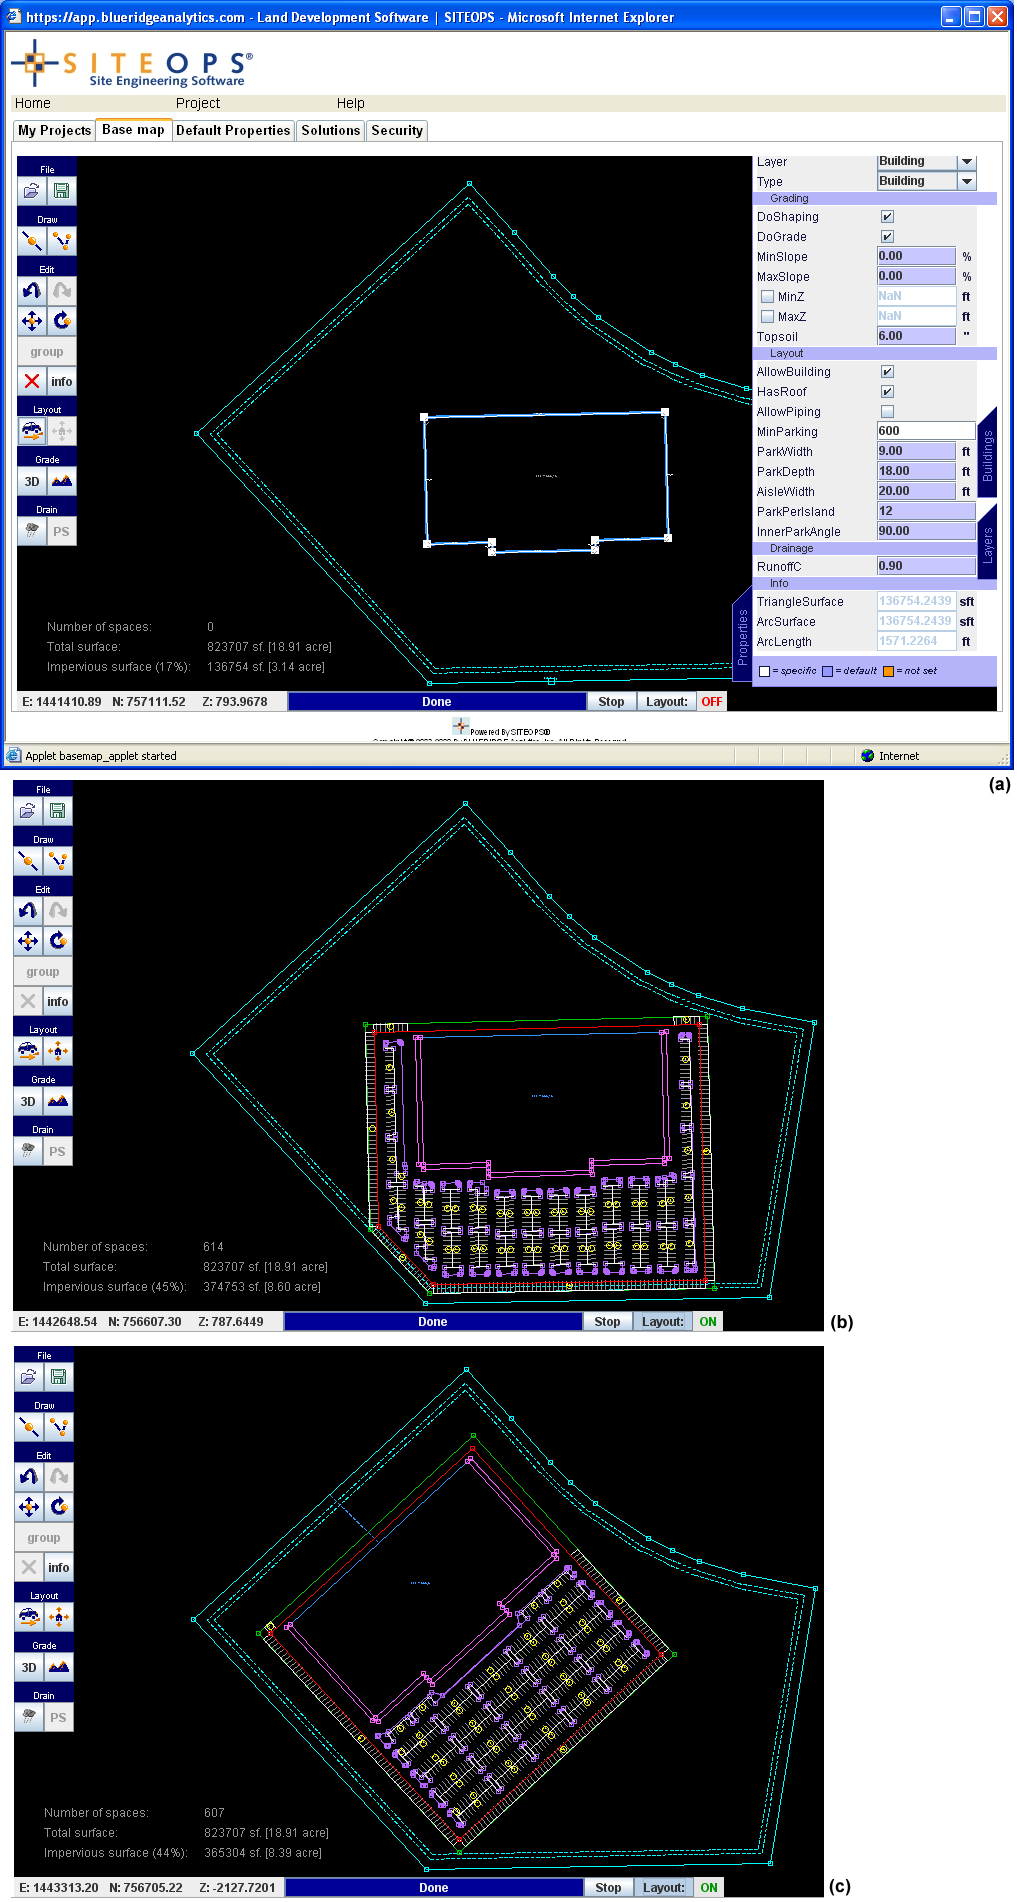
Let’s move on to look at some of the core functionality of the application, starting with creating a layout. You would start by configuring the properties of the building and the site to help the system understand where and how the parking should be laid out, what the setbacks are, where to locate the building entrance and sidewalks, and to include needed drives. The properties can be specified in detail through the Properties tab, as shown in Figure 7-a, while the driveway locations can be specified by using the Driveway tool from the toolset on the left. All you then need to do is click on the Layout button to get a layout that meets all the criteria and constraints, as shown in Figure 7-b. If you change the position and/or orientation of the building footprint using the editing tools, the layout is immediately re-calculated, as shown in Figure 7-c. There is also a Layout Solver option, which you can use to let SITEOPS run through potential site layouts to find the most optimal placement of the building, drives, and parking area. (Note that all the contour layers were turned off in the base map to better visualize the layouts in Figure 7.)
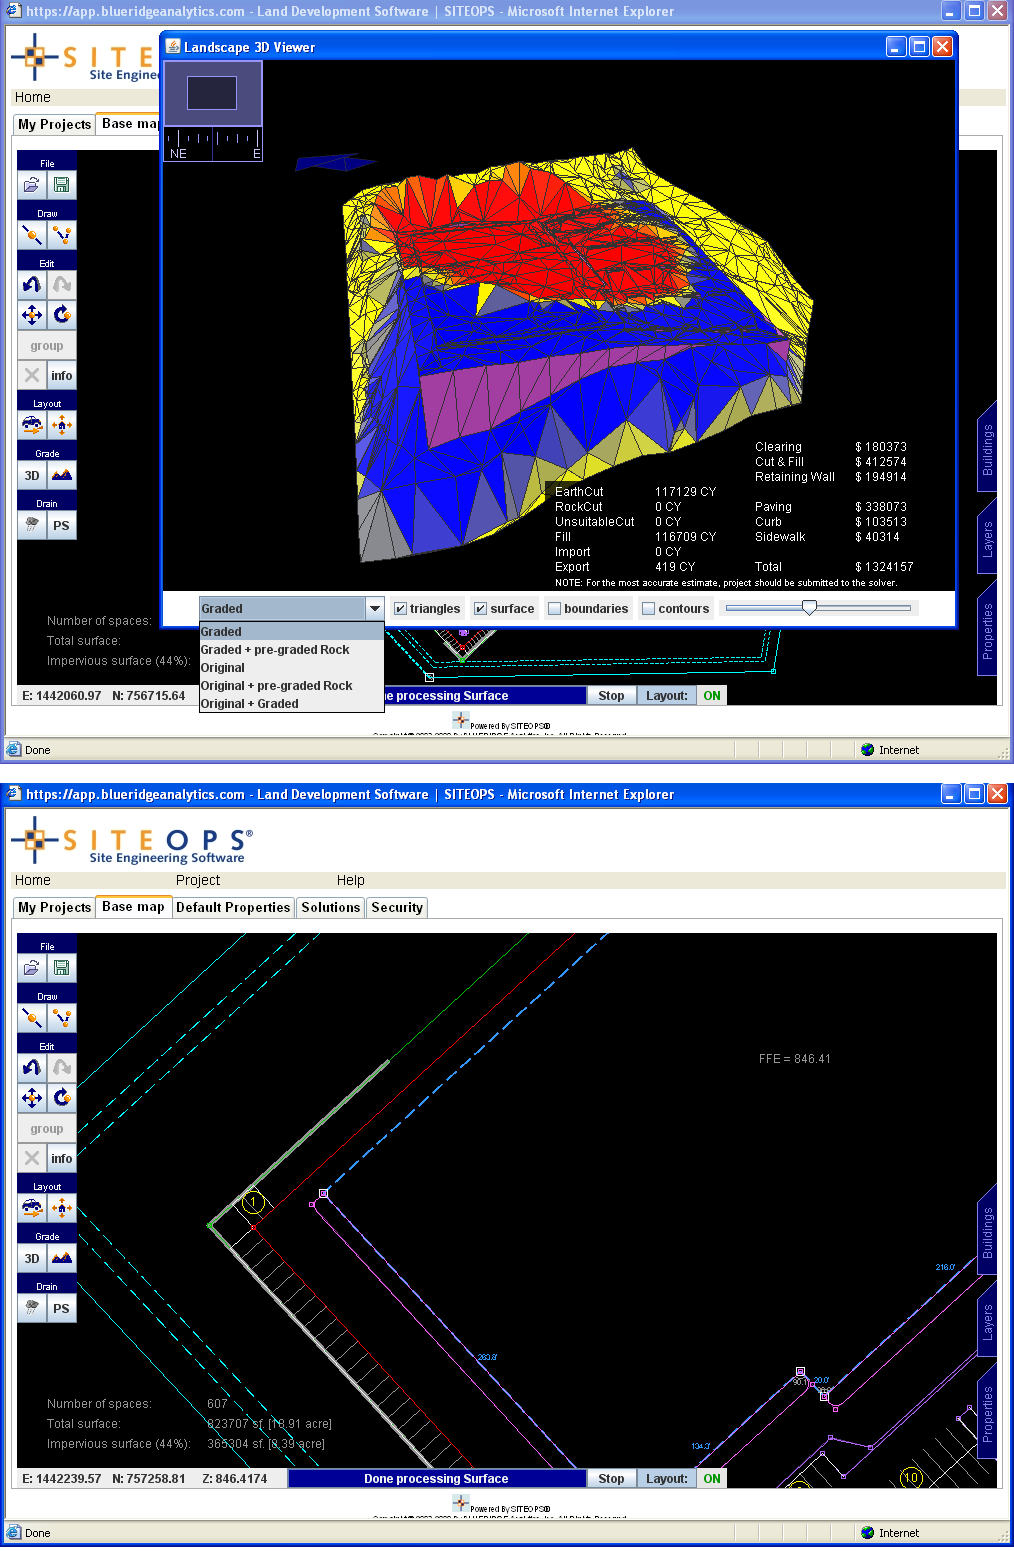
In the same way, SITEOPS can also generate solutions for grading and drainage. Clicking on the Grading Simulation button opens up the grading solver for the current layout. It shows the site in 3D and displays the general cost estimates for grading (see the top image of Figure 8). You can watch the simulation of the site to see how the cost is optimized to adjust the cut and fill in real time. The prices are calculated on the basis of the costs that were specified in the “Default Properties” screen shown earlier in Figure 4. The 3D view can be rotated to see the site from any desired angle and there are several options for specifying the type of display. You can also switch between the original and graded views, or see them juxtaposed for a better comparison. At any time, if new information about the site is discovered such as the presence of rock or water, it can be factored in and the grading costs will be immediately recalculated. After the grading simulation is complete, retaining walls for the building automatically appear on the base map as gray lines, and the proposed FFE (finished floor elevation) for the building is also displayed (see the lower image of Figure 8).
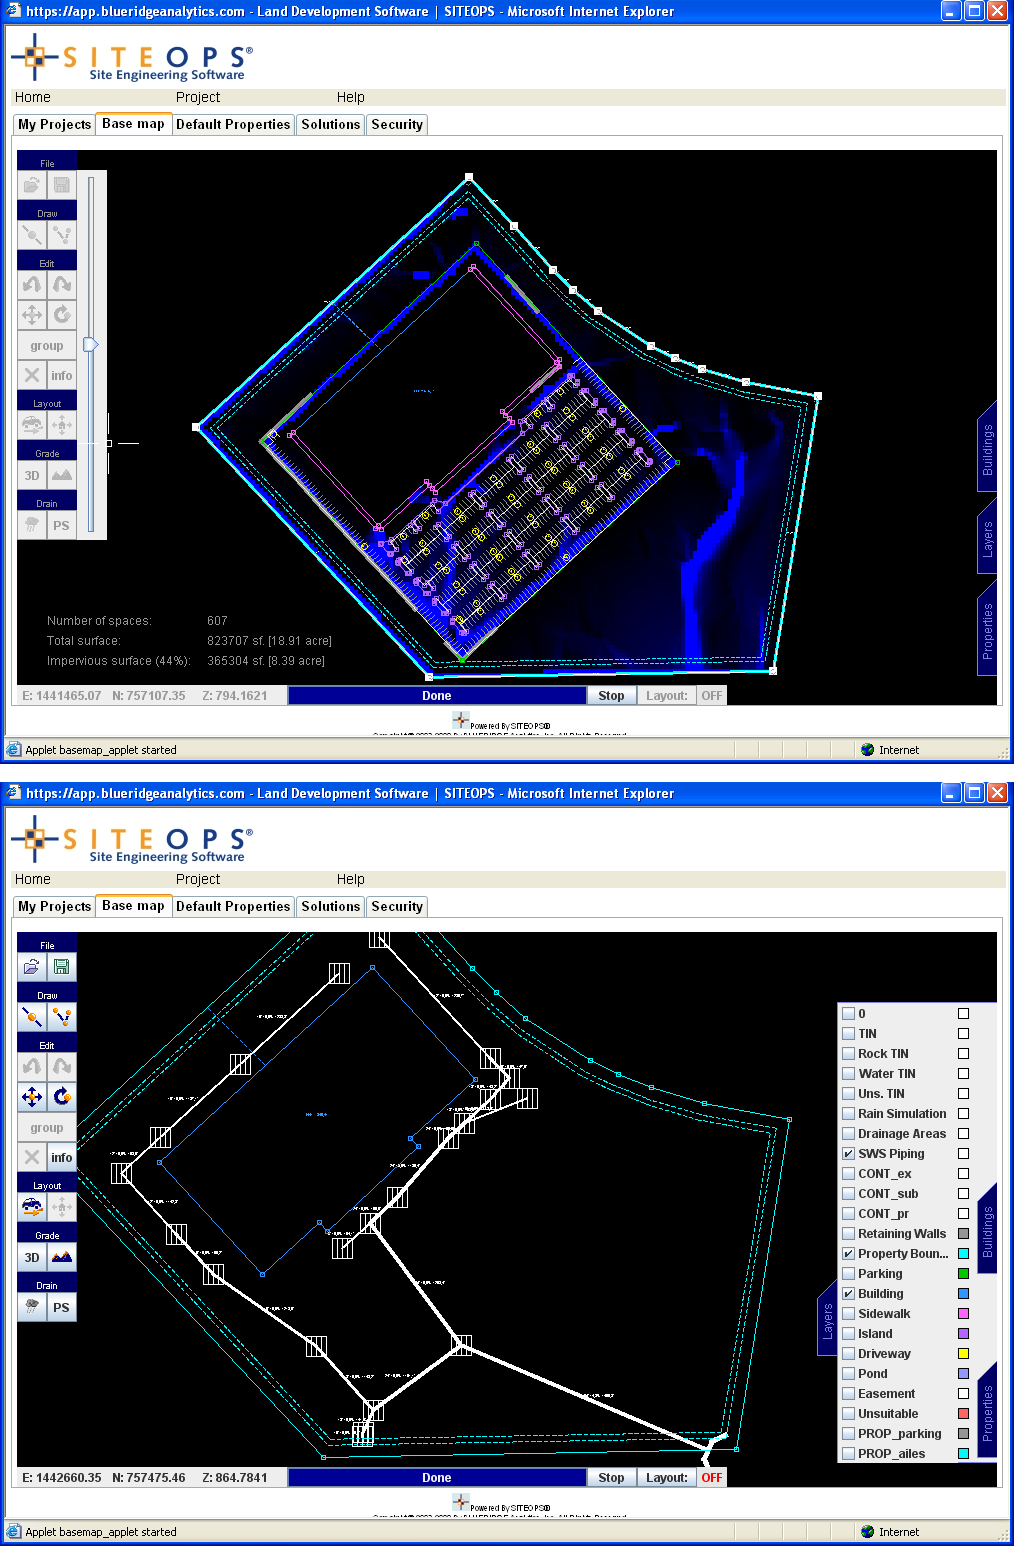
Based on the proposed grading solution and the stormwater retention parameters that were specified in the “Default Properties” screen, we can now run a storm water drainage simulation to see how rain water will flow on the site. For this, a Rainwater Simulator tool is available, along with a vertical scroll bar that simulates rainfall from light to heavy when moved (see the top image of Figure 9). It allows us to see where the water is pooling—as indicated by the areas in blue—and add drainage points where needed. There is also a Piping Simulator tool that can be used to quickly generate a piping solution, complete with actual pipe part numbers, sizes, lengths, etc., for the current layout and grading solution (see the lower image of Figure 9).
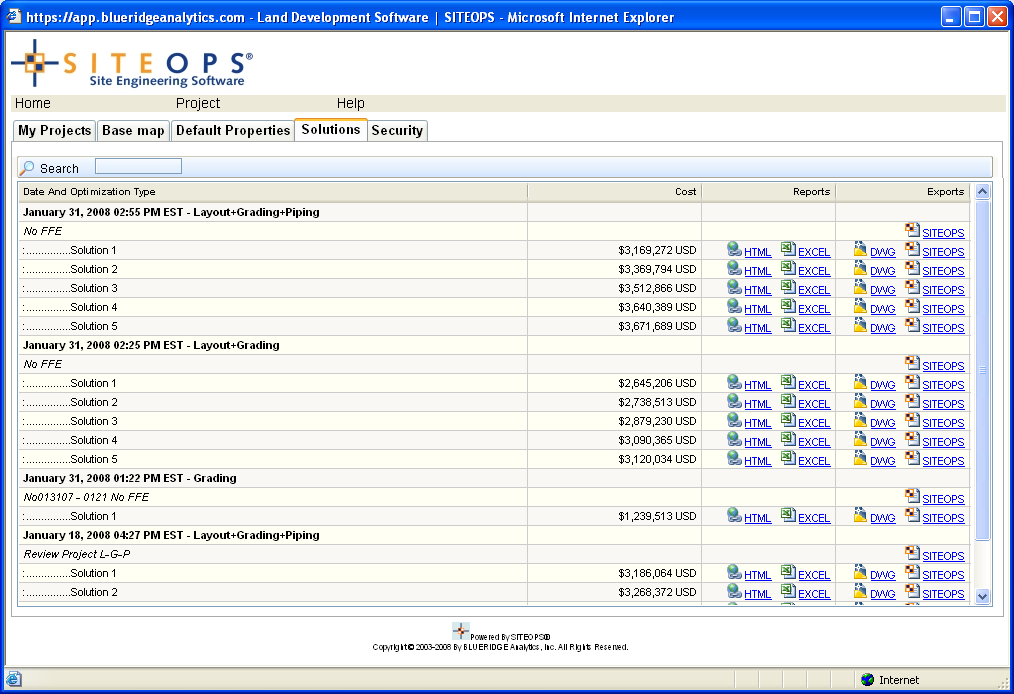
It is important to note that all the layout, grading, and piping solutions that were obtained so far were generated by the online solvers. To get more optimized solutions, the project should be submitted to the SITEOPS offline solver for processing. You can specify the kind of optimization you want from four different choices: Grading; Layout + Grading; Grading + Piping; Layout + Grading + Piping. The SITEOPS optimization engine goes through 10 billion combinations of layout, grading, and drainage design options to find the most optimal ones. Within 24 to 48 hours, it provides 3 to 5 optimized solutions, with a CAD (.DWG) for each solution containing 30 layers of information showing the parking, drives, building, retaining walls, curb, easements, etc., and a takeoff cost report in Excel format showing the detailed cost estimate. As shown in Figure 10, these can be seen by going to the “Solutions” tab of the SITEOPS project interface. Any of these options can be selected for the final design. The preferred solution can, if desired, be taken back into SITEOPS again and worked on further by fine-tuning the parameters and repeating the optimization process.
The implementation of SITEOPS seems like a no-brainer for any civil engineering or land development project, as it can not only reduce project time and risk, but also lead to substantial savings on grading, layout, and piping costs by exploring billions of possible solutions to find the most optimized ones. It allows extensive what-if analysis such as the implications of a bigger versus smaller building footprint, the position and orientation of the building on the site, roads through the site, delivery truck routes, parallel parking versus angular parking, and so on. I also found the application very easy to learn and use. Having an optimal site design and the associated cost information early on in the land development process—and with such ease—can give land developers and retailers a strategic edge in site assessment and property negotiations. For retailers in particular, any time saved from the land development process can mean the ability to open stores sooner, leading to more revenue. This is why it doesn’t come as a surprise to find out that a customer such as Lowe’s, whose daily sales in stores averages $100,000 has signed up to use SITEOPS on 30 projects this year.
In addition to the obvious benefits of SITEOPS for site design, what I found particularly fascinating about it was its use of a very sophisticated computing technology to a design problem in an industry that has seen very little of such radical innovations so far. We have, of course, seen the technological state of the art in the AEC industry improve significantly of late with BIM (building information modeling) and supporting analysis and evaluation tools. However, while these technologies make building design and construction processes much more efficient, smarter and cost-effective, they are still a far cry from technologies such as SITEOPS, which are harnessing the astronomical processing powers of computers to provide designers with actual solutions for their problems, reducing work that would take normally 3 to 4 months to just hours. This puts SITEOPS in a league similar to Design++, a rule-based technology used by one of the leading manufacturers of pre-engineered metal buildings to automate its design and engineering tasks, which I wrote about close to three years ago in the article, Automated Rule-Based Building Design and Engineering at Robertson Ceco Corporation. The optimization technology used by SITEOPS is similar to rule-based design in a way—it is capturing expert knowledge and rules of land planning and site design into algorithms that are then used to run through and evaluate billions of options to find the most optimal ones.
It is easy to envision other potential applications areas of this technology in AEC: for example, finding the optimal layout for the floor plan of a hospital or another specialized building type; determining the optimal façade to volume ratio of a building to maximize on its energy performance; finding the most efficient HVAC layout for a design, and so on. However, my guess is that it will still be several years before we see any progress in the development of such truly smart applications that can work as design assistants rather than simply as design aids. But it is extremely promising to see an application like SITEOPS that has already made this start—at least in the field of civil engineering.
Lachmi Khemlani is founder and editor of AECbytes. She has a Ph.D. in Architecture from UC Berkeley, specializing in intelligent building modeling, and consults and writes on AEC technology.
AECbytes content should not be reproduced on any other website, blog, print publication, or newsletter without permission.