


In one of my earlier articles on iPad apps for AEC, published in 2011, I provided an overview of GRAPHISOFT’s BIMx app that was designed for easy navigation of 3D building models published from ArchiCAD on the iPad. At that time, I found it the most impressive of all the model-viewing apps that I tested, with a slick interface and intuitive controls to navigate the model. GRAPHISOFT has recently released the next generation of this app, called BIMx Docs. It extends the scope of the viewing and navigation to 2D content as well, enabling all the models as well as the accompanying 2D drawings of a BIM project to be accessed and explored from a handheld device. I tested out the app on an iPad mini, which is even smaller than a regular iPad, and I was amazed at how much understanding of a project I could get from a device I could simply slip into a purse. (I didn’t venture so far as to test the app on a iPhone, but apparently, it does work on that as well with an adjusted navigation system for one-hand/thumb operation.)
This review takes a comprehensive look at this new app and how it is different from GRAPHISOFT’s earlier BIMx app.
The new expanded BIMx Docs app is built on top of GRAPHISOFT’s original BIMx app, which continues to be available for free as it has always been. I still have that app on my older iPad, and it gave me the opportunity to compare it with the new BIMx Docs app on a separate iPad mini. Compared to BIMx which is free, BIMx Docs is priced at $49.99 for use on unlimited projects. As with all iOS apps, there is volume pricing as well as enterprise pricing for medium and large firms who want to get multiple licenses for their employees and centrally manage and deploy them.
So what does the paid version get you that the free version does not? While BIMx continues to enable navigation of a 3D model published from ArchiCAD, BIMx Docs extends this to the full spectrum of BIM, enabling the complete design and documentation of a building to be explored. It provides a very effective and inexpensive way for design/design-build firms to share design proposals with their clients, without them needing to know anything about the modeling process or how to use a BIM application. The 2D and 3D information describing the project are integrated in an innovative way—using hyperlinks, as described in a later section—enabling the client to obtain a comprehensive understanding of it.
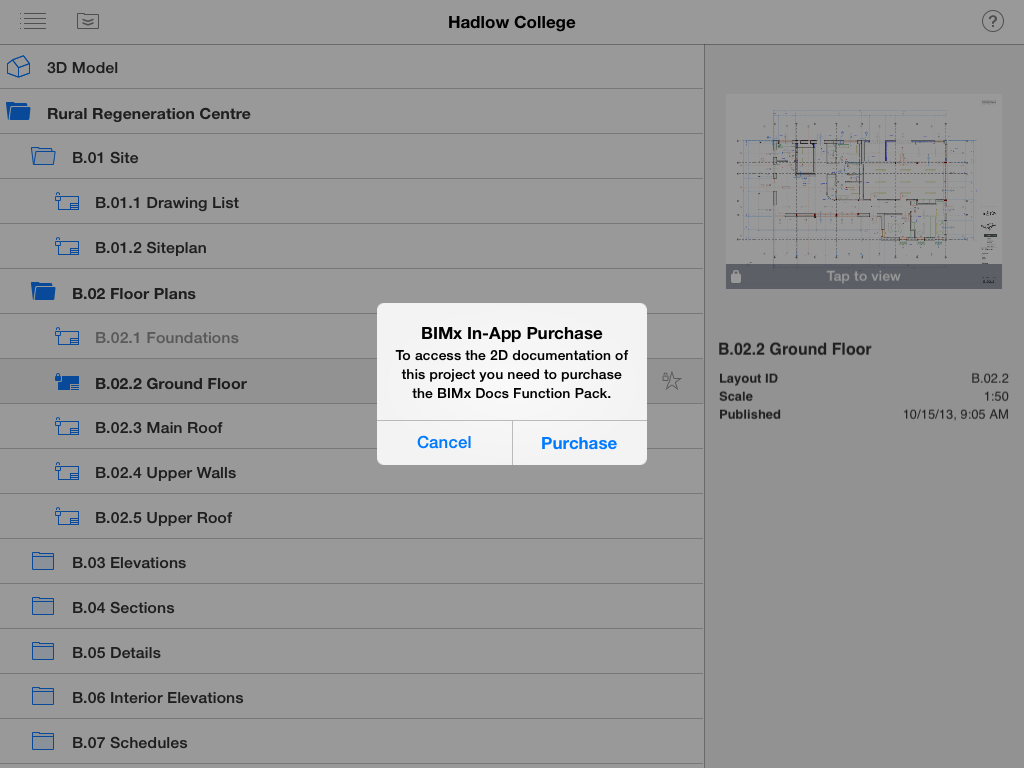
While the free BIMx app can still be used to open a BIMx Docs file, view its table of contents, and preview documents, it does not allow any content apart from the main 3D view to be opened (see Figure 1). You can, however, make an in-app purchase of $4.99 to see all the additional content of that particular project. Note that a couple of the demo models published by GRAPHISOFT have their full functionality enabled even for the BIMx app, so you can get an idea of how BIMx Docs would work by previewing these models with BIMx.
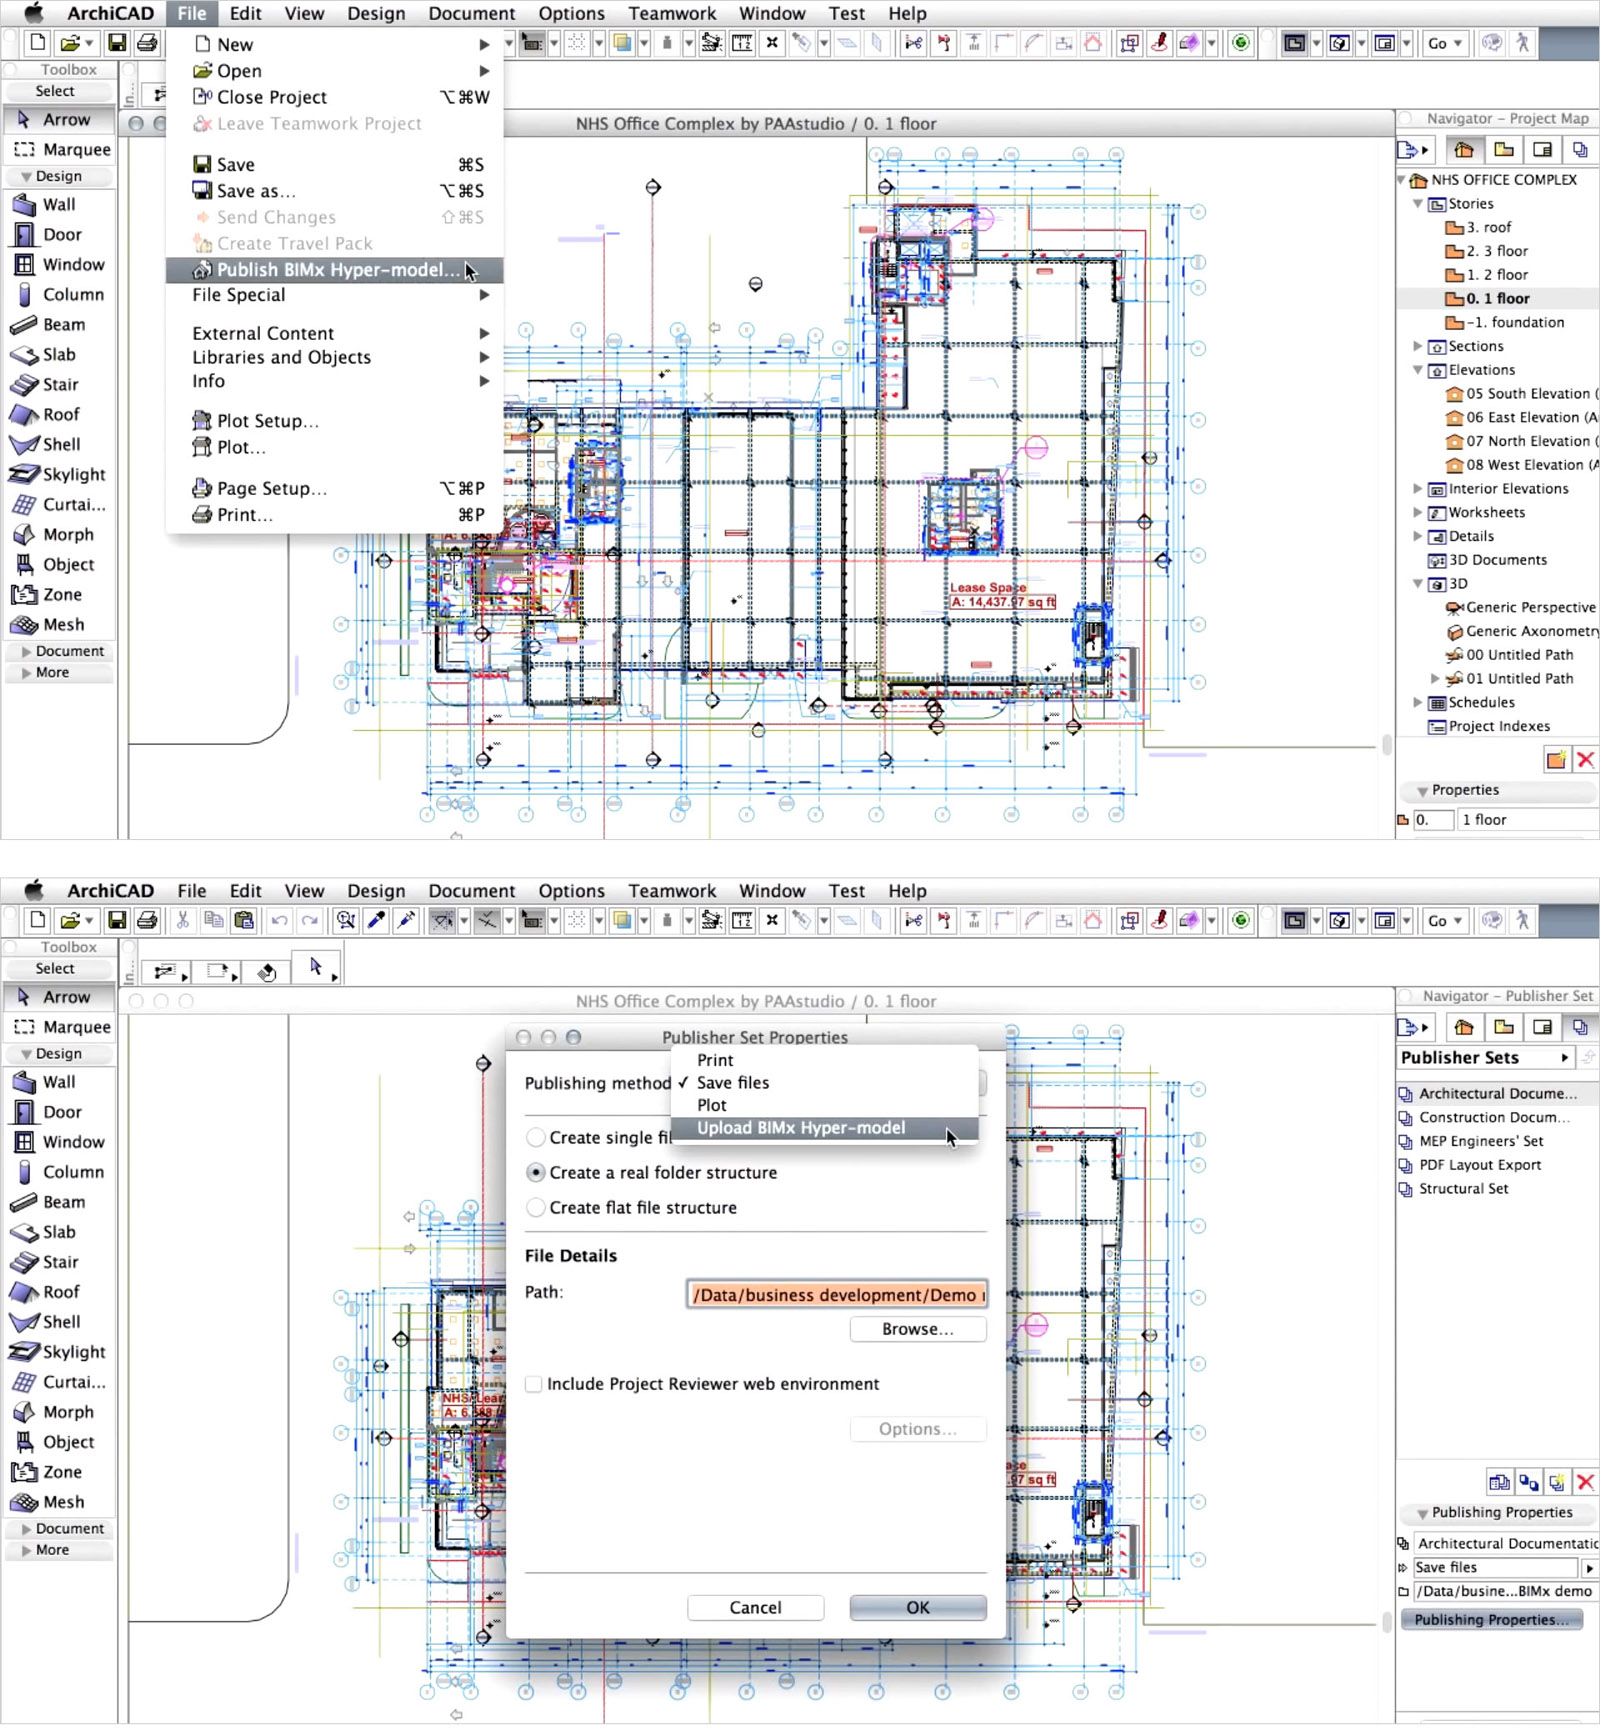
To create a BIMx Docs file of a project, it has to be published from ArchiCAD. While previous versions of ArchiCAD could publish BIMx models that could be explored with the free BIMx app on the iPad, the new functionality of BIMx Docs—which integrates 3D and 2D content using hyperlinks and allows all of it to be viewed—requires an updated version of the current release, ArchiCAD 17. This version of ArchiCAD includes a one-step wizard for publishing a BIMx Docs file (called BIMx Hyper-model) of the current project. Alternately, the ArchiCAD Publisher also has the additional option of publishing a BIMx Hyper-model in addition to traditional plotting, printing, and saving as PDF. Both methods are illustrated in Figure 2. Since the effectiveness of the project navigation in BIMx Docs depends upon how tightly the content is integrated using hyperlinks, it is important for the project in ArchiCAD to be properly linked to begin with, following the standard BIM process. So, for example, layouts (sheets) with plans, sections, elevations, etc., should be created with the dedicated tools ArchiCAD provides for them, so that they are correctly linked to the 3D model and you can go from one document to another by following references rather than having to open them up separately. As with any kind of printing or publishing option, you can choose exactly which 3D views and 2D layouts are included in the published BIMx Hyper-model.
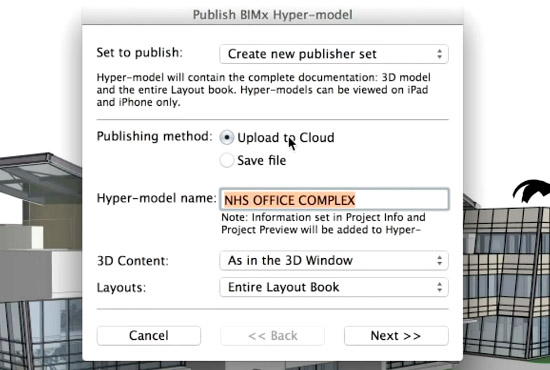
For the actual publishing of the BIMx Hyper-model, you can either choose to create a new model or update one that you have already created earlier. There are also two options for where the published model should reside: you can choose to save it locally and then send it to the recipient by email, DropBox, or another method, or upload it directly to the cloud (see Figure 3). This “cloud” is actually a GRAPHISOFT cloud with a 5GB storage for BIMx models, which is provided for free to all its customers that have a maintenance contract with the company. Needless to say, the Upload to Cloud option requires Internet connectivity. If this option is selected, you can further choose to make it public or upload it to a private folder (only available for those who have the account with the 5GB cloud storage). Uploading the model to the public domain is open to all ArchiCAD users and the model gets added to the community BIMx site from where it can be searched and downloaded. Uploading the model to a private folder keeps it confidential; it can also be further password-protected if required. Another significant advantage of using the GRAPHISOFT cloud is that syncing with it is incremental, so project changes are easy to push through to mobile devices from ArchiCAD.
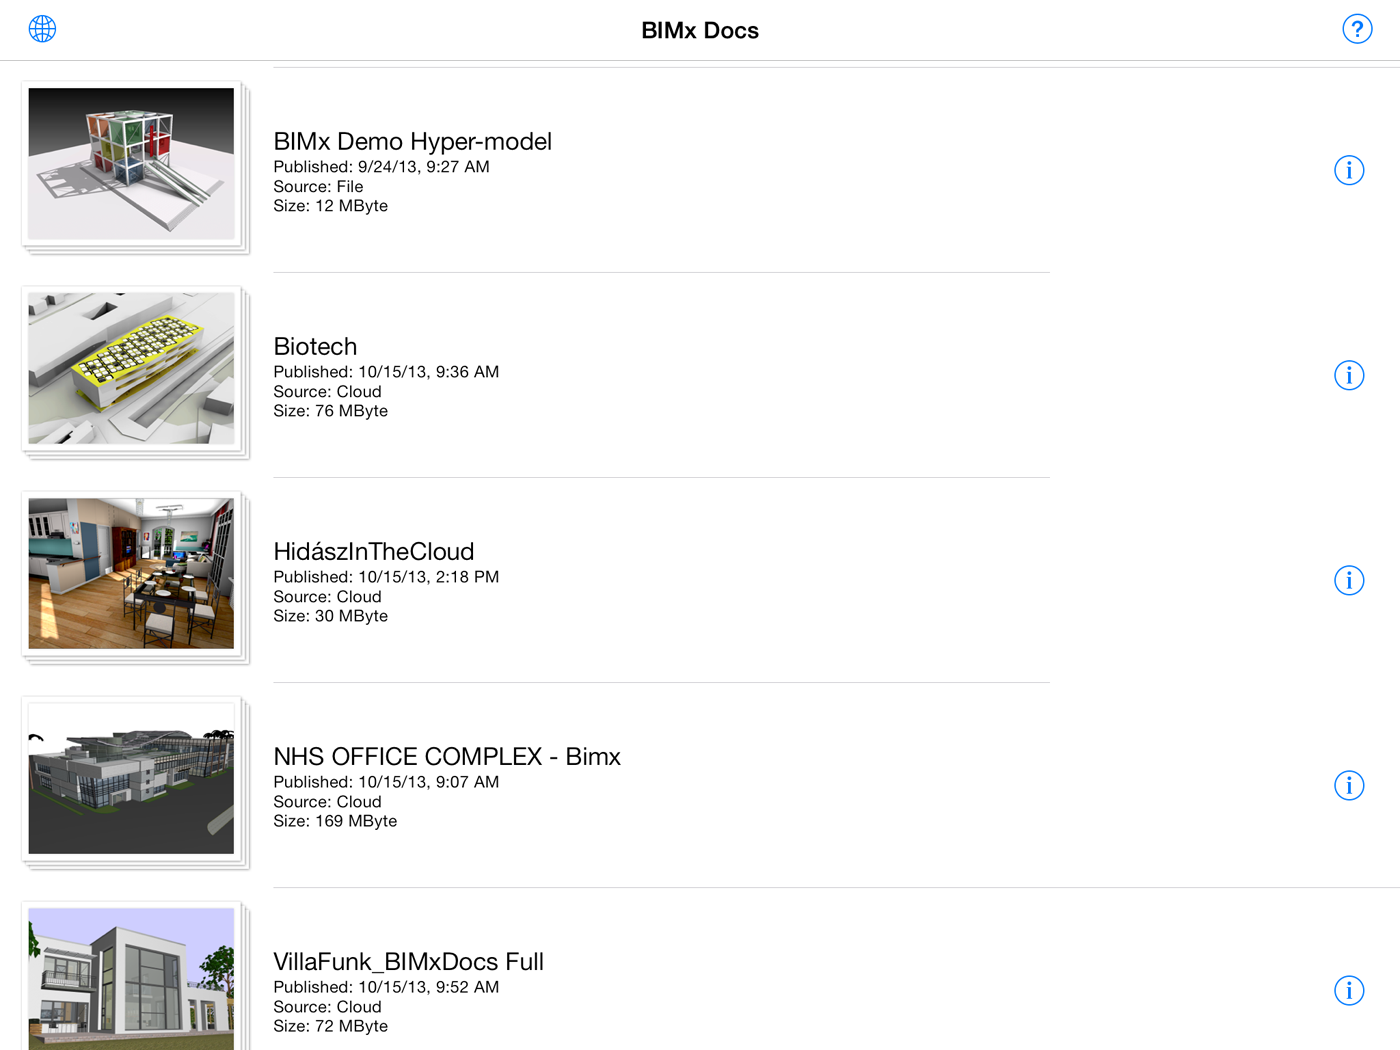
Let’s move on to the BIMx Docs app on the iPad. When you open it, you can see a list of the BIMx Hyper-models available for you to explore—models that you have received by email, or downloaded from a private cloud, or downloaded from the public domain on GRAPHISOFT’s BIMx community site. It should be noted that once you have the BIMx app on your iPad, a BIMx file received by email or accessed using DropBox is automatically detected as being a BIMx file with the choice to open it in BIMx. (This process is described in detail in the recent Tips and Tricks article, Mobile Model and Document Review with BIMx Docs.) The opening screen of the app listing all the available models is shown in Figure 4. To browse through additional models, you can click on the icon in the upper left cover and you will be taken to the BIMx community site showing all the models in the public domain that are available to download.
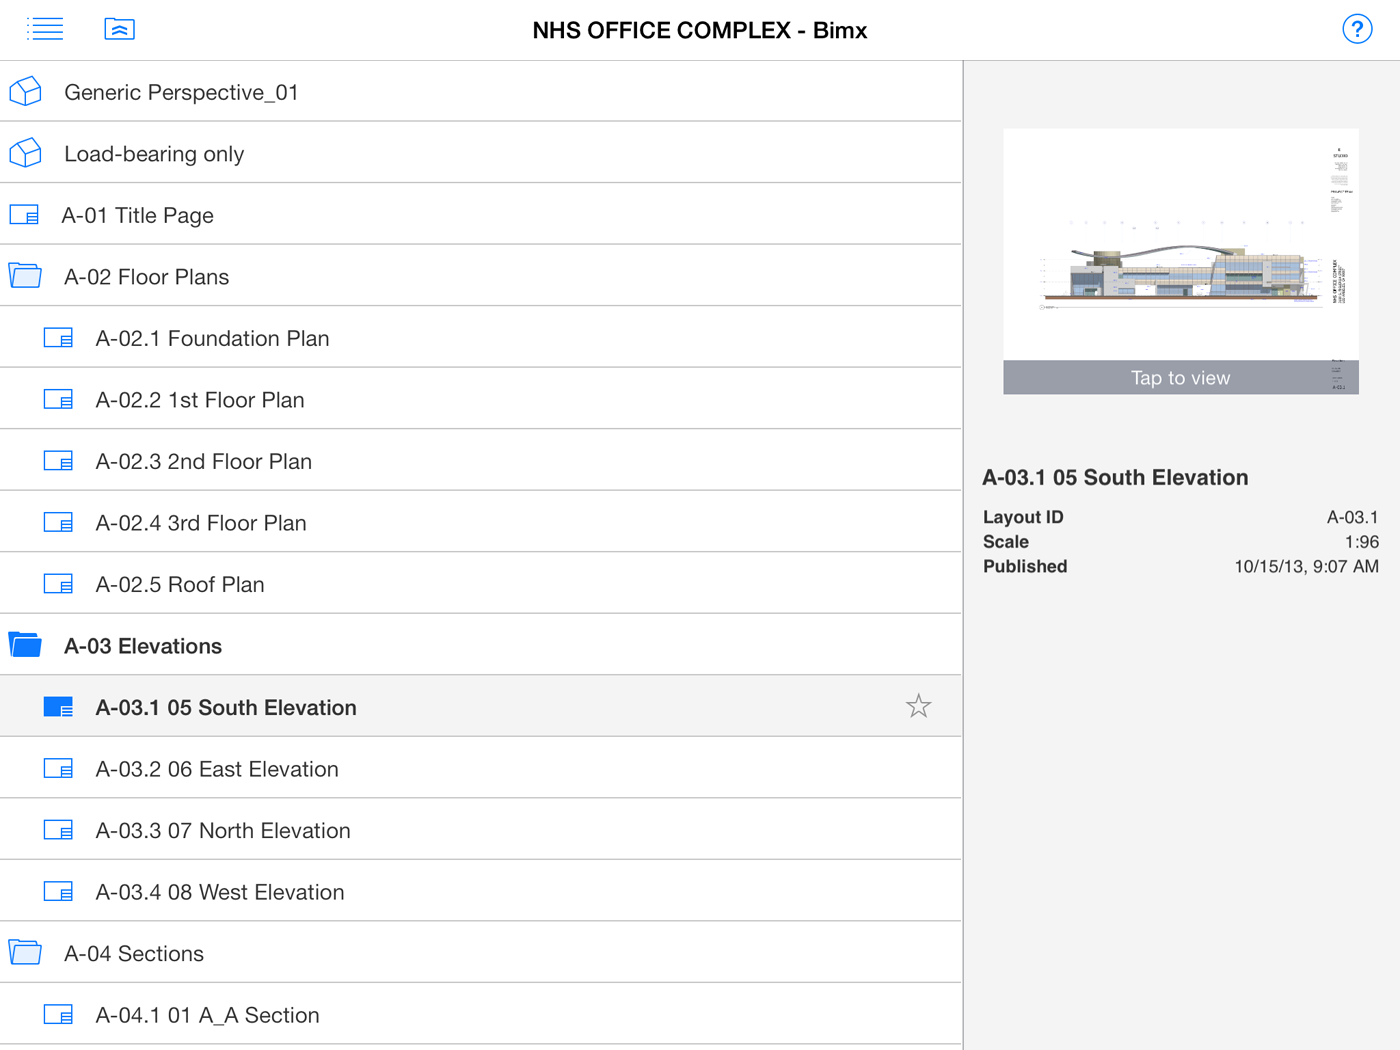
Selecting one of the models takes you a table of contents showing all the 3D views and 2D layouts published for that model. An icon at the top displays the complete index hierarchy of the model when clicked, opening all folders and sub-folders, as shown in Figure 5. Alternately, clicking on a specific folder will also open the list of its contents. Clicking on any item displays a preview of it on the right, along with some basic information. Tapping the preview image displays the selected item in full size. With the free BIMx app, you can only open the main 3D view, with the option to open the other documents using an in-app purchase. With the paid BIMx Docs app, you can open any of the documents. (As mentioned earlier, the exception to this are the demo models published by GRAPHISOFT, enabling the full functionality of BIMx Docs to be explored in the free BIMx app.)
The user would typically start by exploring the 3D model, the navigation of which works in the same way as was described in the overview of BIMx in my 2011 AEC Apps for iPad article, with controls that are so intuitive that you don’t even really need to refer to the brief Help documentation that comes with the app. Pinching the fingers zooms the model in an out, swiping with two fingers pans the model, and swiping one finger orbits the model (see Figure 6). You can fly to any location in the model by tapping on it and then tapping again on the icon that appears in that location. An icon on the lower left corner of the screen activates a joystick that appears in the viewing window and allows you to walk forward, backward, or turn in place. As you navigate the model, both horizontal obstructions such as walls and vertical obstructions such as ceilings are automatically detected, so you cannot go through them. Even objects such as stairs are intelligently detected, allowing you to “walk” up or down them to another level. Overall, the navigation of the 3D model provides close to what real-life navigation in the building would be like. There are also options to go back to the Home View or Fit the model to the screen, which are extremely helpful in case you get “lost.” You can save views as “favorites” that you want to return to later. There is also an option to turn on a Stereo 3D view, enabling you to get a 3D feel of the building with 3D glasses.
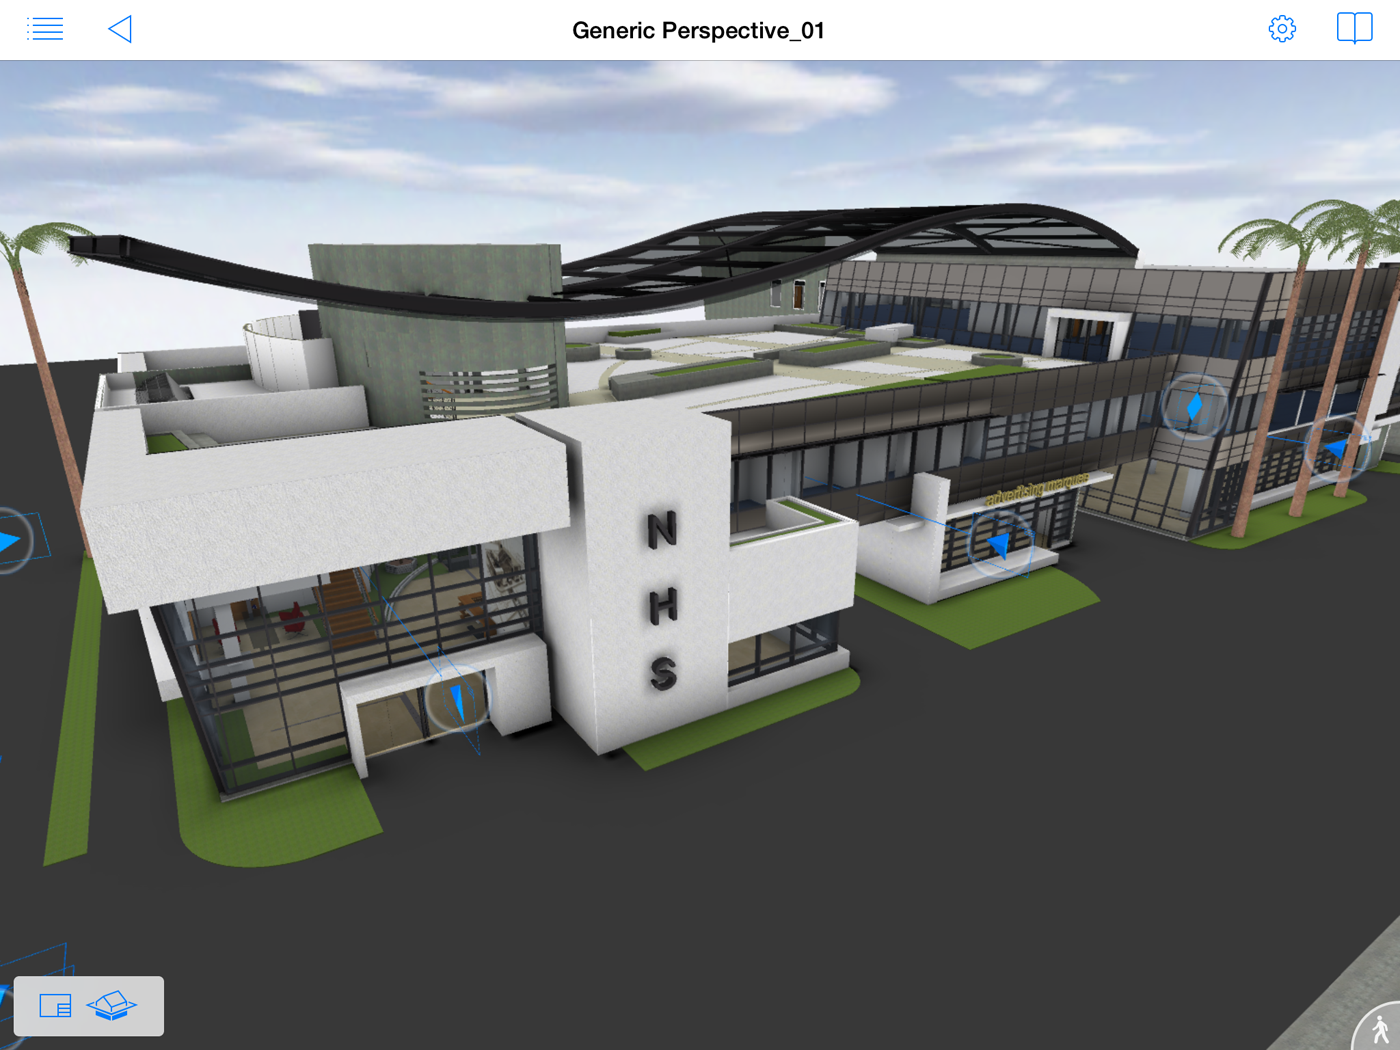
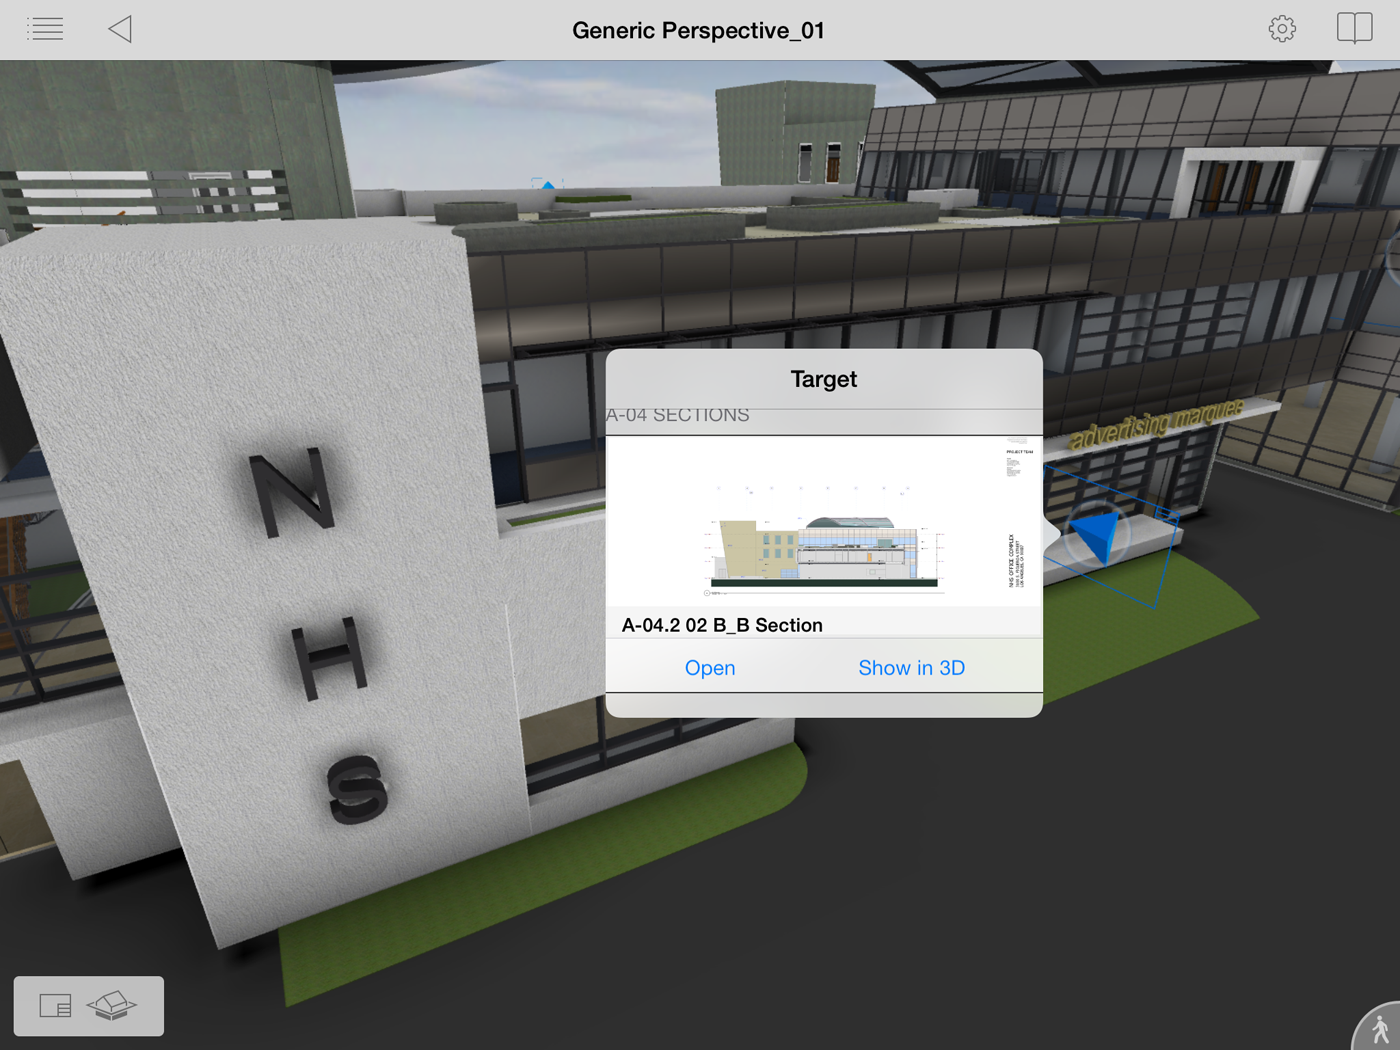
While the seamless 3D navigation was there in the earlier app as well, the “killer feature” in the new BIMx Docs app is its hyper-model capability that lets you quickly navigate between the 3D view and the associated 2D views. These hyperlinks appear as markers in all the views, and you can see them in the 3D view shown above by several blue triangles, which are oriented based on whether they link to a plan, section, or elevation. Clicking on a marker, as shown in Figure 7, shows the document associated with it, a section in this case. You can choose to either open it or show it in 3D.
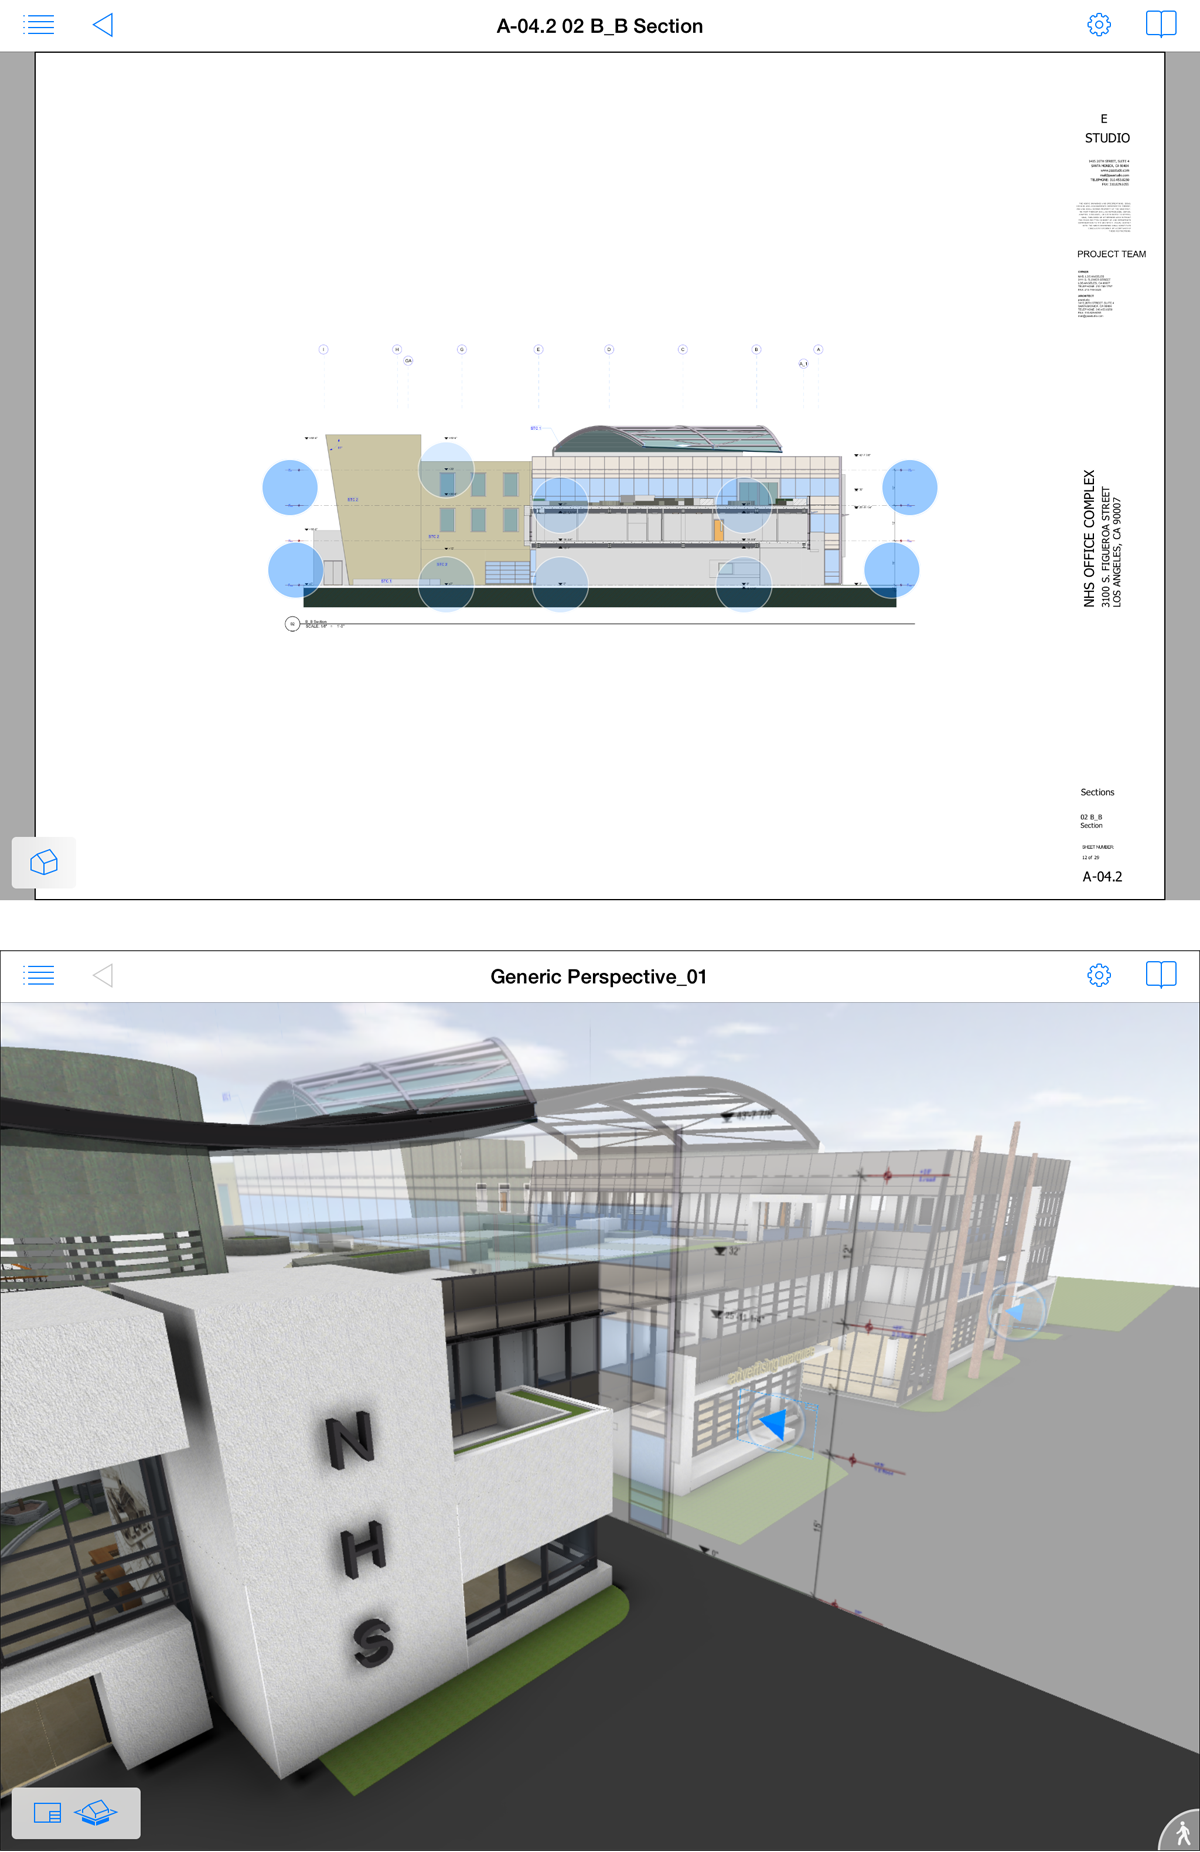
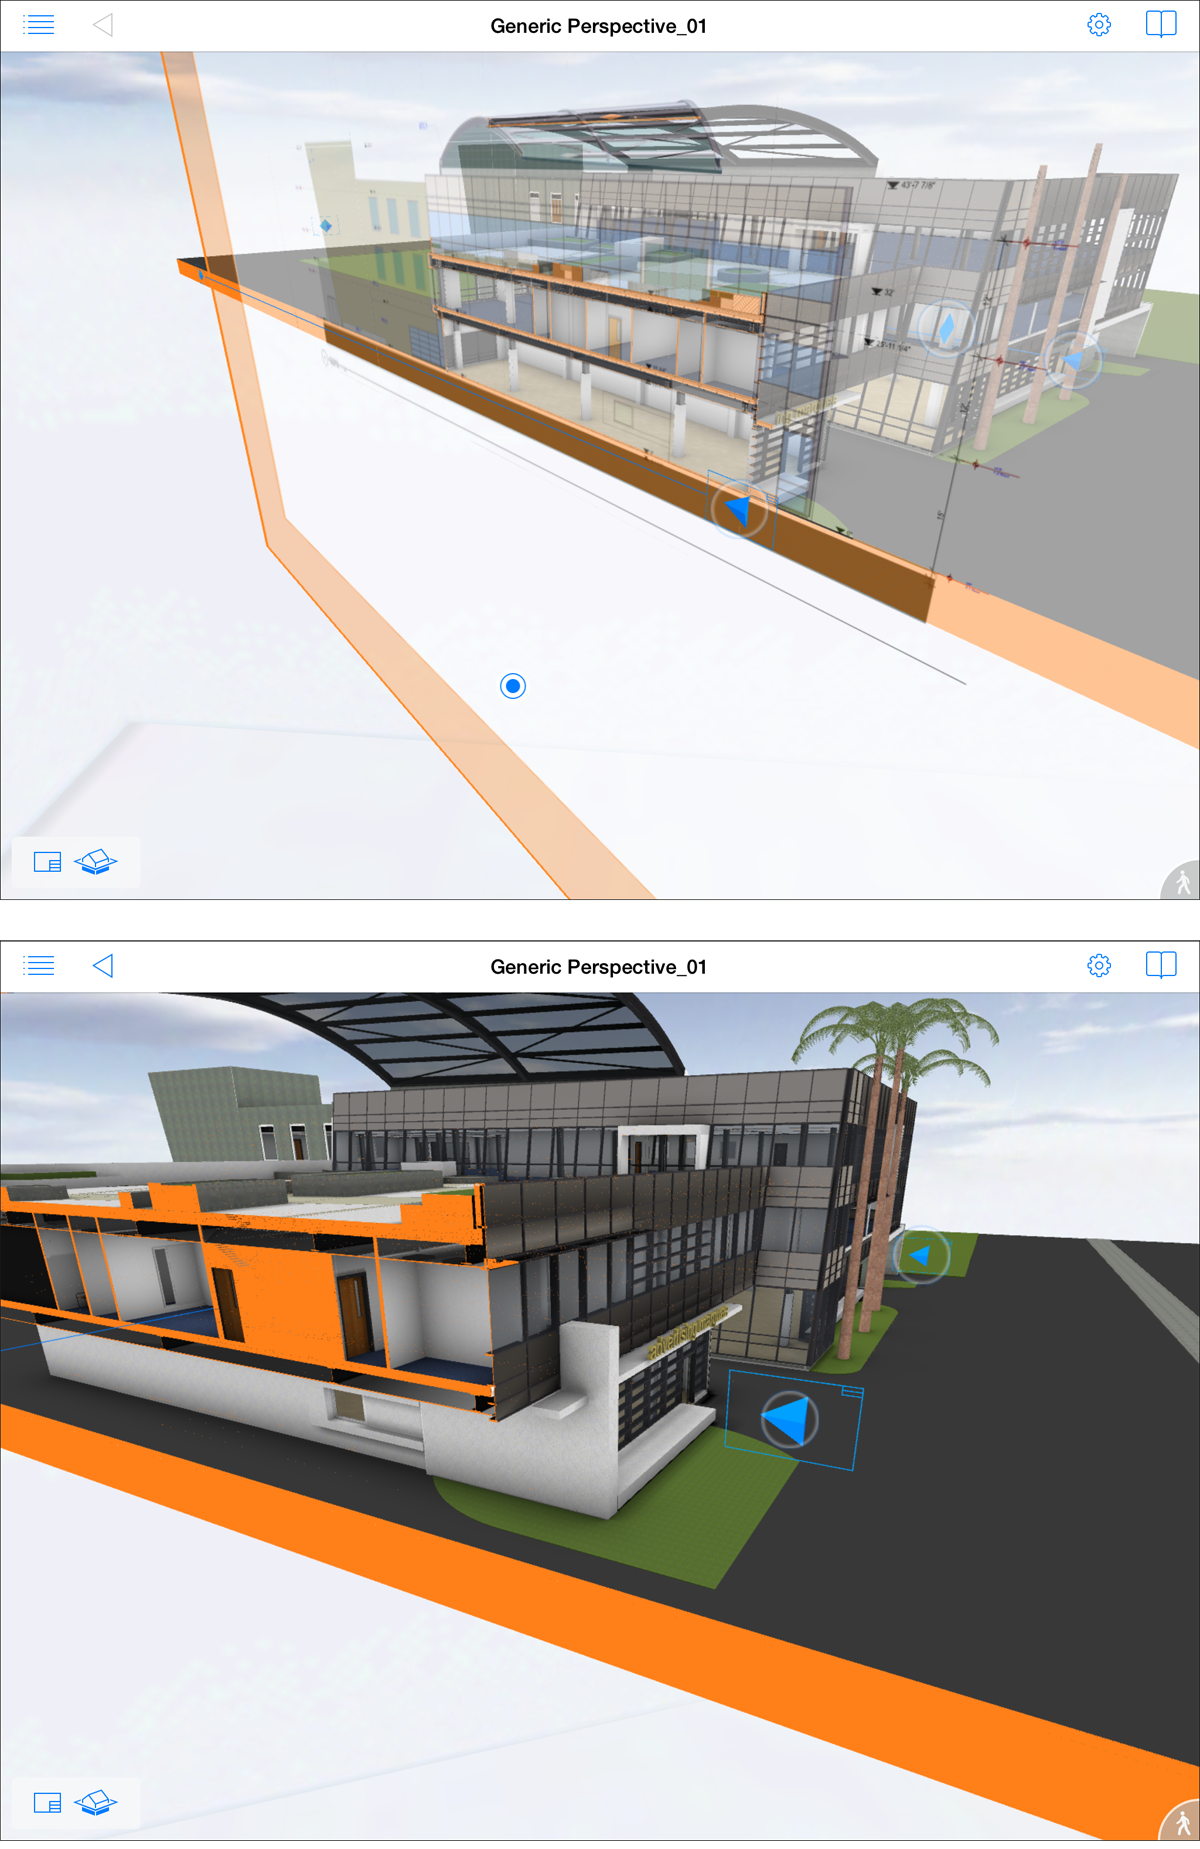
Choosing the Open option not only opens the section layout, but does it in a spiffy way, transitioning almost magically from the 3D view to the 2D sheet. On the other hand, if you were to choose the Show in 3D option from the hyperlink, you can see the drawing superimposed on the model, with the section in the exact place it would be in the model. The results of both actions are shown in Figure 8.
Let’s look more closely at the result of the Show in 3D option for the section drawing illustrated in Figure 9. There are two icons on the lower left of the screen. The first takes you to the 2D layout view again, with the similar spiffy transition we saw earlier. The second icon, when selected, hides the front half of the sectioned building, giving you a sectional perspective that allows the interior of the building to be explored. There are also some more interesting operations you can do at this stage. You can select the cutting plane and move it forwards or backwards to explore different sections of the building (see the top image of Figure 9). You can access its options and choose to flip the plane or turn it off. You can also select the section drawing itself and turn it off, displaying only the 3D section view without the drawing superimposed on it (see the lower image of Figure 9).
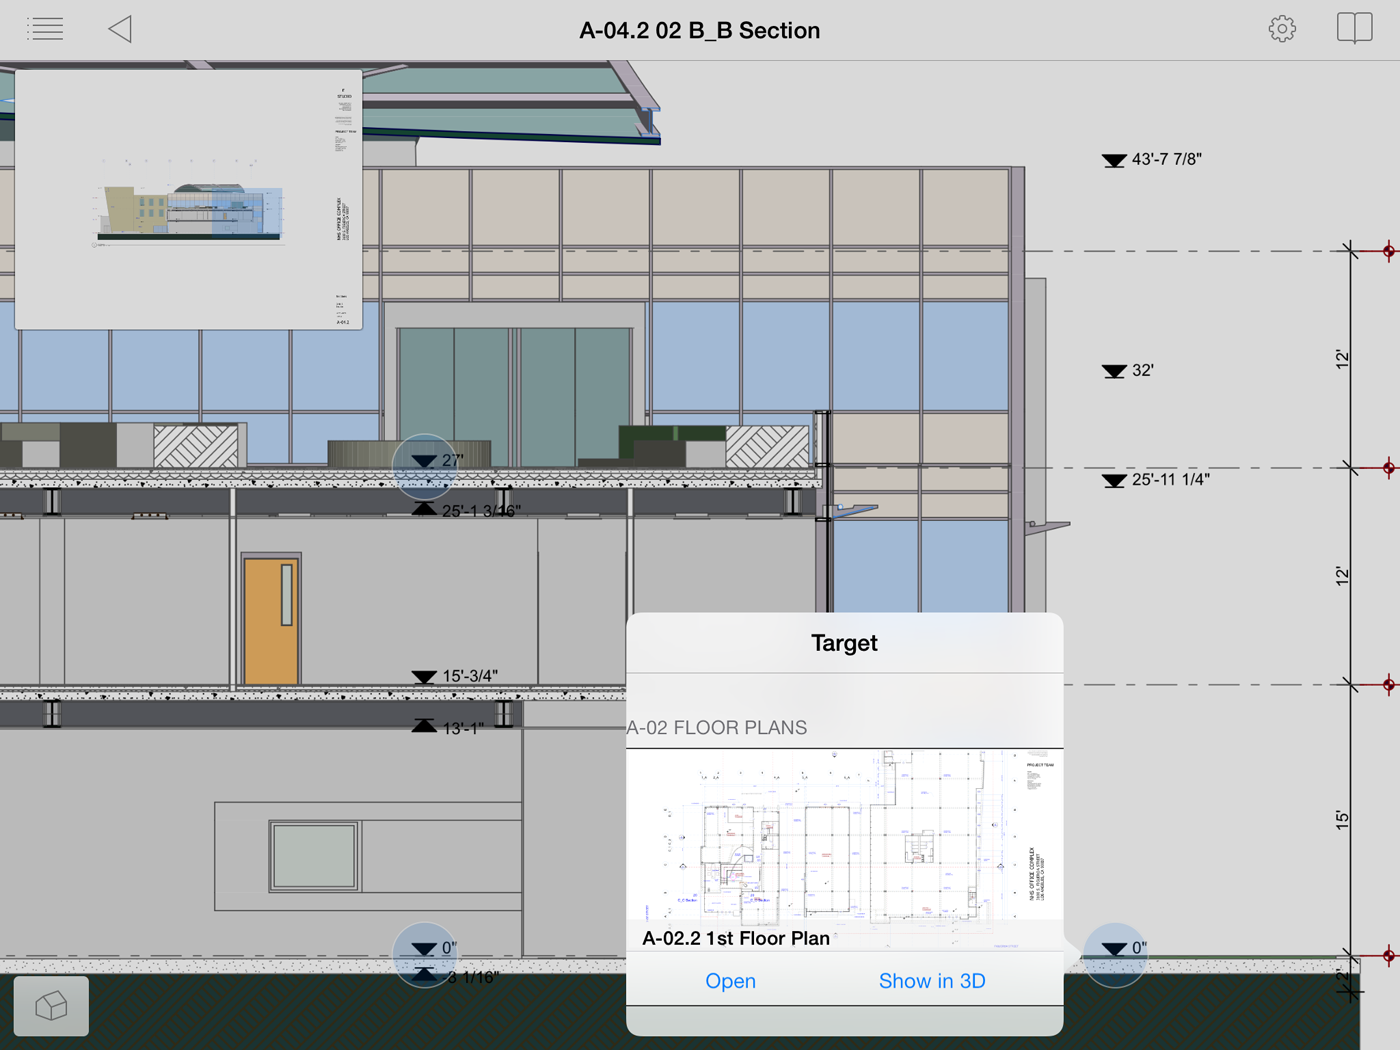
Getting back to the 2D layout view, you can zoom in on parts of the layout to see them more clearly, as shown in Figure 10. If you are zoomed in on a drawing, a navigation map is displayed that shows you exactly what part of the drawing you are currently seeing. The 2D views also have links to other documents, and if you click on a link, you can see the target associated with that link with the same option to either open it or view it in 3D.
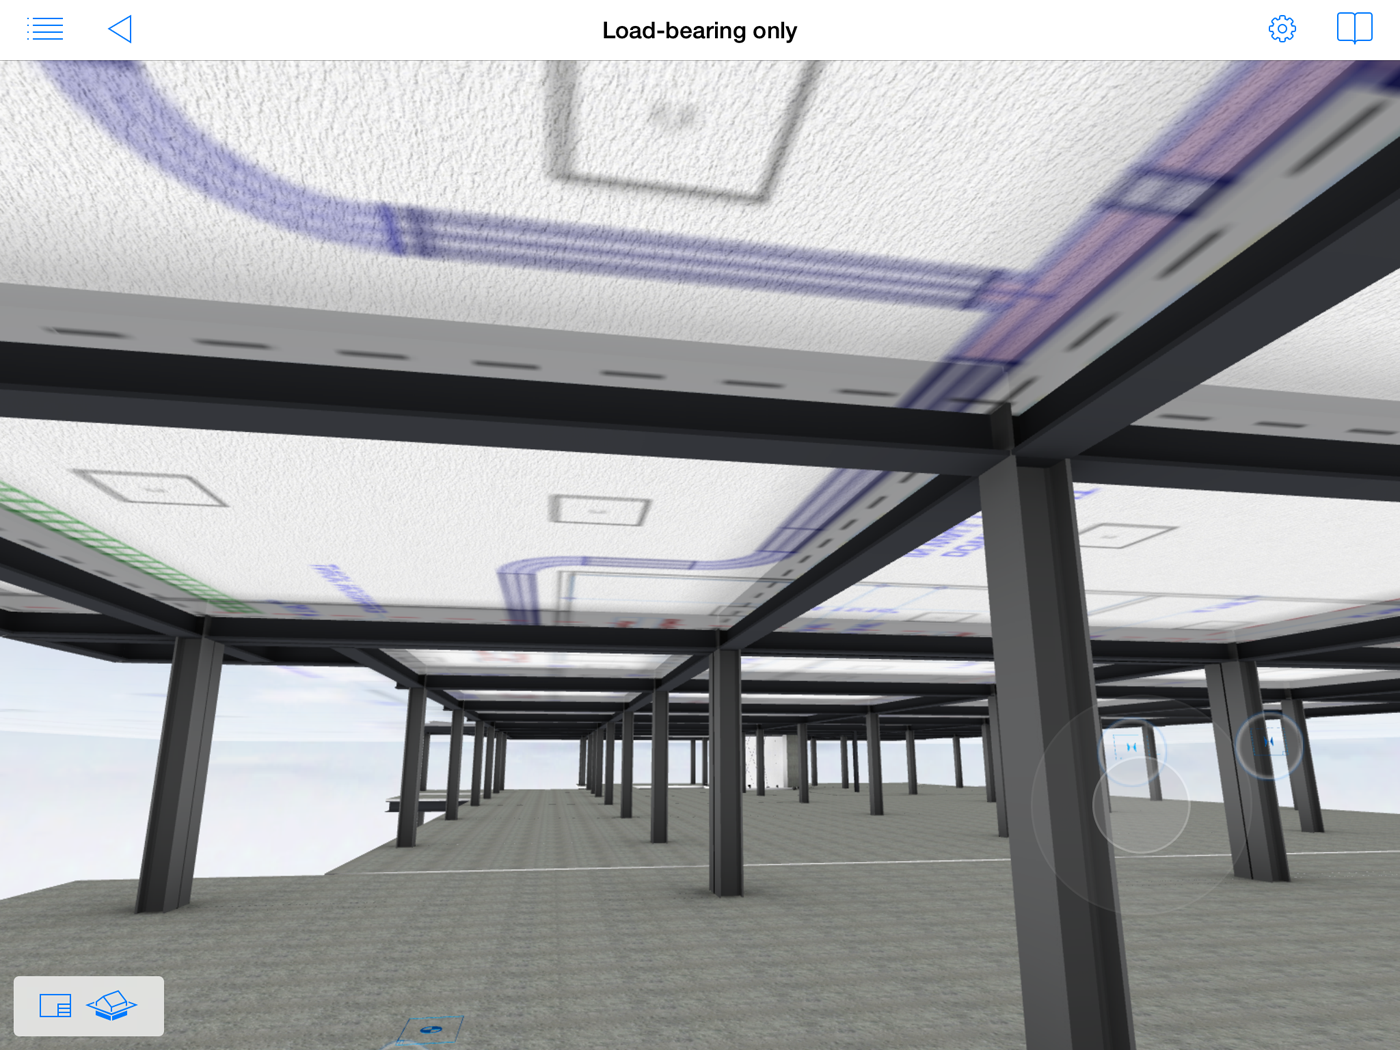
Navigating between related 3D views and 2D documents in this manner using hyperlinks with smooth, seamless transitions enables the user to get a comprehensive understanding of the project. What makes it even more convenient is that these hyperlinks are automatically created in the BIMx model when it is published from an ArchiCAD file (assuming, of course, that the ArchiCAD file has been properly created to begin with). While ArchiCAD itself has the same hyperlinked markers that take you to different parts of the project when clicked on (for example, clicking on a section marker in a plan takes you to that section), the user experience of hyperlinks is actually better in BIMx Docs than in ArchiCAD itself. Also, the juxtaposition of 3D and 2D information is unique to BIMx Docs and greatly enhances the understanding of the project. An example is shown in Figure 11, where an MEP plan is displayed in a 3D view showing how the MEP elements would be positioned on the ceiling of the spaces. This kind of information would be very difficult to visualize using any other modeling or viewing application, but is instantaneously available in BIMx Docs.
Since the advent of tablet devices, the number of AEC-specific apps has been constantly growing. In particular, there are already so many apps for viewing models, so why one more? The answer is that BIMx Docs provides so much more than just viewing 3D models; it provides a way to get a comprehensive understanding of the entire project by exploring not only the 3D aspects of it but the supporting sheets and documentation as well. The navigation between all the related content is so seamless and intuitive that it is almost absurdly easy to jump from one view to another and quickly explore all of the published content. Just as with the original BIMx application which had the best user interface and viewing capability that I found among iPad apps at the time I wrote my first iPad apps article, BIMx Docs is very visually pleasing and takes full advantage of the iPad’s inherent elegance, sophistication, and ease of use. Essentially, it is a cool product built on top of another cool product, making it, like the iPad itself, a delight to use.
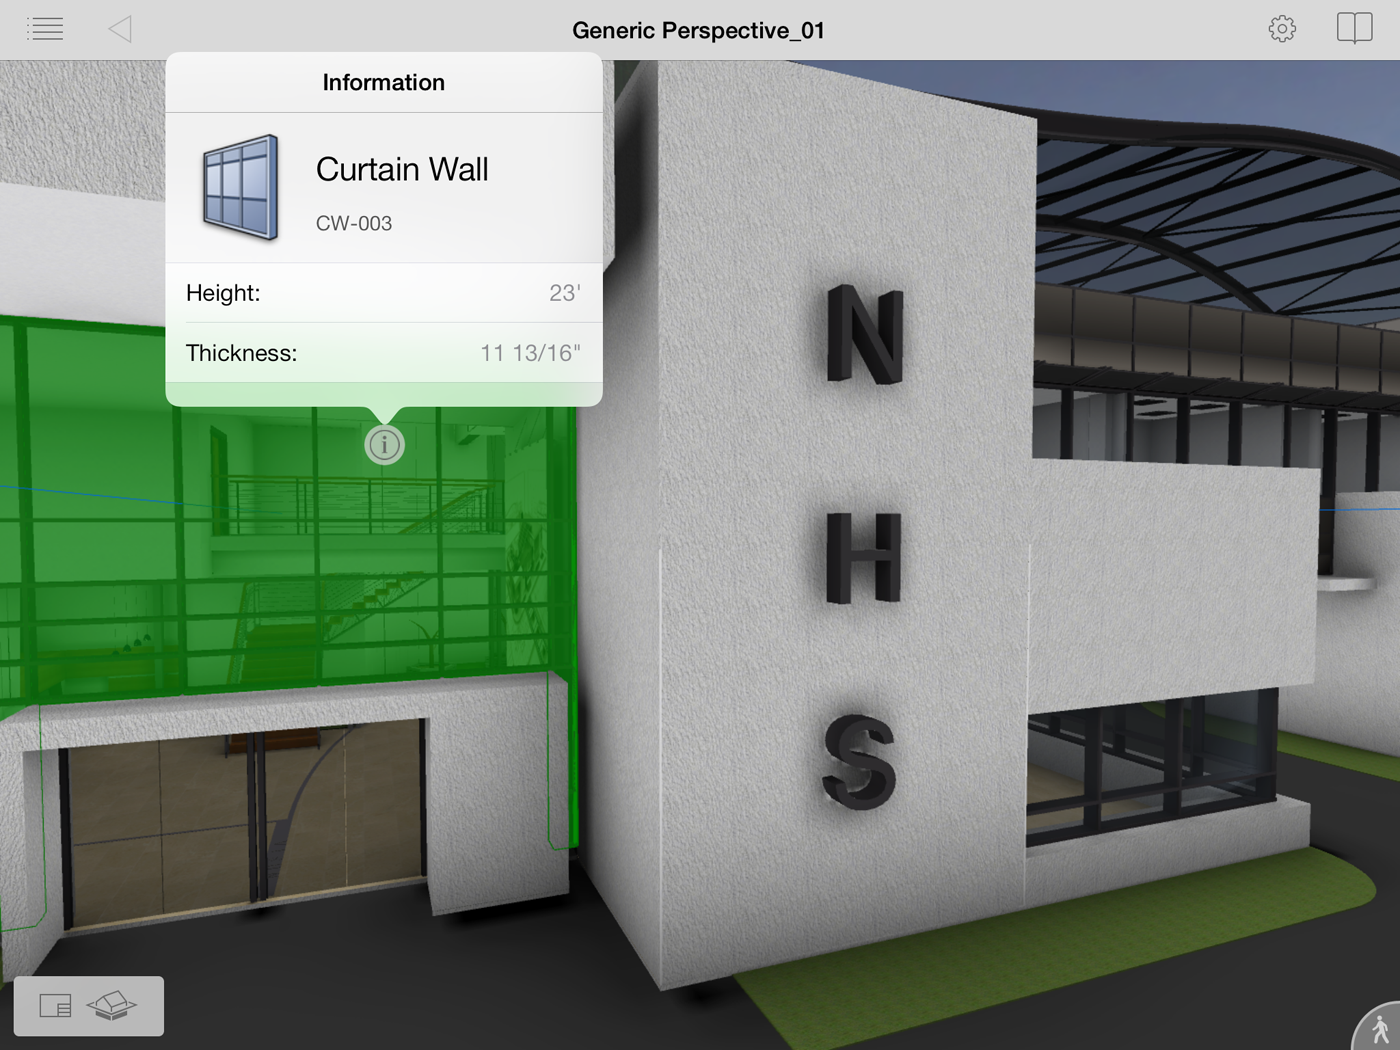
One of the other significant advantages of BIMx Docs is that it does not experience any performance issues with large and complex models, unlike, say PDF files, which do not work well for larger drawings. Also, while the PDF format supports 3D models, these haven’t really taken off in the AEC industry in a big way. (Adobe, itself, has stopped developing 3D PDF capability.) BIMx Docs also provides the ability to see some basic BIM information about an element, as shown in Figure 12. This option is off by default, but can be activated from the Settings menu.
The biggest limitation of BIMx Docs is that it is currently limited to ArchiCAD models, so anyone using any other BIM application could not avail of its power and capabilities. This is a pity, as the app could be of interest to a much larger AEC community. It was, of course, developed by GRAPHISOFT as a complement to its ArchiCAD BIM application, to strengthen the case for its adoption; however, it could potentially become a tool in its own right. Also, it currently lacks mark-up capabilities, the ability to manipulate the visibility of elements, a search option, etc., that we have come to expect in design review applications. Hopefully, future versions of the app will offer some of these capabilities. It would also be nice to have an Android version of the app for those not on Apple’s iOS platform.
In the current era of mostly free apps, it is interesting to some bold attempts by AEC technology vendors to develop paid apps for professional use that provide a valuable service. If applications like BIMx Docs succeed, it could open the door for more paid, professionally-oriented apps in the AEC industry that are not simply adjuncts to existing desktop tools but applications in their own right.
Lachmi Khemlani is founder and editor of AECbytes. She has a Ph.D. in Architecture from UC Berkeley, specializing in intelligent building modeling, and consults and writes on AEC technology.