


When it comes to the Autodesk ecosystem, those involved in designing buildings tend to know a lot about the Revit-centric offerings. However, stepping just outside the building, and considering civil, site and landscape architecture tools and workflows, that same group might not be as familiar with some of the newer options for these design tasks. This is not entirely surprising, as a lot of these tasks are not always performed by architects, MEP, or structural engineers. The goal of this article is to offer a high-level overview of important options to help bridge the gap in some areas, and offer up new solutions to previously overwhelming tasks one might wish to perform in Revit to produce high fidelity site models. With this information, teams can improve collaboration and enhance model fidelity across a project’s design team.
The topics that will be covered in this article include:
Let’s dig in and take a closer look at each of these topics.
AutoCAD Civil 3D is Autodesk’s platform for survey and civil design and documentation. I helped my previous firm implement this product shortly after it came out in 2005; prior to that, they were using Autodesk Land Desktop. Similar in some ways to Revit, Civil 3D revolves around a 3D representation of the project, where individual elements hold information. It differs from Revit in that it is still very much a file-based system where only one person can work in a file at a time, so a project is typically broken up into separate pieces, for example, grading, alignments, pipe networks, etc.
Civil 3D is a tool designed on top of AutoCAD for civil engineers. There are a lot of sophisticated workflows and dialogs (some of the most complicated dialogs I have seen!) used to automate, or at least streamline, tricky things like developing the path of a road, which has defined components (two lanes, boulevard, sidewalks, and daylighting grade) which optimally interacts with the existing grade.
Survey crews can standardize their data collection in the field in such a way that Civil 3D will automate the surface creation and linework, like back of curb and fire hydrant symbols.
These civil design files are almost always associated with a state or county coordinate system, which is why they link into Revit so far away from the CAD file’s internal origin; that point represents the benchmark of that coordinate system.
Many Revit users are familiar with BIM 360 Collaborate Pro (aka, BIM 360 Design, C4R) even if they have not used it. This is an optimized cloud-based platform which allows disparate staff or firms to work together against the same dataset, even the same file in the case of Revit.
Civil 3D started supporting BIM 360 Collaborate Pro workflows in 2019. At my previous firm, I worked to implement this for the half of the firm using Civil 3D at the start of the 2020 pandemic to support #WorkFromHome. The rest of the firm, all Revit users, were already all-in on Revit in the cloud for architecture, MEP, and structural. I won’t sugarcoat it, there were a lot of challenges with this at that early point, which largely revolved around getting existing, large, complex projects transferred to the cloud as all the links and data shortcuts became a mess.
When a Civil 3D project is set up correctly in BIM 360, it opens up many opportunities. In the case of the pandemic or work/life balance, staff can work from anywhere against a single source of truth dataset. This also offers additional tools and collaboration opportunities with architects, when a civil project includes a building.
Here are several images, which highlight AutoCAD Civil 3D and BIM 360 Collaborate workflows.
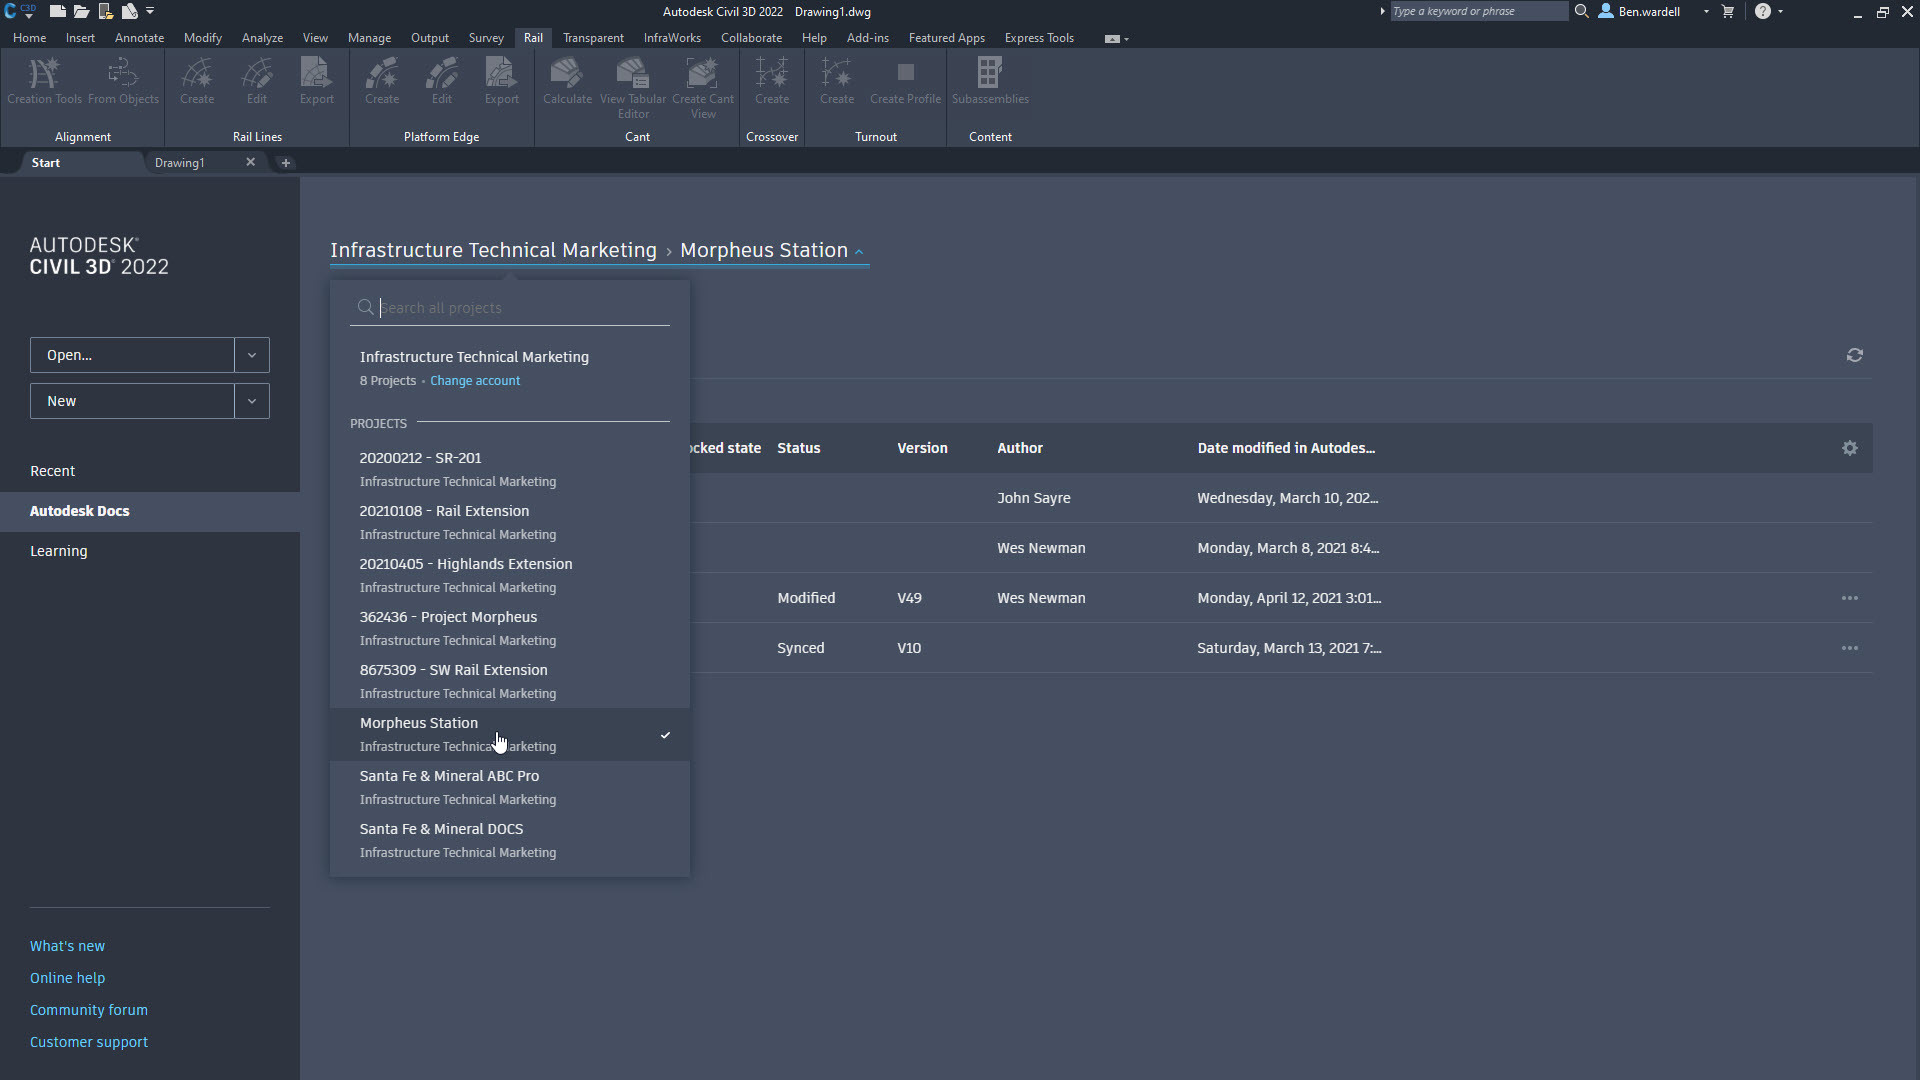
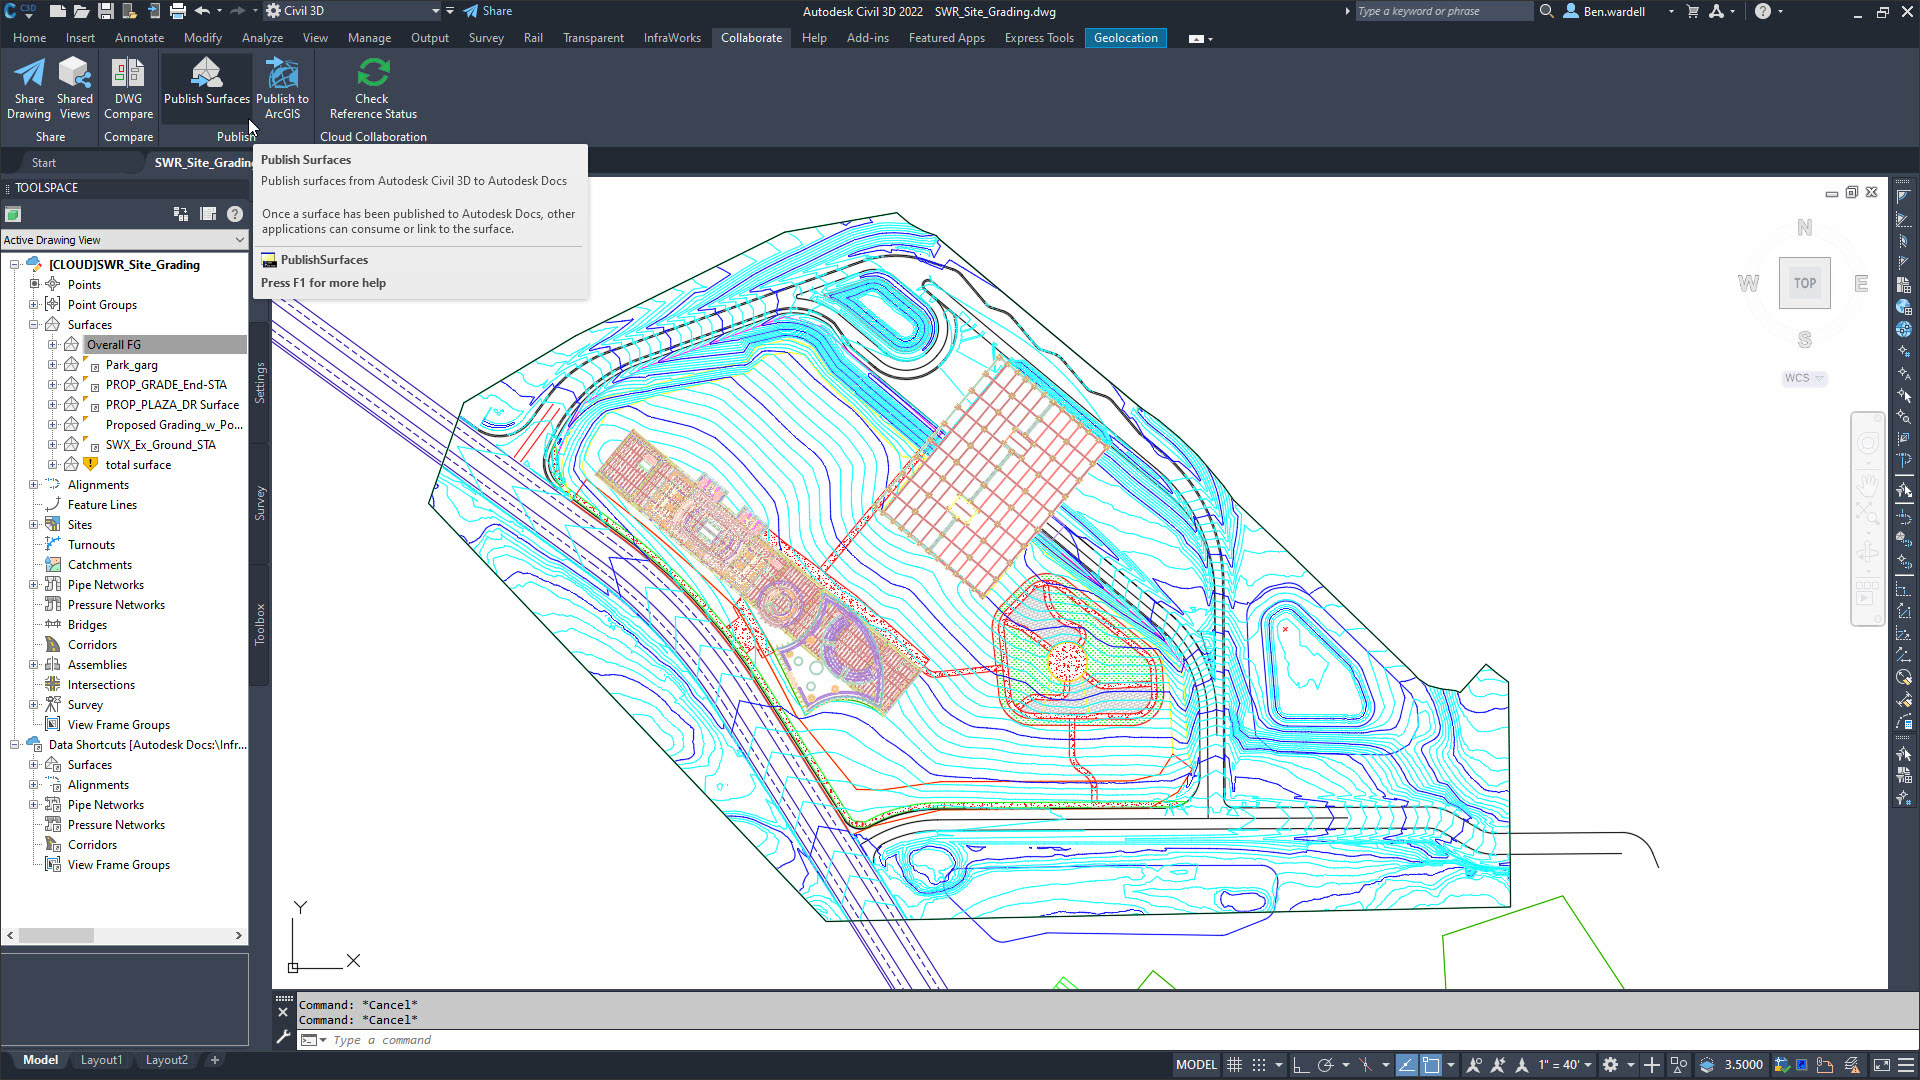
The Start screen of Civil 3D is shown below. This will be very familiar to Revit users. Here Civil 3D users have direct access to BIM 360 Collaborate Pro projects and files.
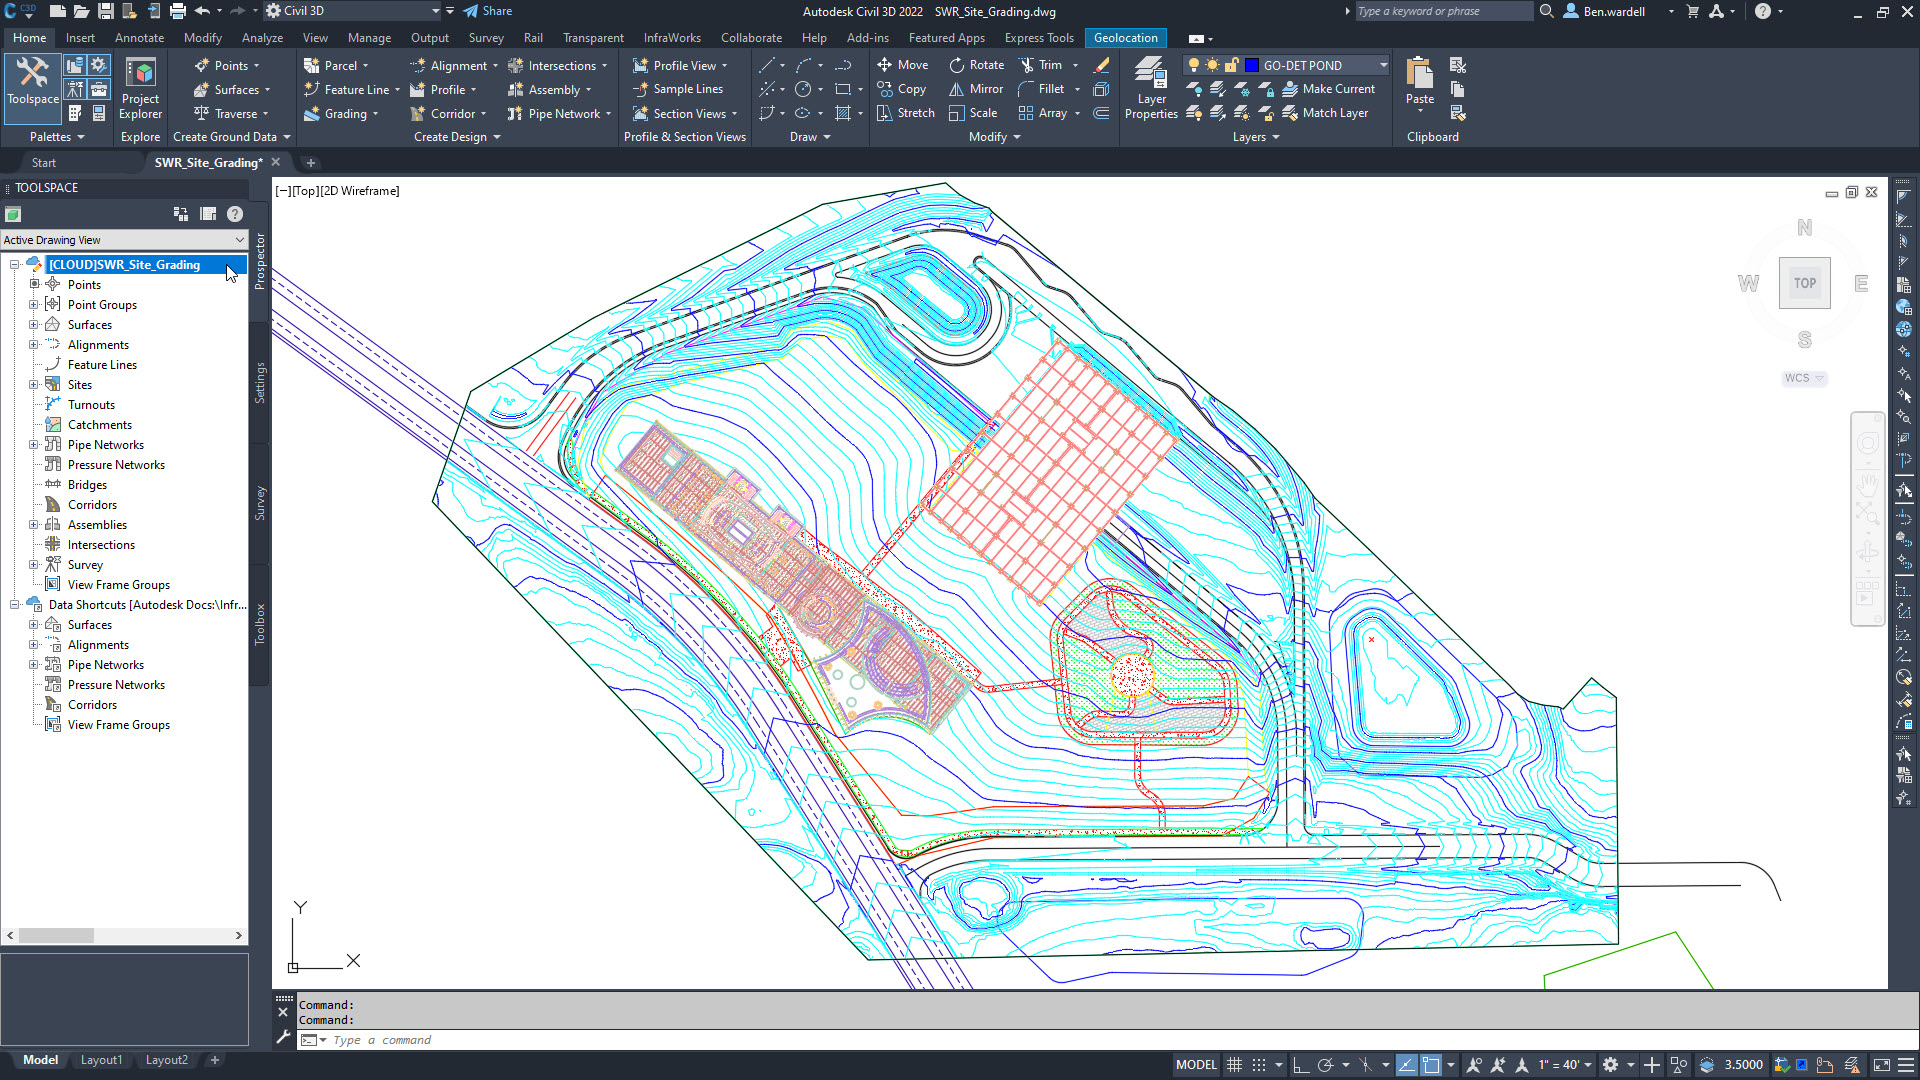
The following image shows a surface (aka toposurface), selected in the Prospector, being identified as a “Cloud” hosted element.
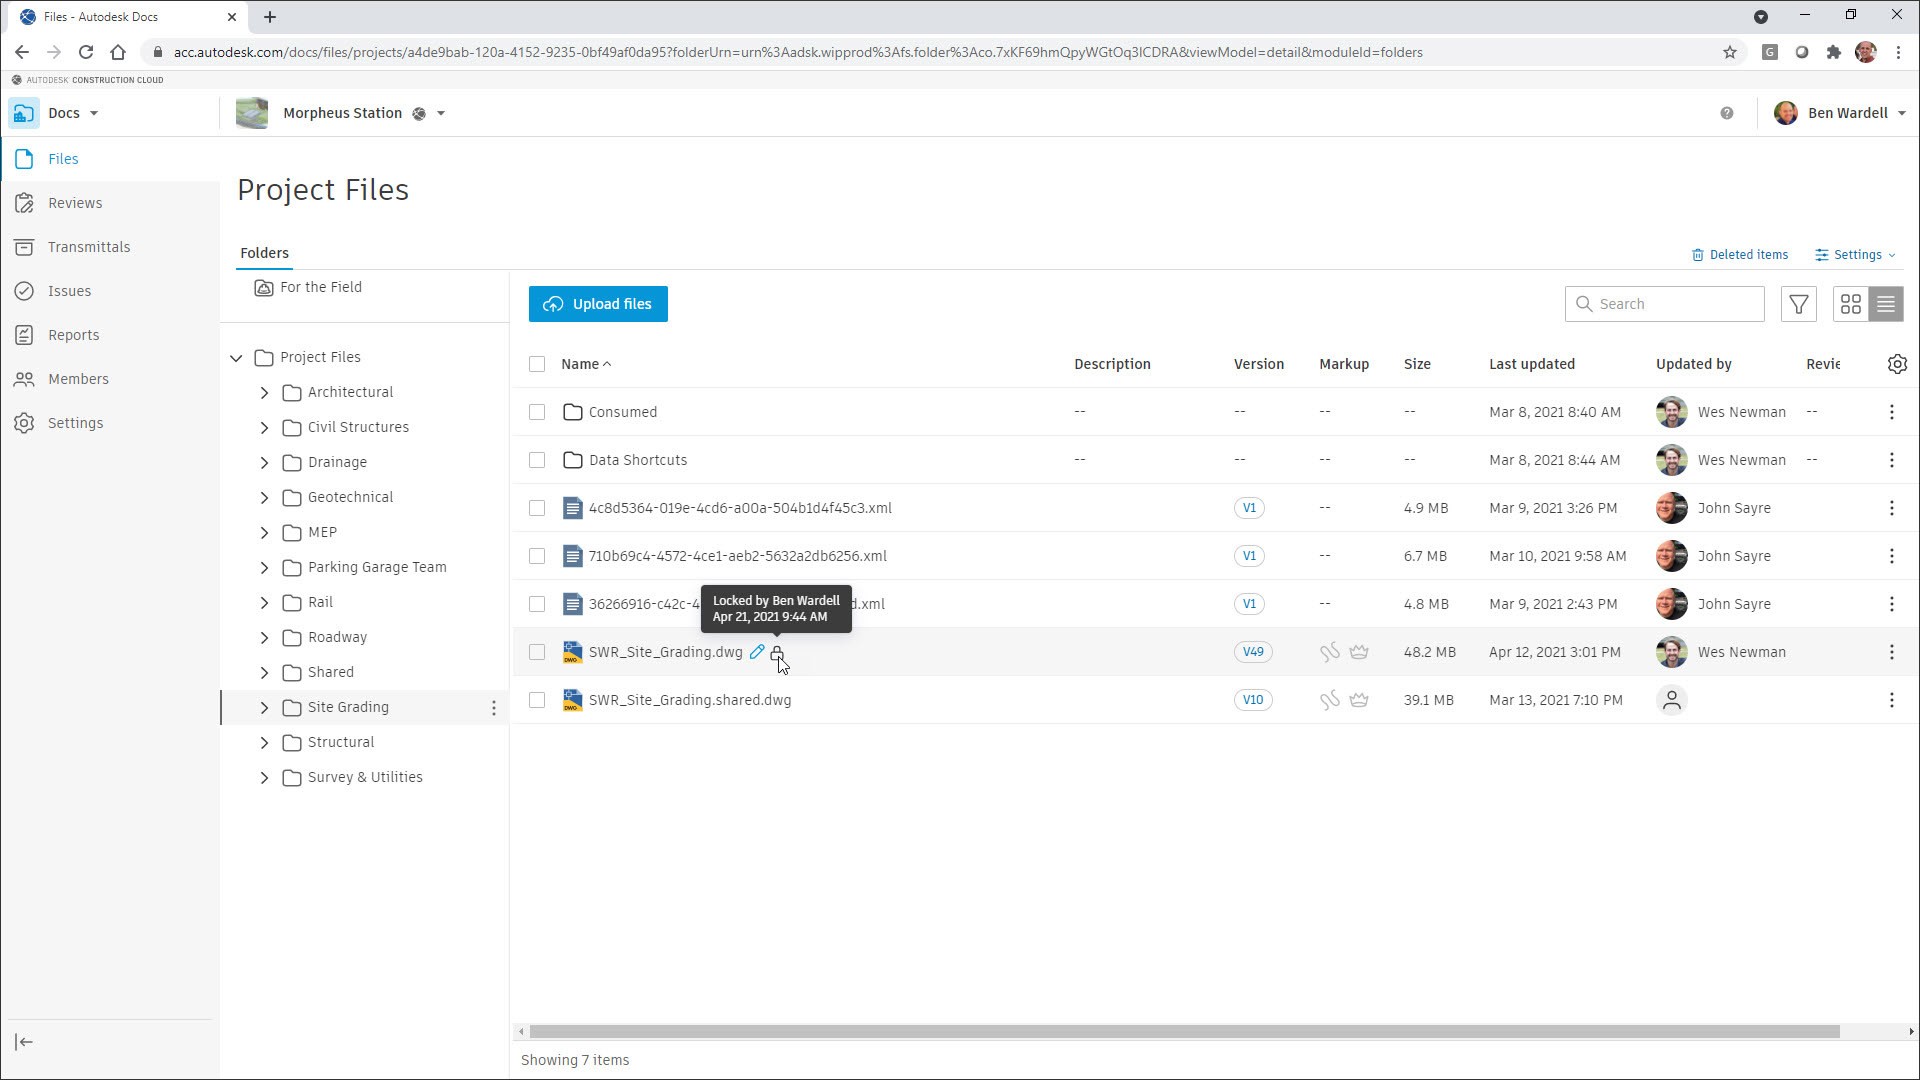
The project files can be seen through a web browser, including meta data such as who has a file locked, version history, and file size.
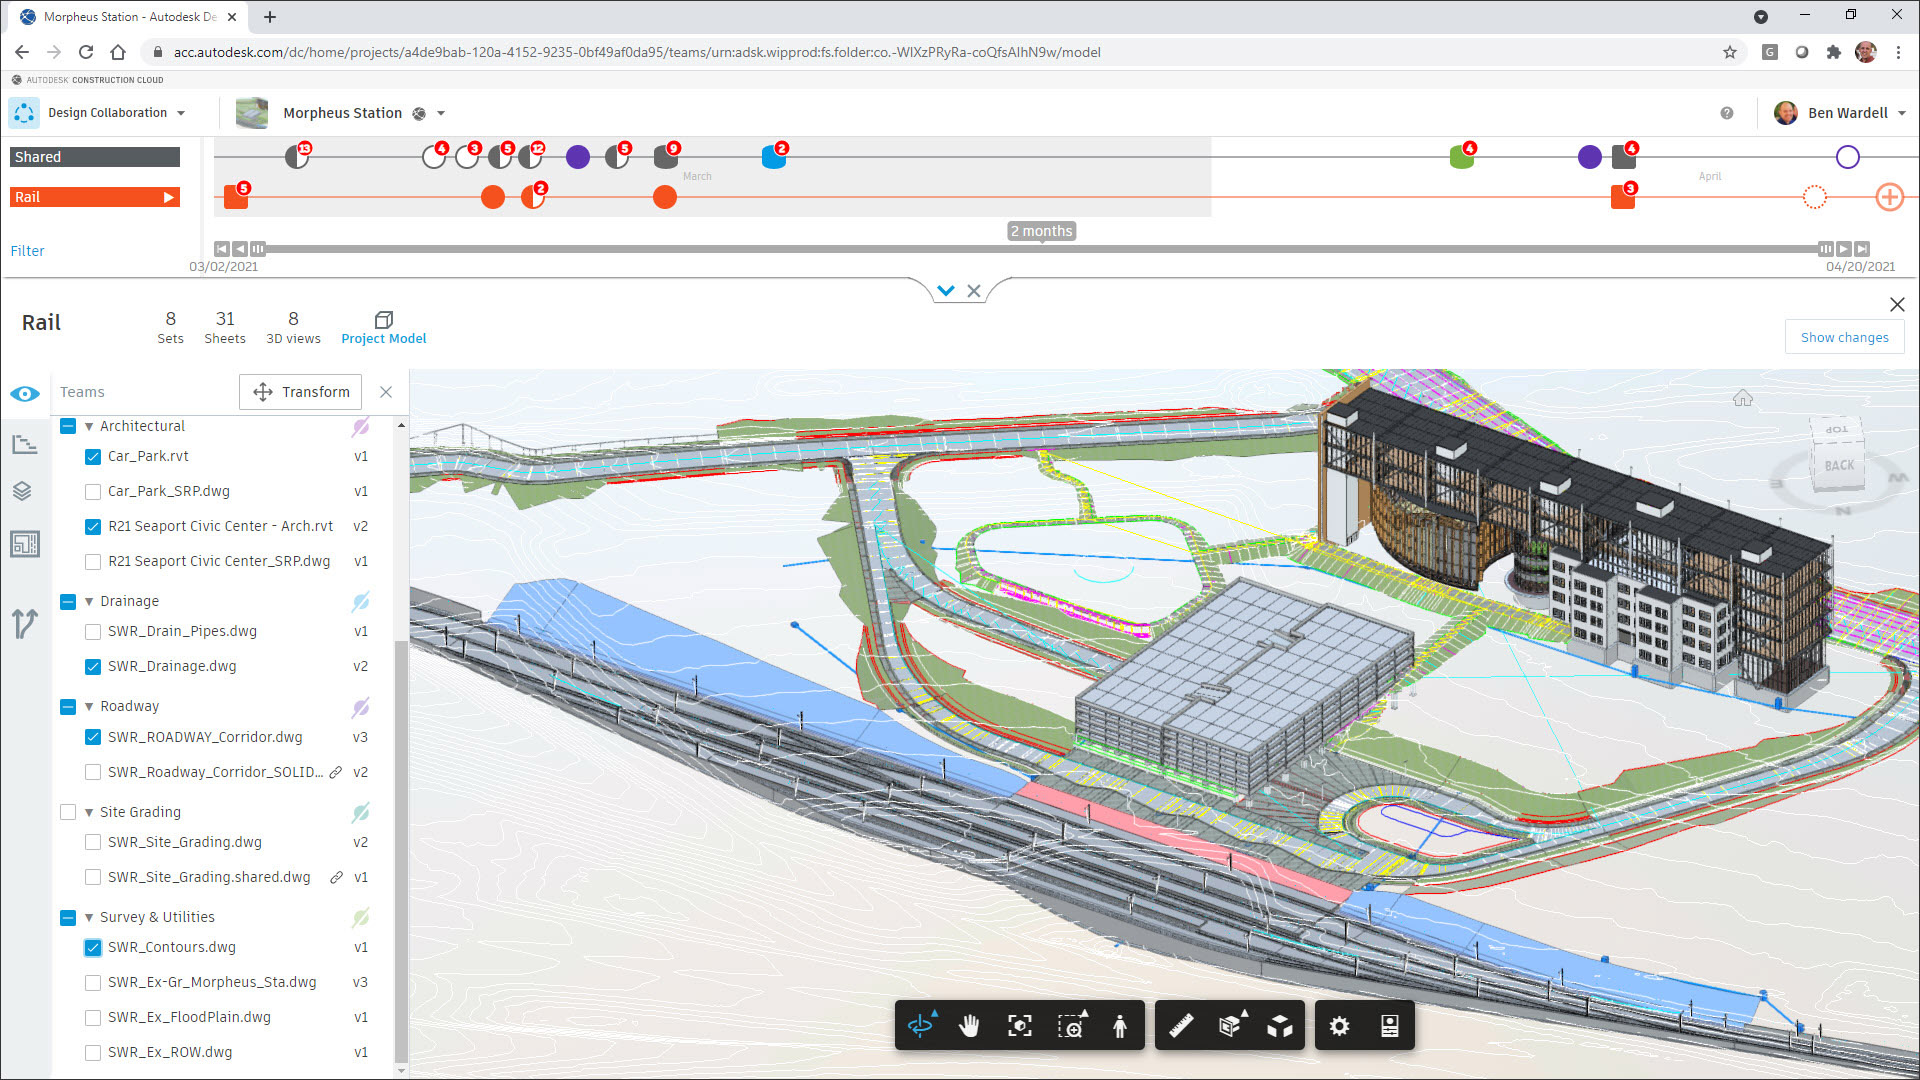
Within the browser, there are interesting opportunities to visualize the data without Civil 3D, Revit, or Infraworks as shown in the following image. Notice the various AutoCAD DWG files and Revit RVT files listed on the left. This example also shows a timeline, illustrating project activity over the past two months.
An exciting newer feature in both Revit and Civil 3D is the ability for Civil 3D to publish a high-fidelity surface to BIM 360 and then link it into Revit. Any time changes are made to the surface in Civil 3D, the surface is simply republished. The Revit model automatically updates the next time the site model is opened.
Within Revit, the linked toposurface has a level of detail not previously possible with the native tools. For example, the linked surface can have perfectly vertical retaining walls and risers on steps. It is also possible to see the curb and gutter profile as well as the crown in a road in the Revit section!
The linked toposurface, within Revit, can also have sub-regions and building pads applied against them. These elements persist even when the Civil 3D surface is updated, as along as those elements still existing within the overall extents of the modified surface.
I first learned about this feature while at a weeklong Revit beta testing event during a visit to Autodesk’s Shanghai, China offices. When this feature went live, I helped implement its use on a nearly $1 billion-dollar new hospital project on a steep complex site. This led to an Autodesk University presentation, called The New Game in Town: Link an AutoCAD Civil 3D Surface in Revit Through BIM 360, with one of the Autodesk developers, Zhengrong Fu. Here are three related blog posts I wrote:
The next set of images show the steps to publish a surface to BIM 360 and view it in the cloud. Later, in the Revit section below, the same surface will be shown linked into Revit.
Here is the Publish command in AutoCAD Civil 3D.
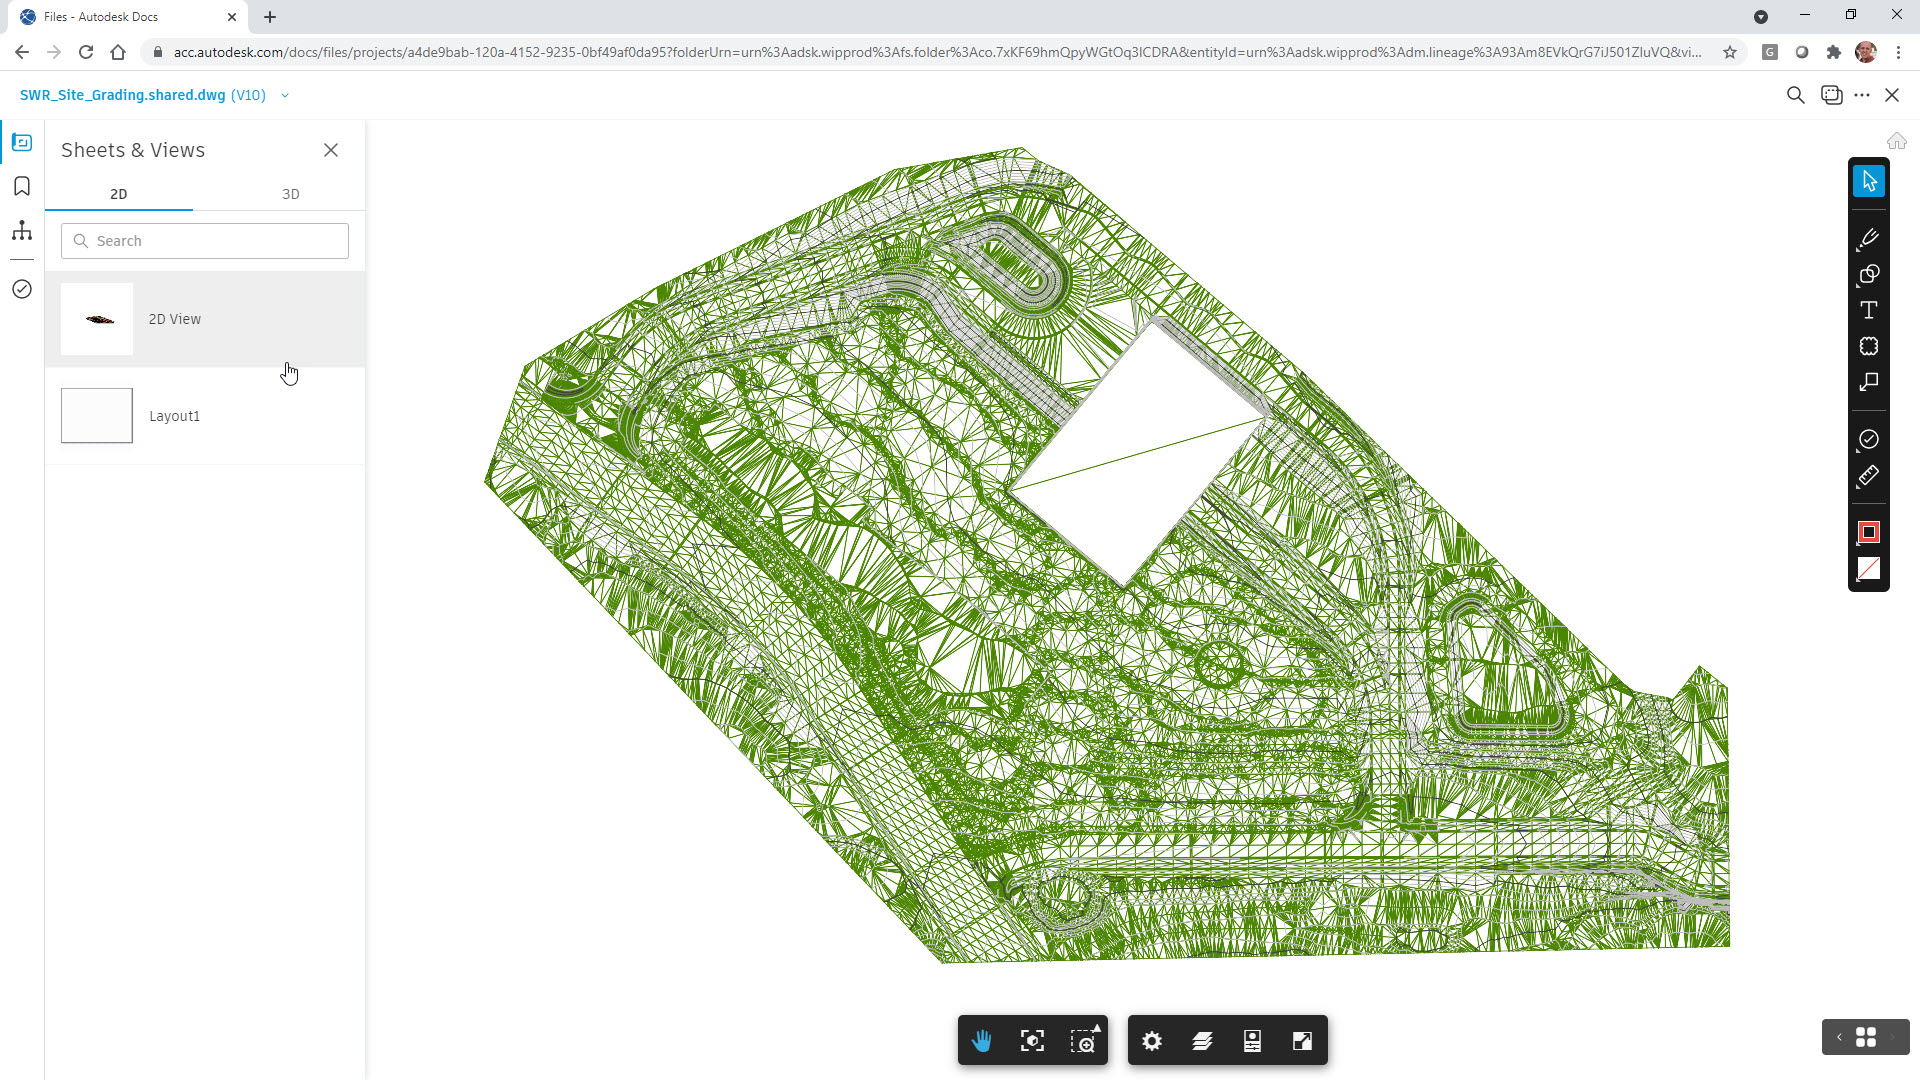
The image below shows viewing a 2D view of the exported, and cloud-processed, surface in BIM 360 without Civil 3D.
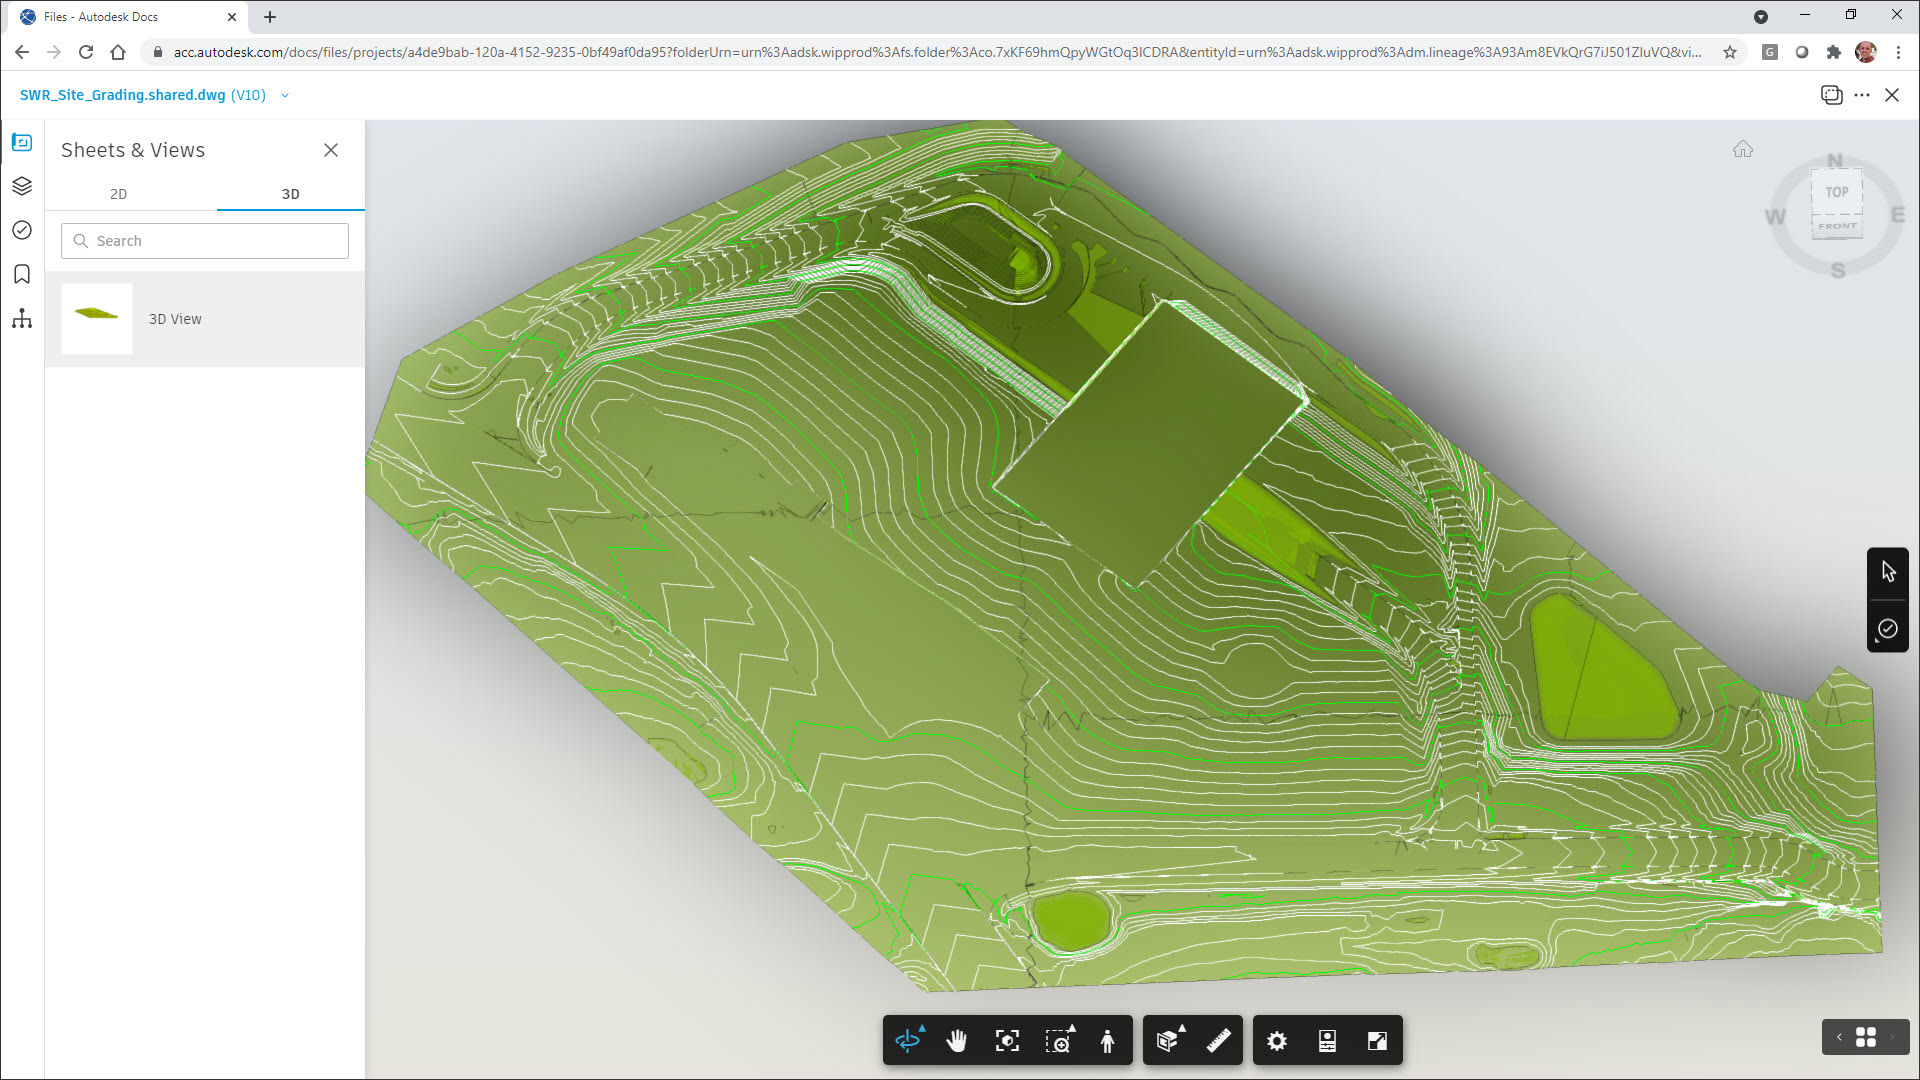
Here is how to view the exported, and cloud-processed, surface in 3D in BIM 360 without Civil 3D.
Whether the linked toposurface method just described is used, or the traditional workflow of linking a Civil CAD file, it is possible (and important) to set up the files to facilitate roundtripping of data between Civil 3D and Revit, and back to Civil 3D.
As already mentioned, Civil 3D files are georeferenced to a real-world coordinate system. This results in the CAD origin aligning with that coordinate system’s benchmark. When this data is brought into Revit, its Shared Coordinate system can acquire those coordinates. Then, when the Revit model is exported to 2D/3D CAD (i.e., DWG file) it is possible to use the shared coordinates. Thus, when that Revit-generated CAD file is inserted/xrefed into Civil 3D, it will be positioned in the correct location, including true north and elevation.
In Revit, this can be helpful for the structural engineer to verify that a brick ledge coordinates properly around the perimeter of the building with the linked toposurface. In Civil 3D, this can be helpful in coordinating the grade at stoops and other access points.
I have a series of blog posts on this as well as a YouTube video demonstrating the entire process. If interested in learning more, start with this post: Revit Shared Coordinates - Civil CAD to Revit and Back.
Autodesk Infraworks is a conceptual design tool geared towards civil site, bridge, and road design. It is meant to be used before AutoCAD Civil 3D and Revit. However, once the design has progressed, some of the preliminary design data can be brought forward into Civil 3D and/or Revit.
The bridge and rail design process is particularly interesting in Infraworks as it has a path to Revit for final design and documentation. The next two images briefly highlight the possibilities.
The image below shows a bridge, for rail in this case, developed in context within Infraworks.
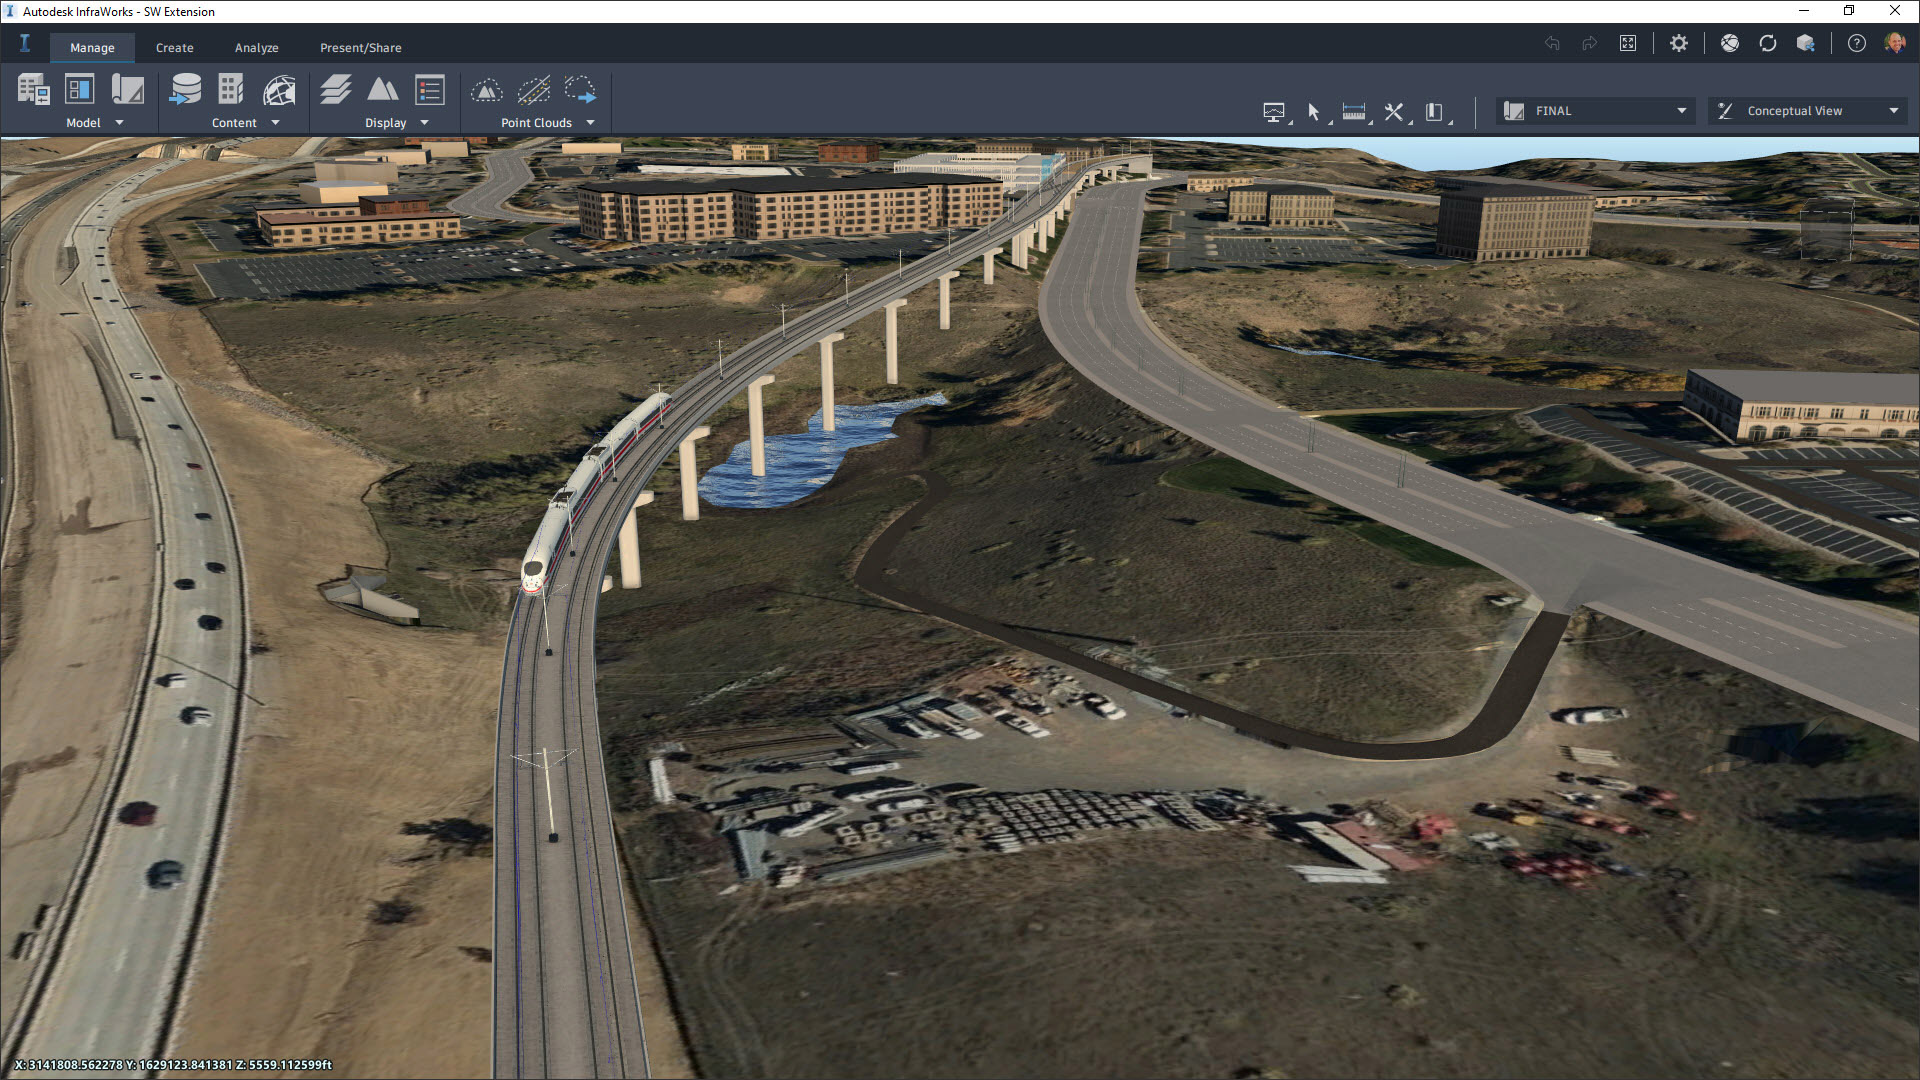
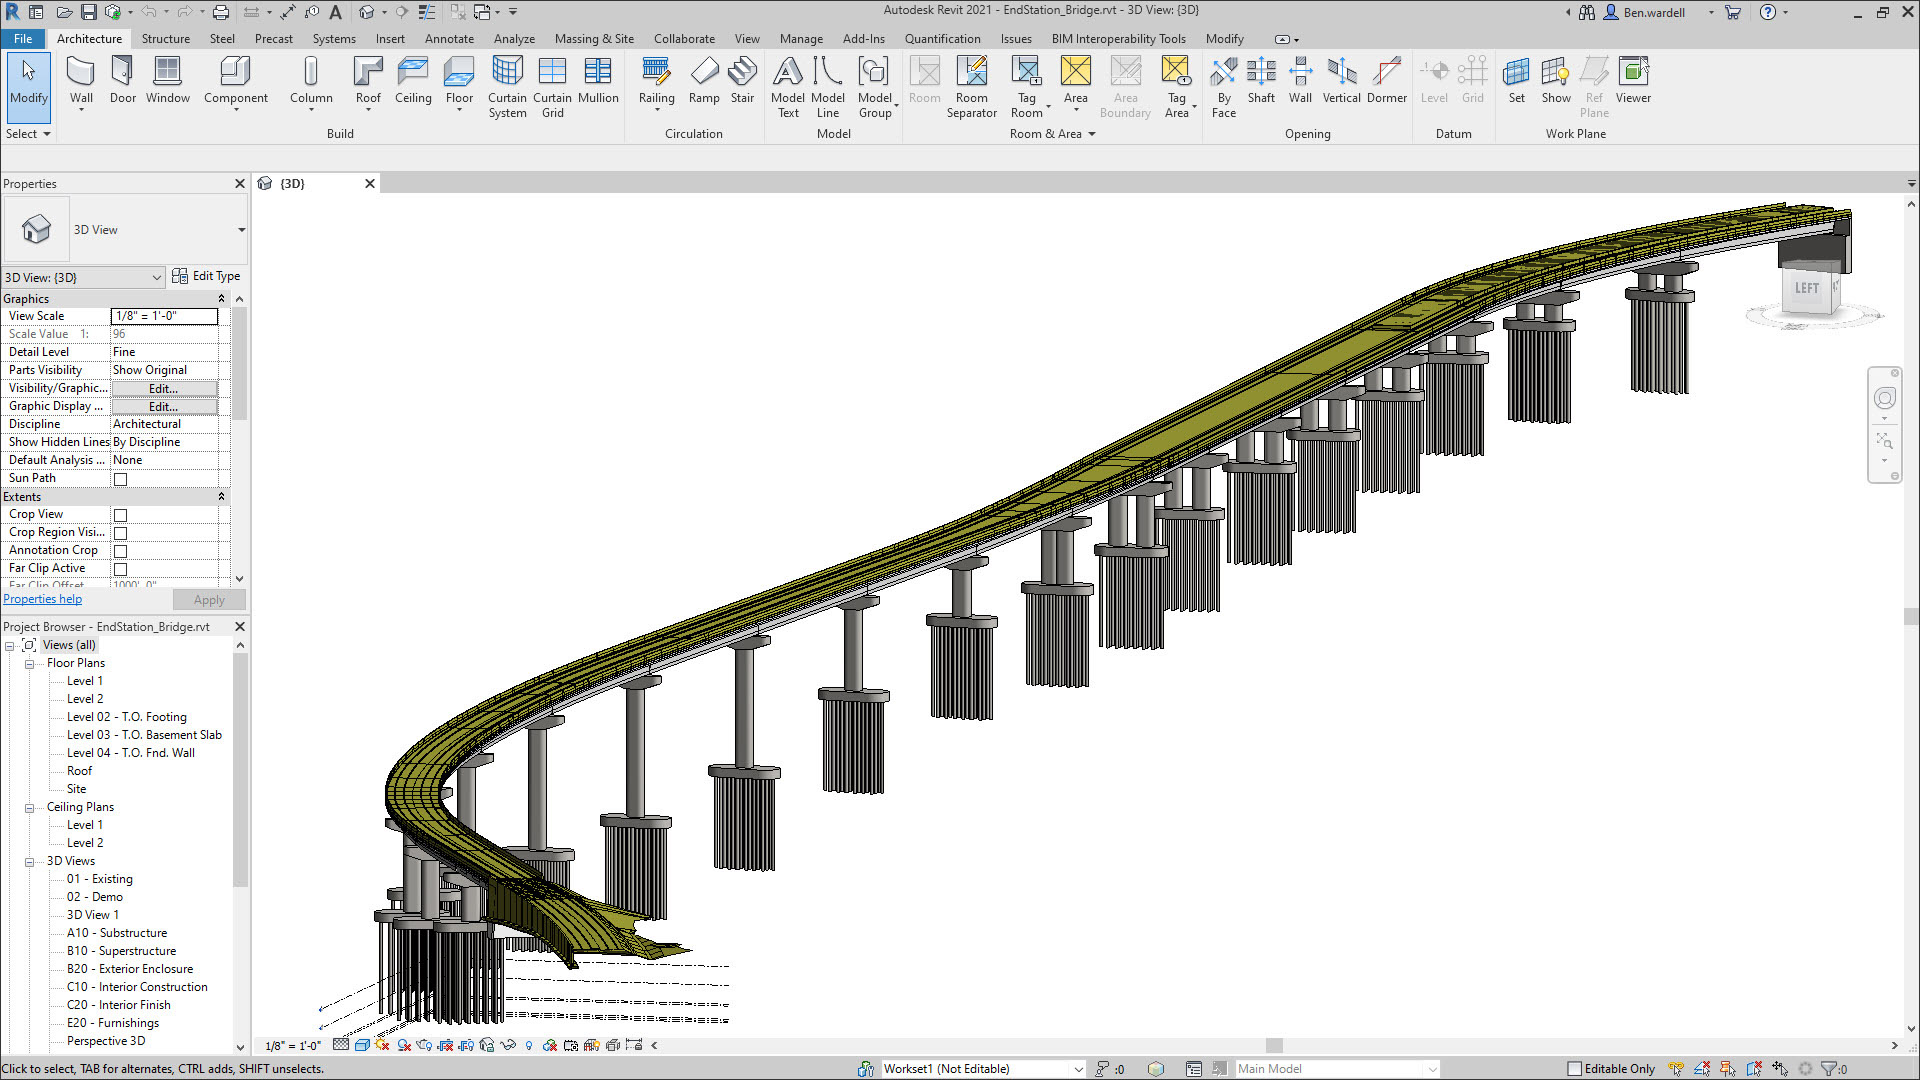
As the design formalizes, this same geometry is now transferred to Revit where additional details can be developed and parametric rebar applied.
An interesting opportunity for architects exists in that Infraworks can be used to grab preliminary topography for use in Revit. Note that if you have even one seat of the Autodesk AEC Collections, you have access to Infraworks.
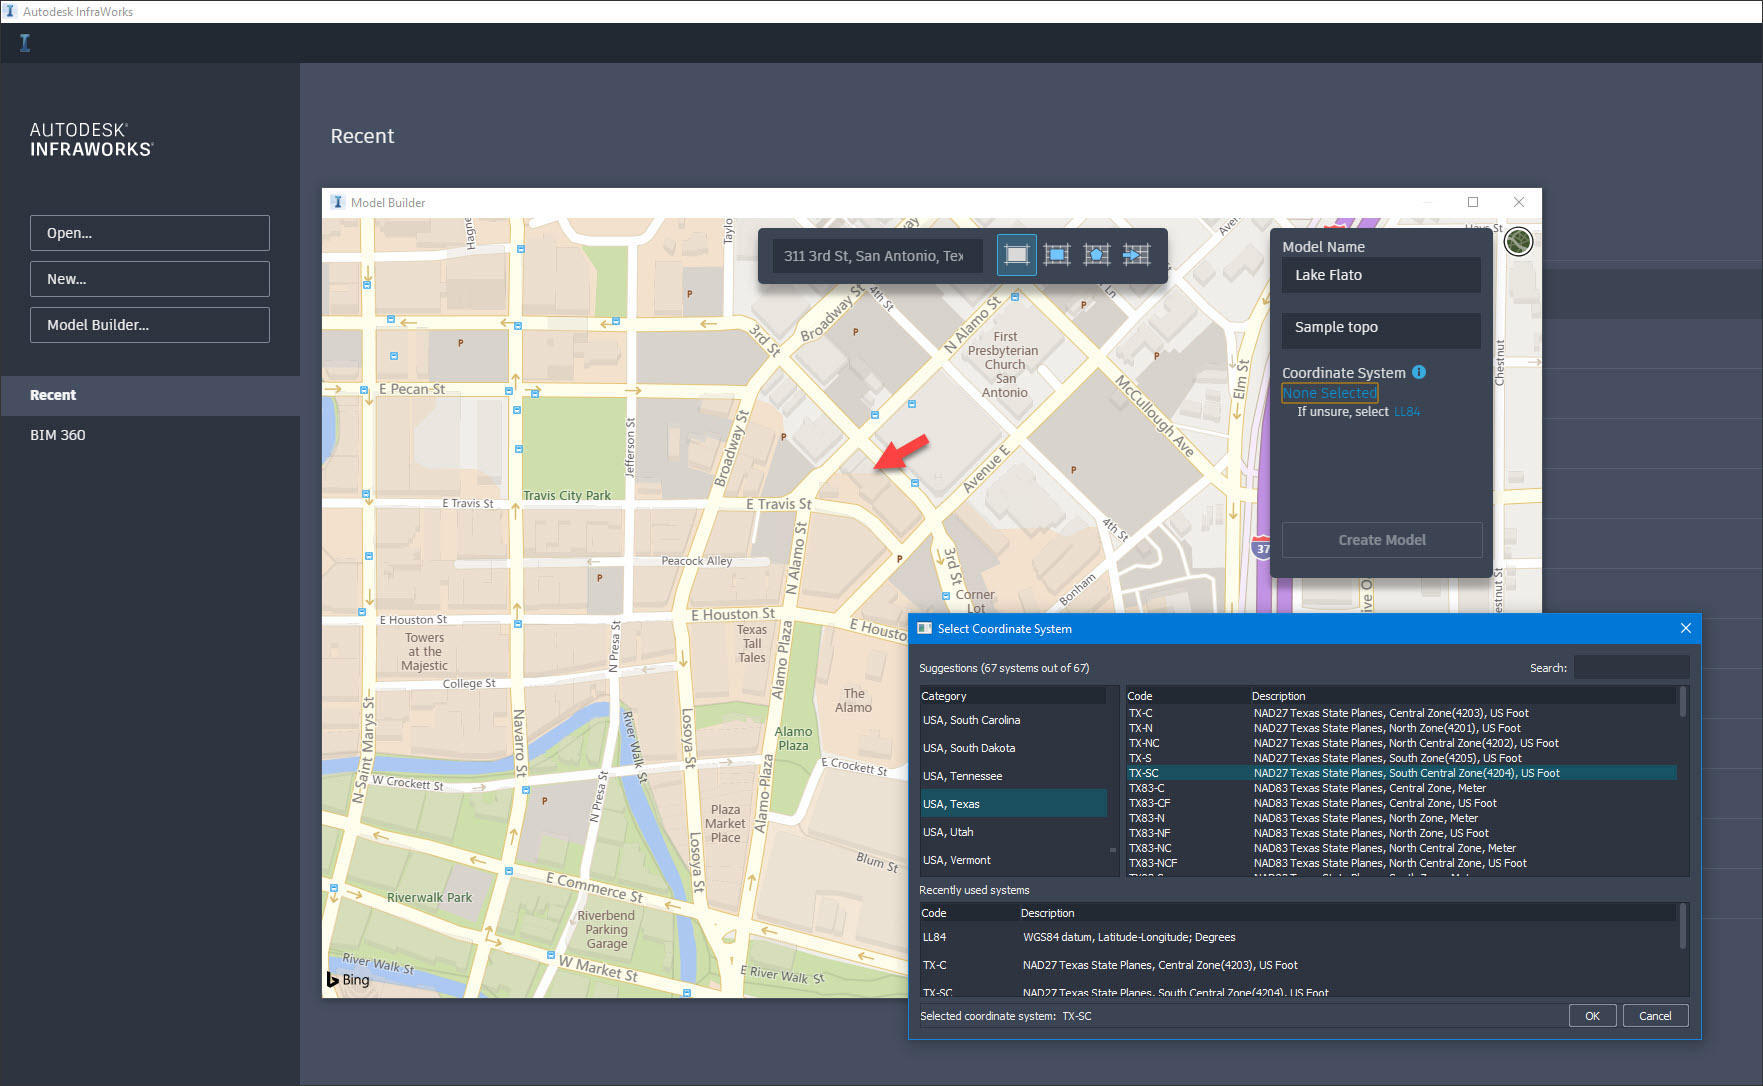
The image below shows how I was able to use the Model Builder tool within Infraworks to create a 3D model around our San Antonio, Texas office. The tool employs various opensource datasets. You start by simply selecting an area in a 2D map view.
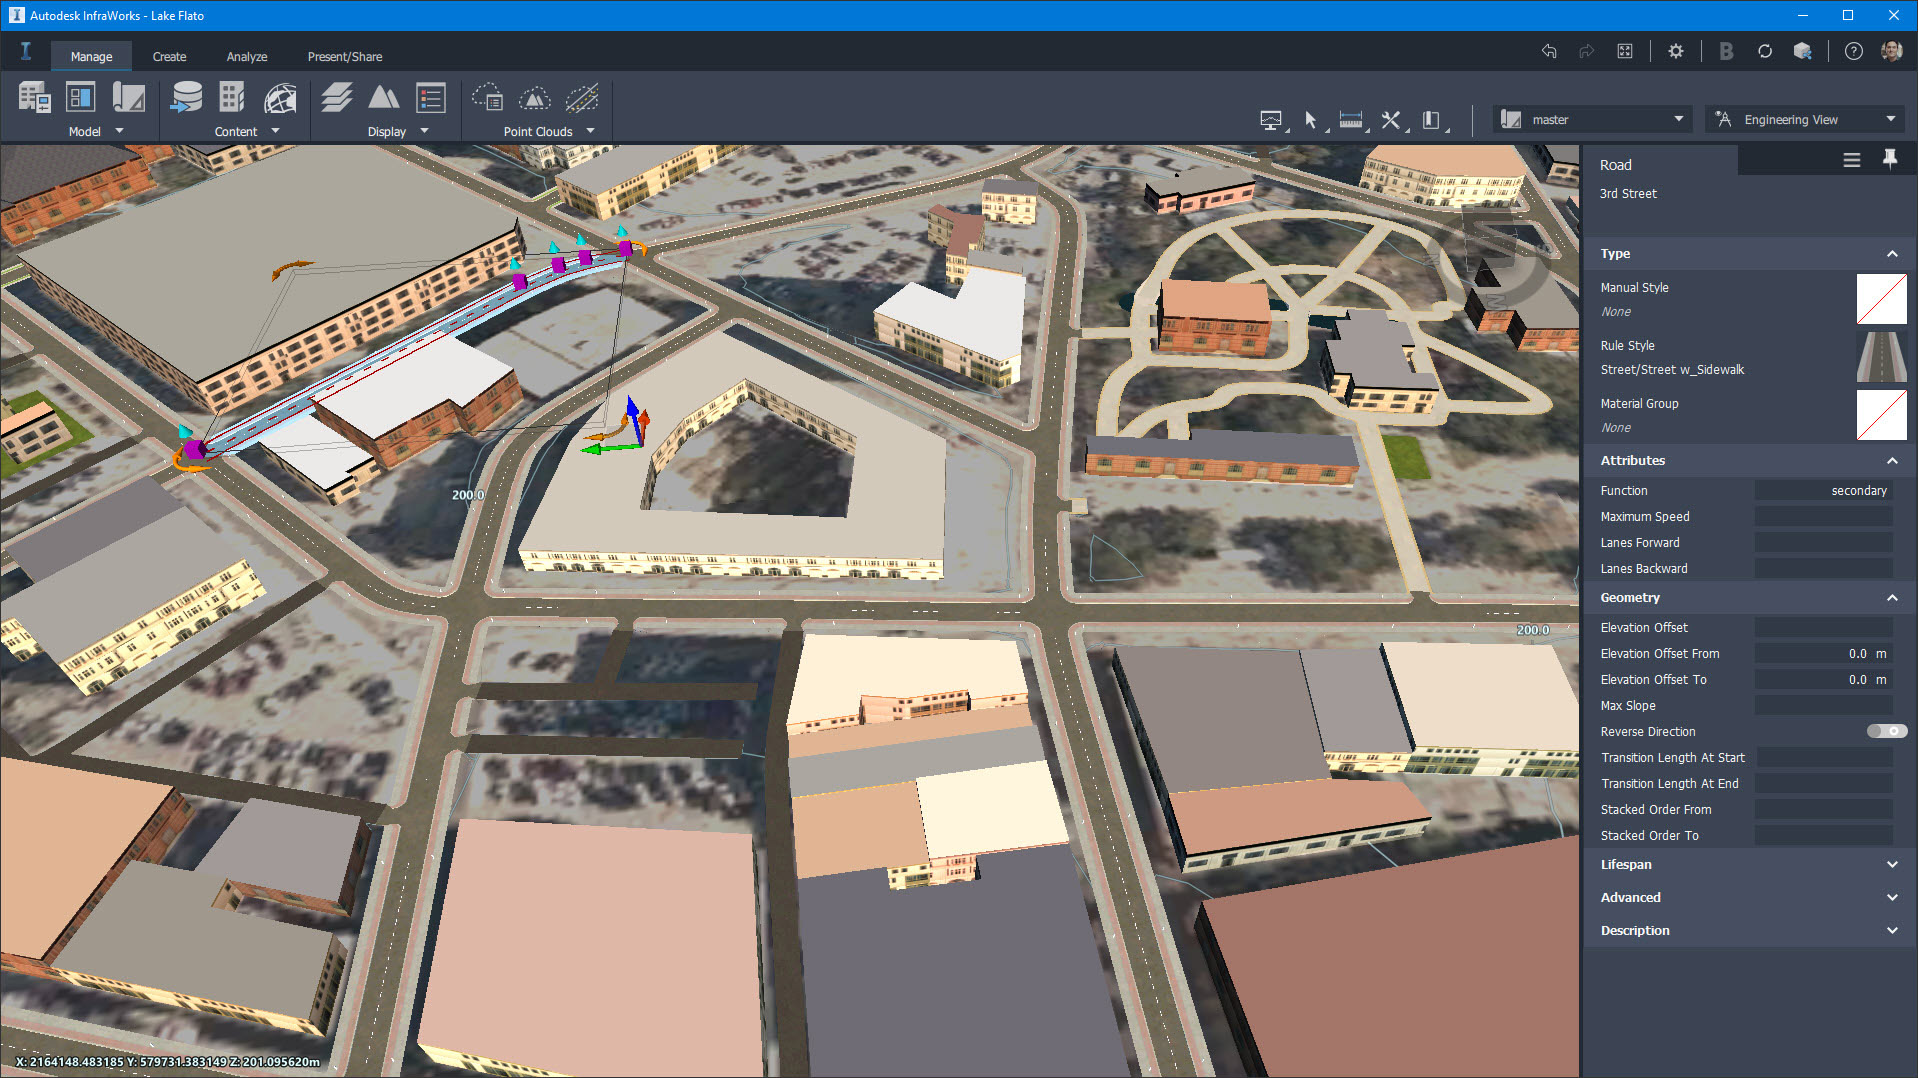
The buildings are derived from GIS data and generic textures are added to the facades. The roads have the correct street names applied and the grade is accurate (at least for preliminary design work). Notice, in the image below, I have selected 3rd street, and this information is seen in the Properties dialog on the right.
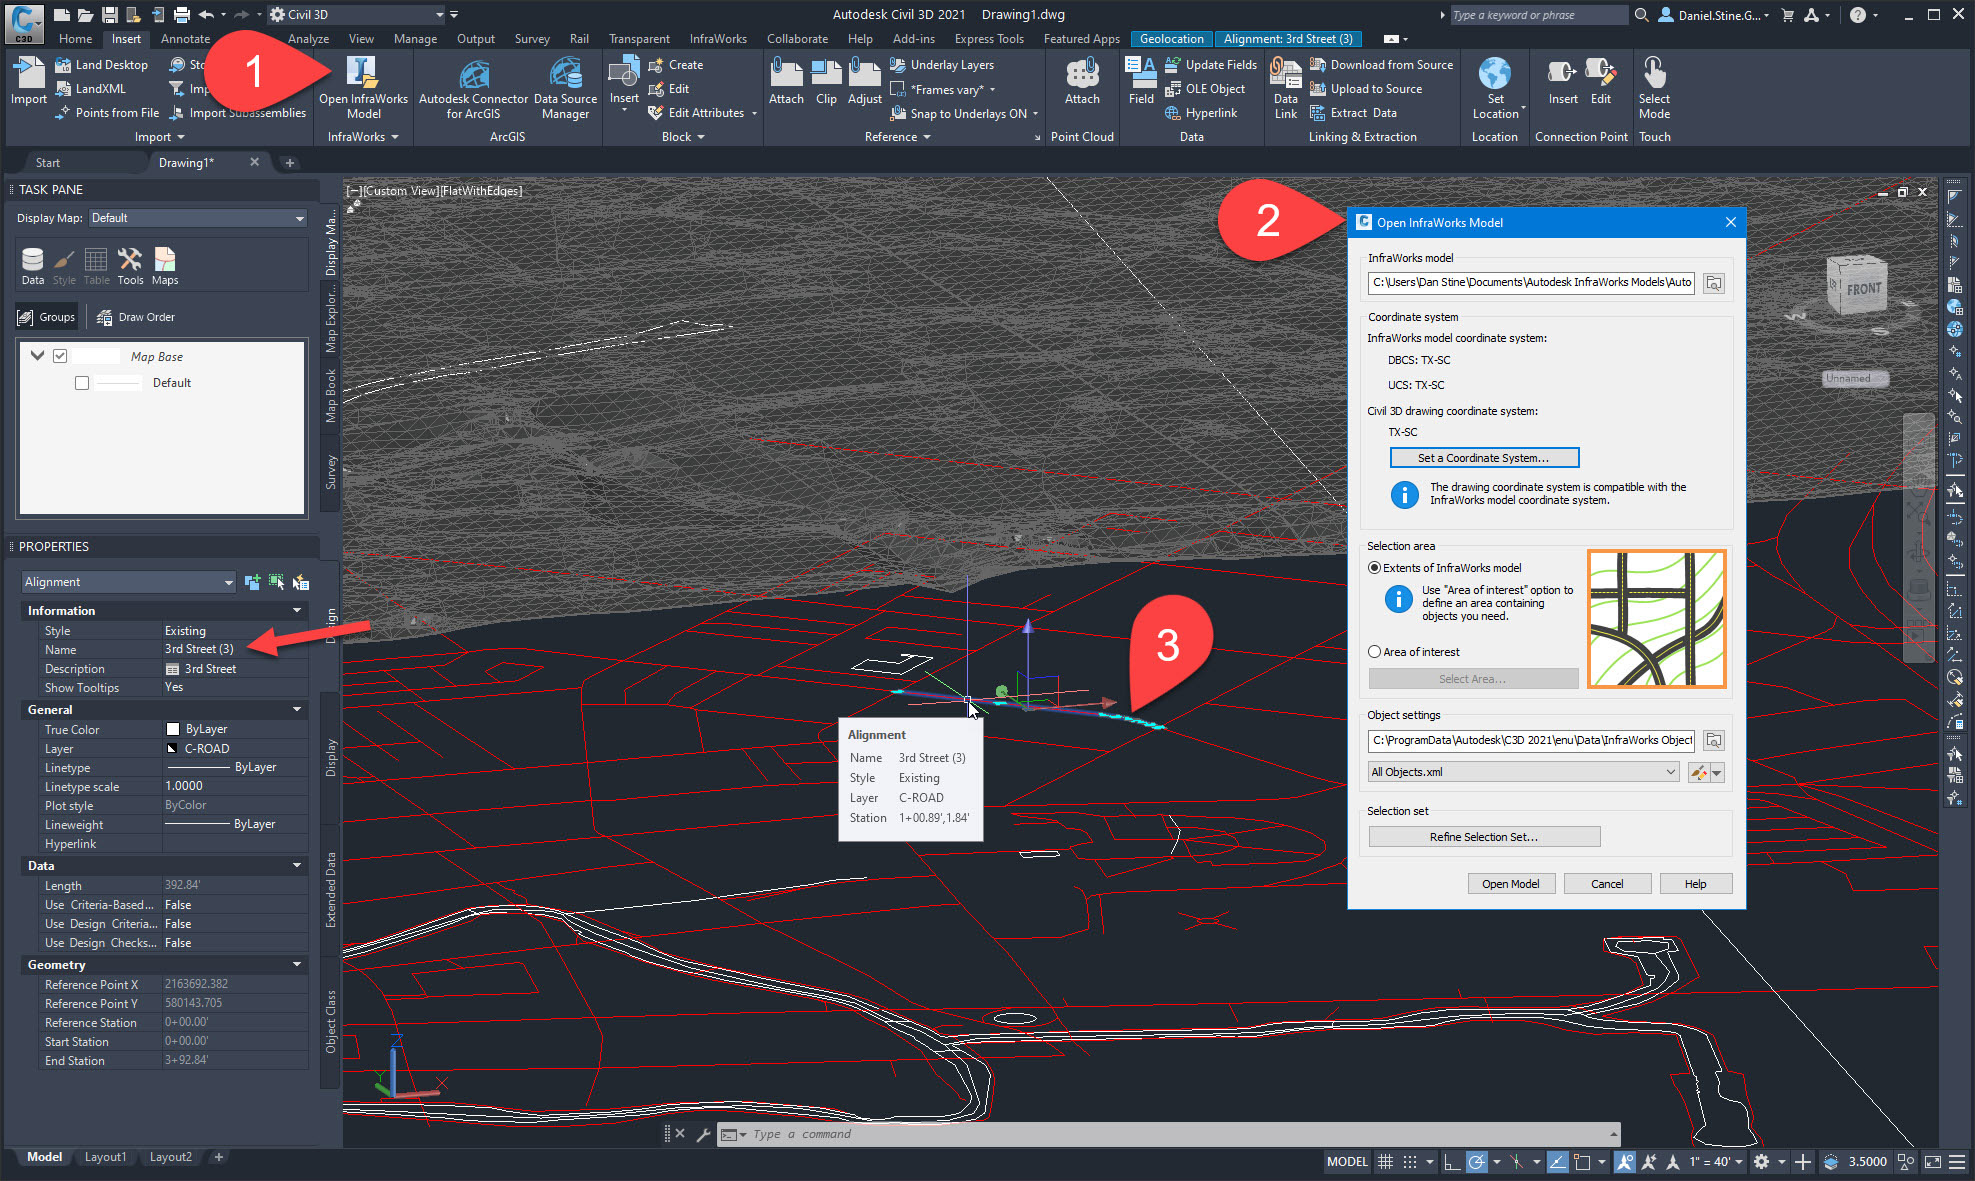
Civil 3D can directly open Infraworks projects and import surfaces, alignments, ands more. Notice the alignment for 3rd street is selected, and the tooltip reports this information (as does Properties).
Of course, now this same triangulated surface may be linked into Revit and a toposurface can be created based on that link. Or, the surface can be published per the newer feature previously mentioned in this article.
Many architects are using Autodesk Revit to design and document projects. Let’s take a look at two opportunities within Revit to work with site data. One is the conclusion of the published Civil 3D surface already mentioned, and the other is a new set of tools in the works by a 3rd party developer. Both can be big game changers for those looking to work in the context of high-fidelity site data.
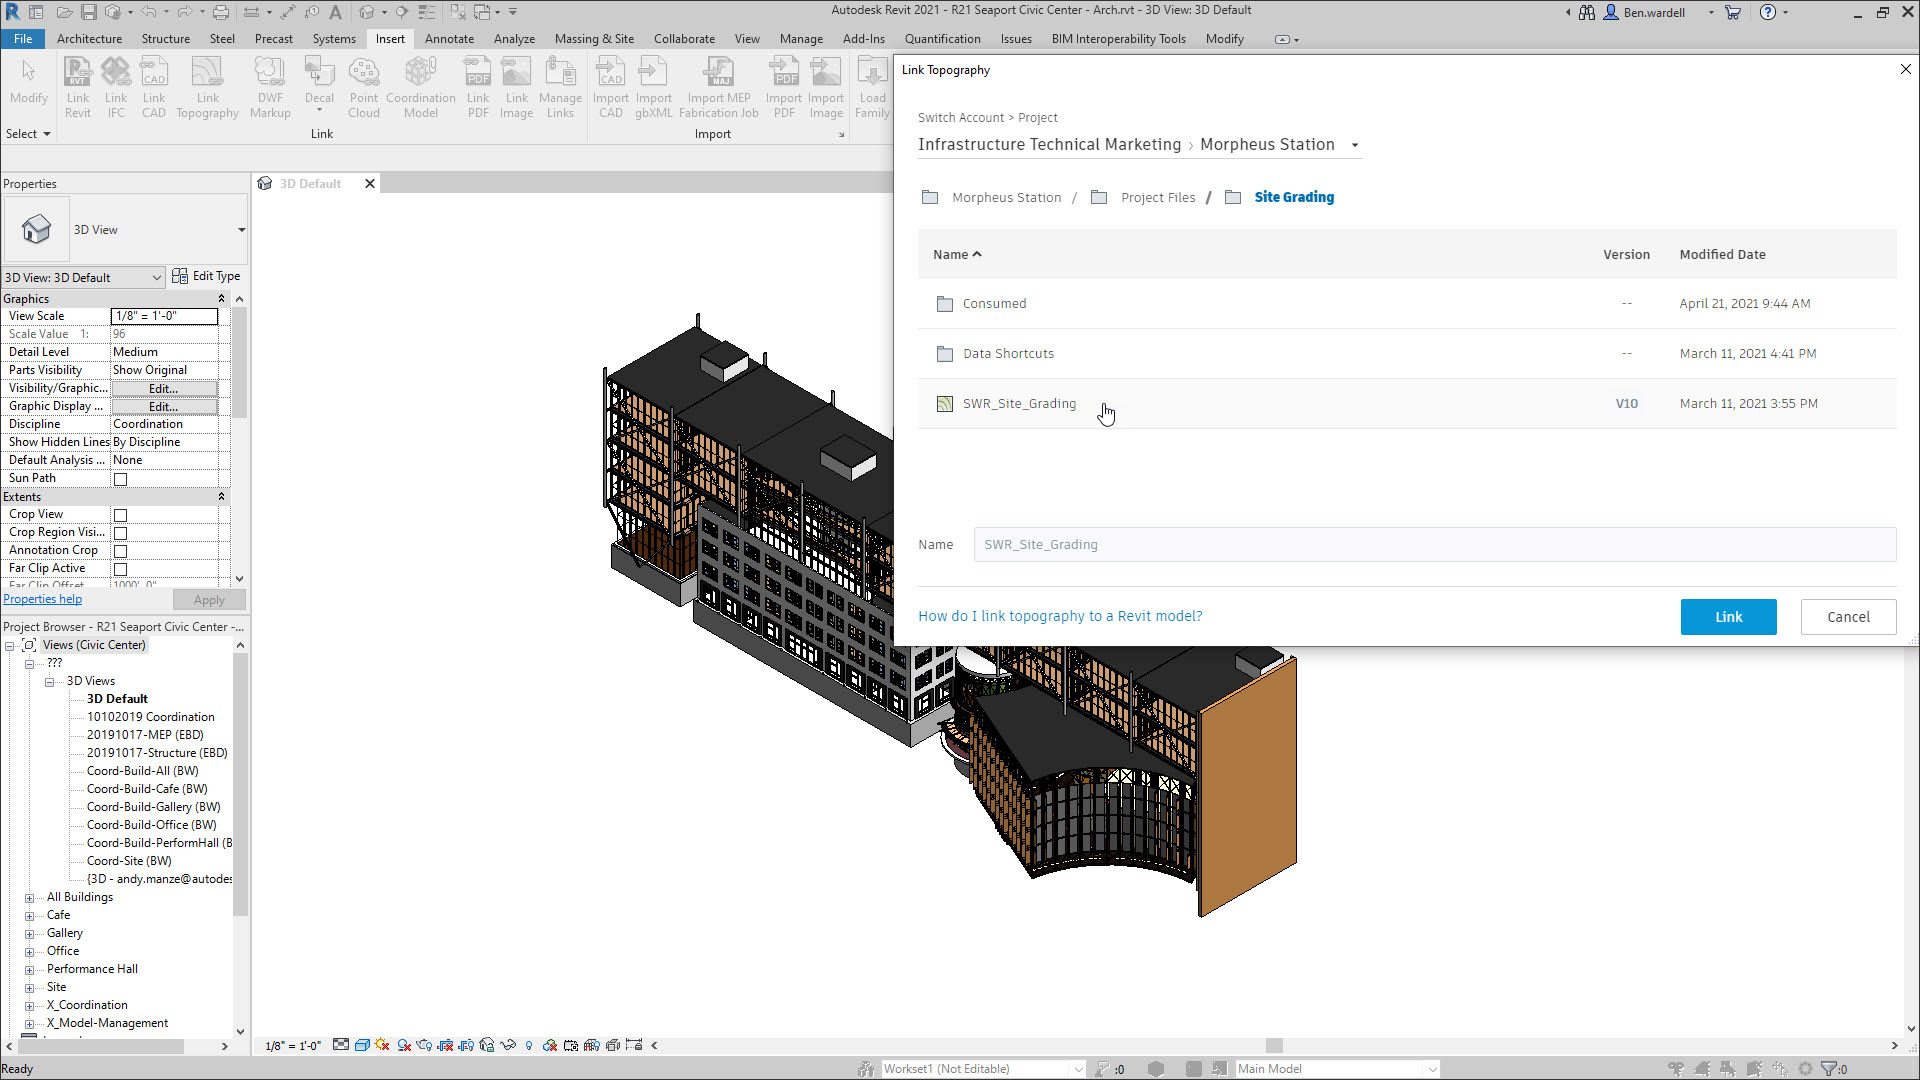
Within Revit, there is a command called Link Toposurface, which is used to initiate a link to a previously published surface from Civil 3D.

The Link Topography dialog, shown below, allows you to browse the BIM 360 Collaborate Pro project for a published surface.
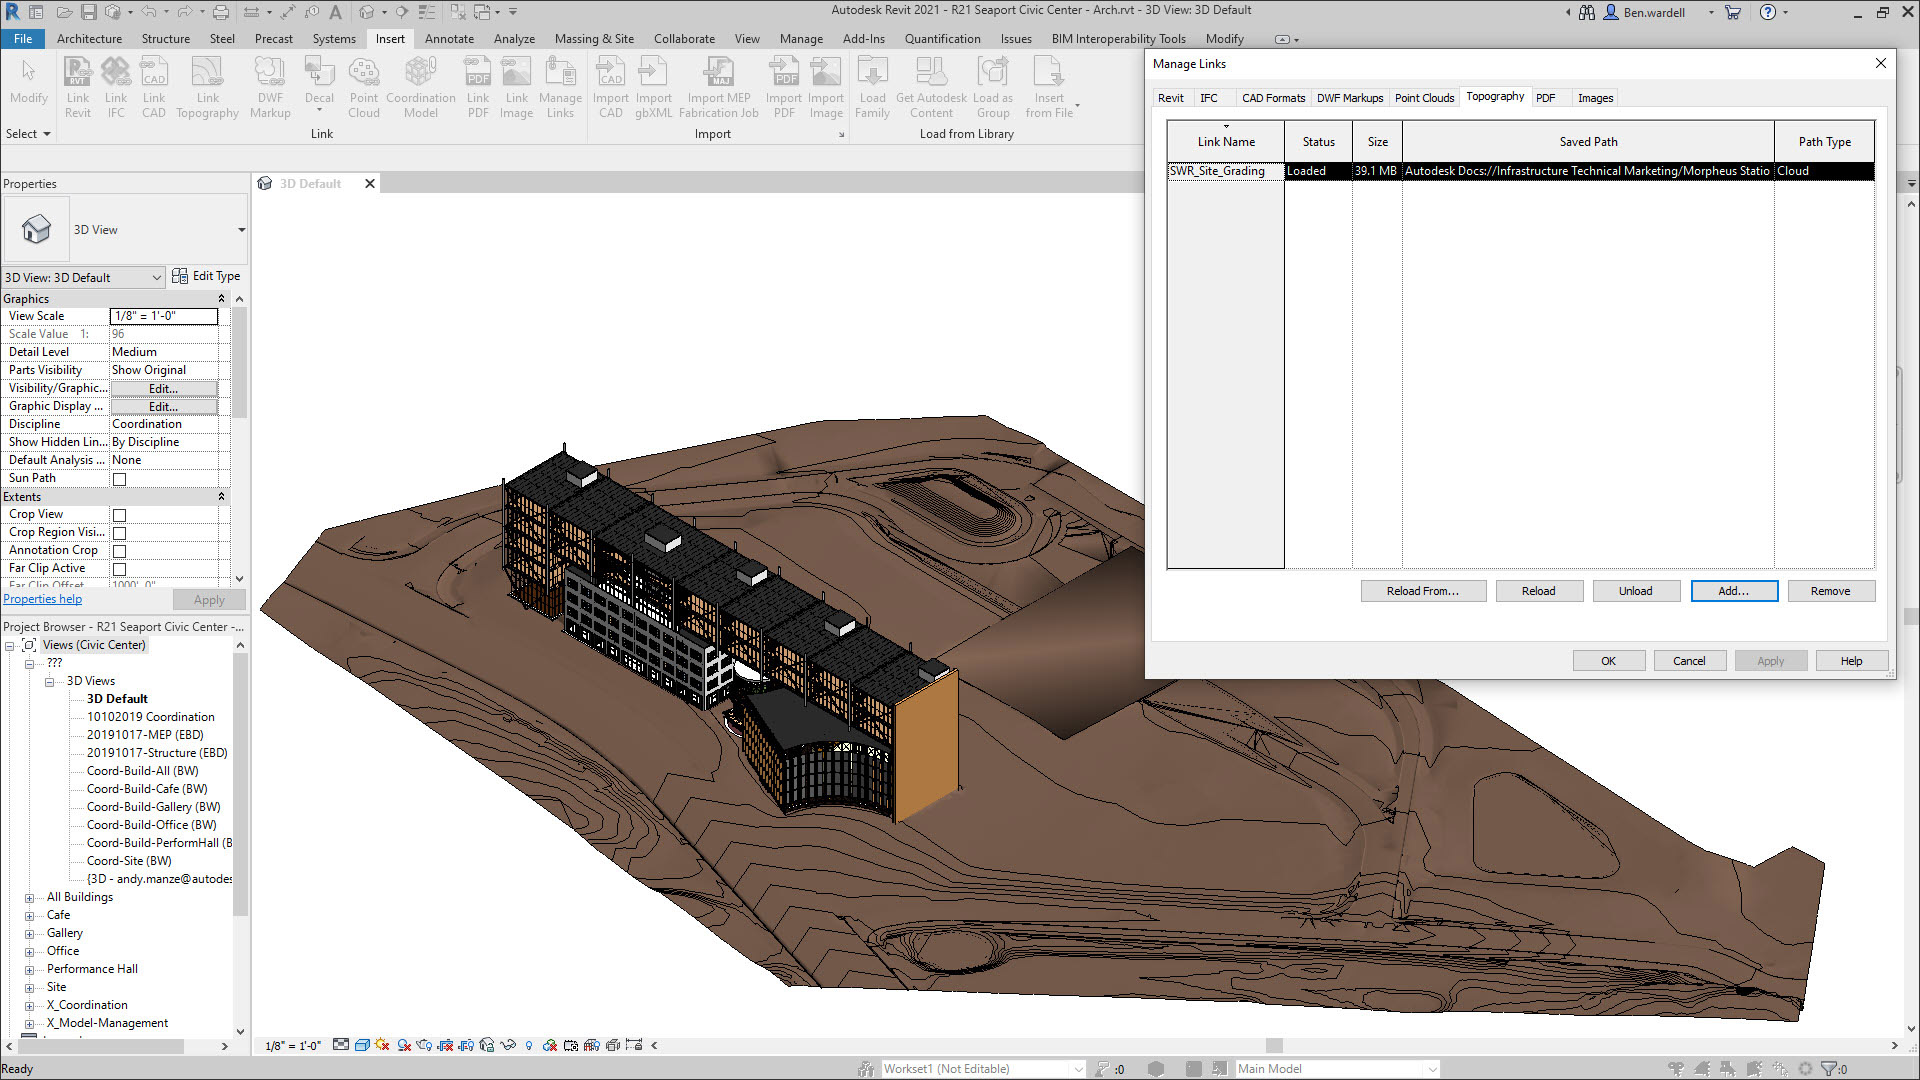
Once linked, the toposurface can be managed from within the Manage Links dialog as shown here. Note that this link will automatically reload anytime the Revit model is opened, just like any other link in Revit.
The FOREground application is a new Revit add-in (see the toolbar below) to assist with site and landscape modeling and documentation directly within Revit. It has several different toolsets: Topography, Slab Editing, Quick Pick, Planting, and Annotations. In general, the goal of these tools is to automate workflows that landscape architects already utilize in Revit but can often be slow and cumbersome. This add-in is being developed by ParallaxTeam, which includes John Pierson and Lauren Schmidt.

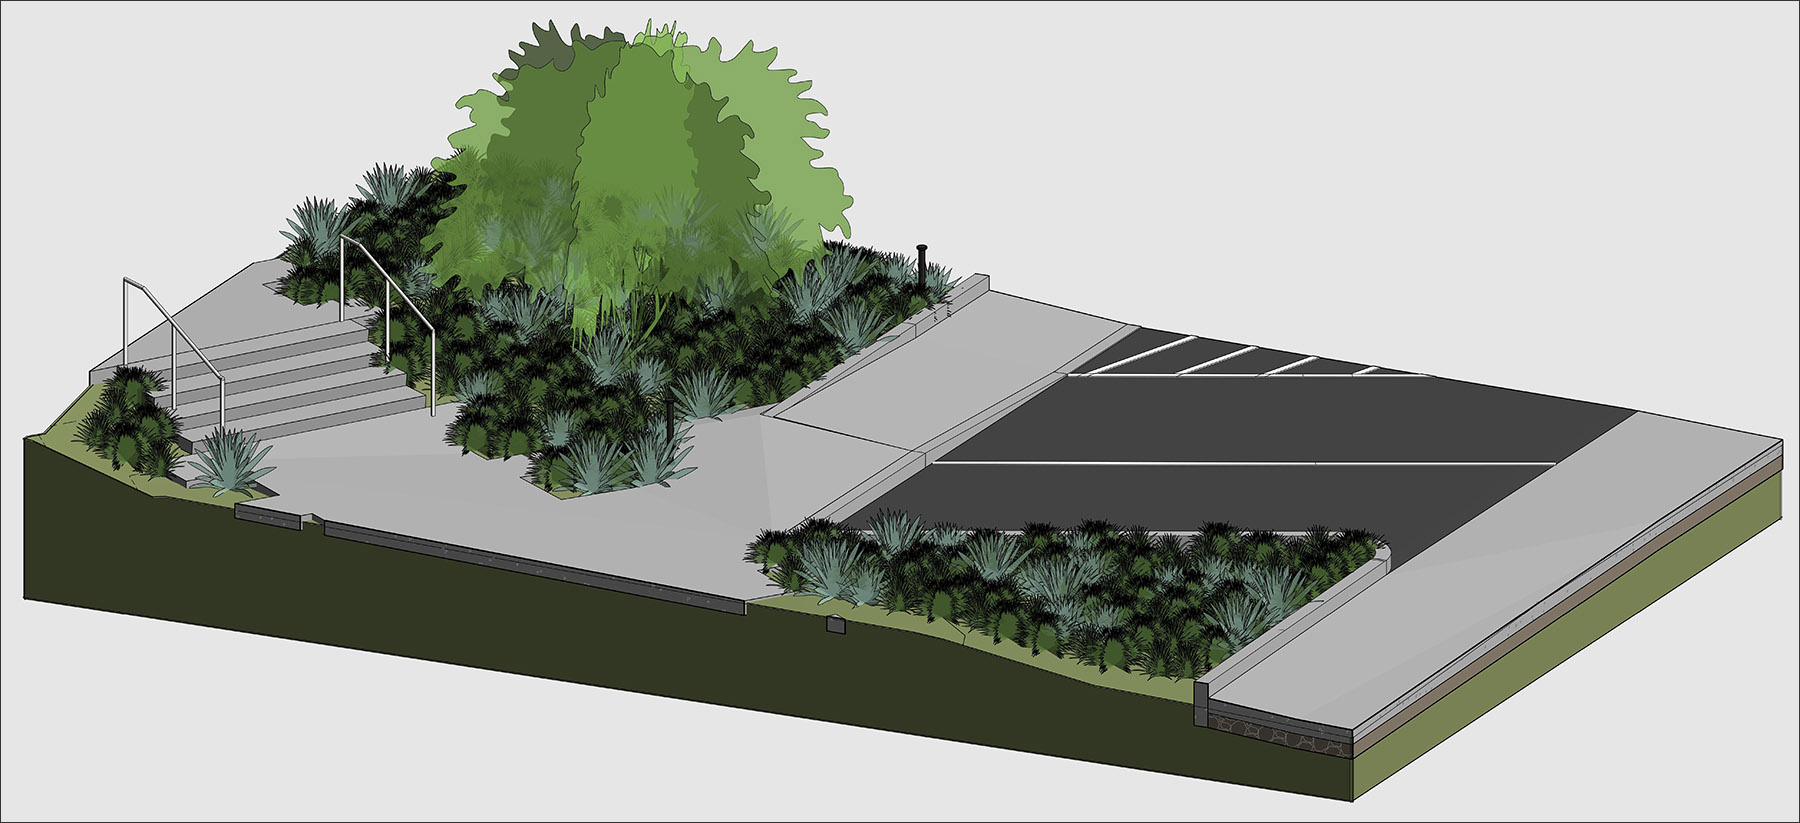
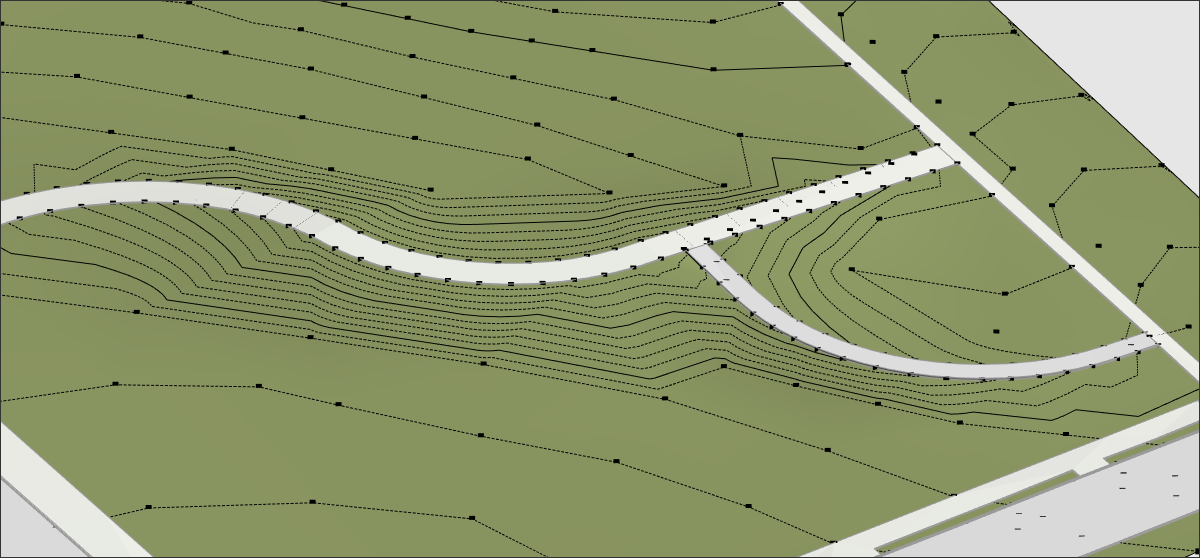
To give you an idea of what is possible, below is an image from a landscape model that was constructed using an early version of FOREground.
The toolset is fairly extensive and will eventually have over 20+ different tools. Here is a quick look at some of the more powerful tools in action:
Drape Slab
Drape Slab is the foundational tool in this toolset, especially when you already have a topography, either from a survey or a civil engineer. There are several options for exterior points and interior points, depending on the situation. And you can offset the slab so that it sits above the surface (or you can uncheck that option and it will be flush).
Shape Topo
Most of the grading tools focus on slab editing, but there are a few topography tools to help on sites or landscapes that need to utilize topography. Shape Topo aligns topography to the bottom of a slab. You can specify the frequency of the points that are placed.
Quick Curb
The Quick Curb tool is perhaps one of the most exciting tools in the toolset. It is quite simple; it allows you to quickly generate curbs by picking edges of a slab. The curbs are technically railings; however, using railings as curbs has several key benefits. First and most importantly, they work on curved slopes and they will also update when the slab points change.
Quick Curb has an option that allows you to pick the entire segment length of a slab, which can greatly reduce the amount of time you need to spend picking edges.
Align Edges
Another relatively simple tool is Align Edges, which automates the tedious task of aligning slabs that already share edges. You can pick multiple adjacent slabs to align edges.
Grade Edges
A big part of grading in Revit is being able to specify slopes along slabs. The Grade Edges tool gives you the ability to either input an elevation change (z-delta) or specify the slope.
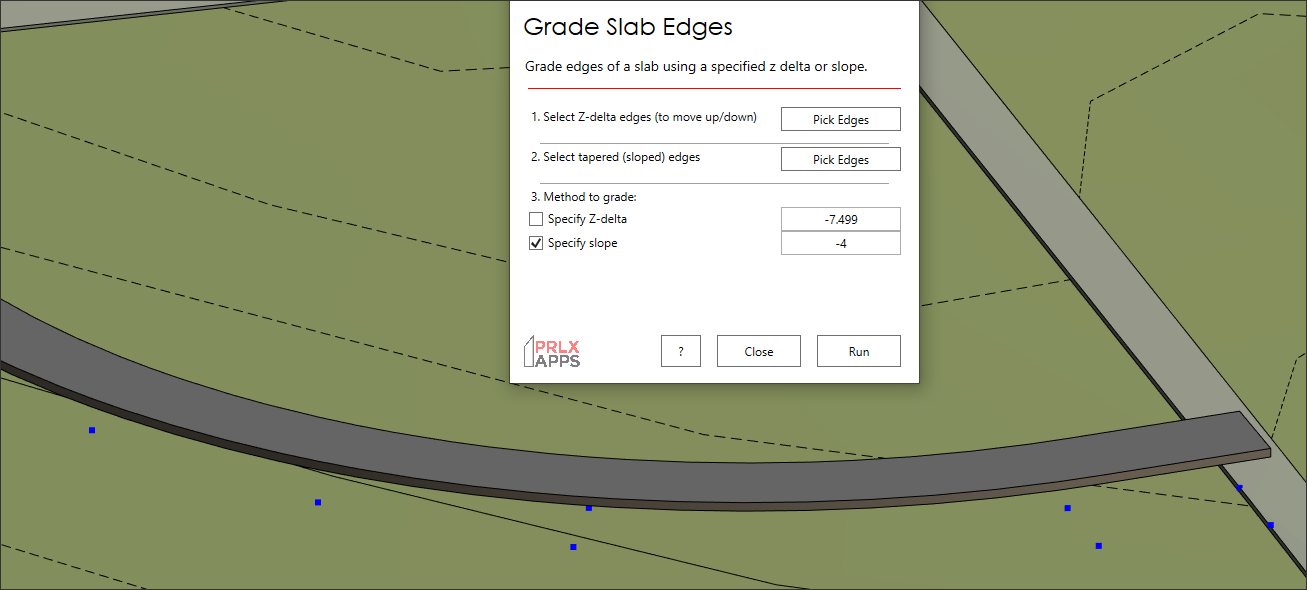
There are two different edge selection types: z-delta edges, which will move up and down together, and the taper edges, which is where the slope will be applied.
Quick Stair
Similar to the Quick Curb, Quick Stair generates a stair by picking an edge. Since stairs are a bit more complex, there are a few more options than a simple type-dropdown. Like many of the tools, a preview is drawn of the stair, so that you can see what it will look like.
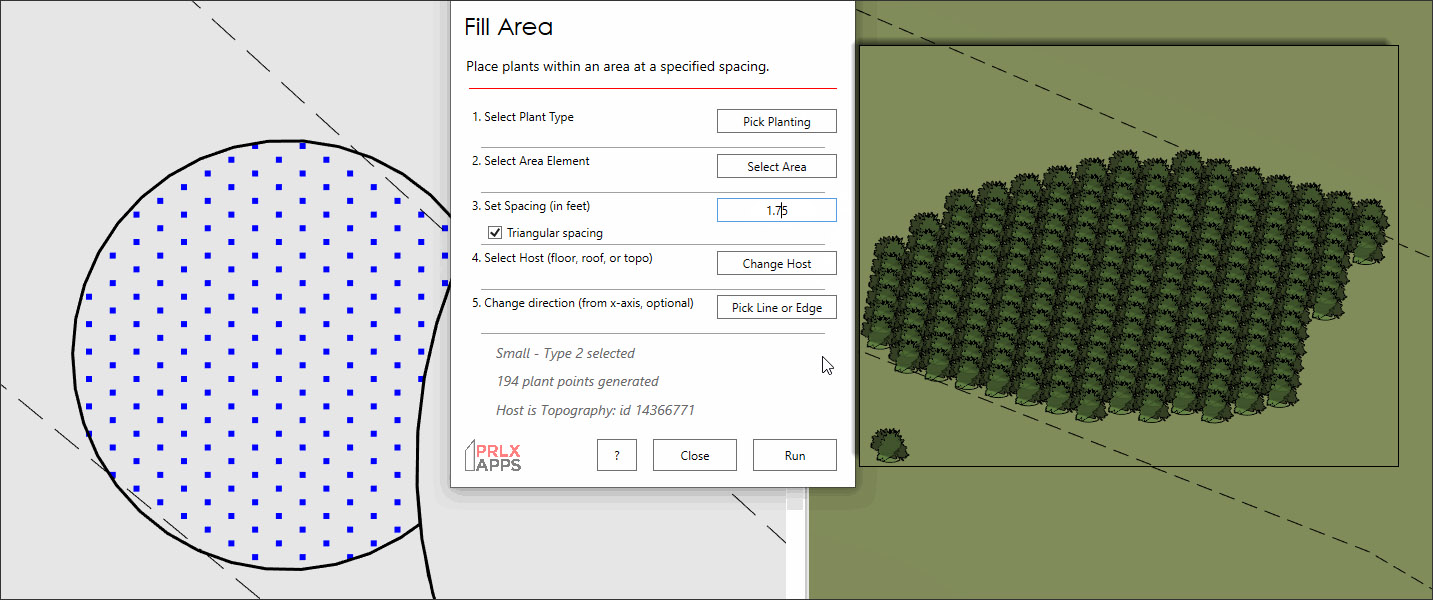
Planting
While the Planting toolset is still under development, the overall goal is to give users the ability to manage plant mixes, groups of plants, and generally automate the placement of plants. The placement tools, Fill Area and Place Along, are just the starting point.
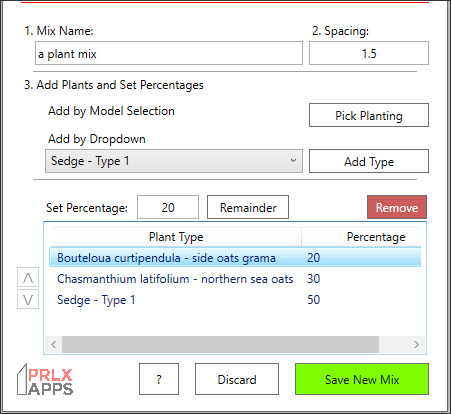
Here is a sneak peek at the Plant Mix dialog, which will allow you to create and update plant mixes, to then use in the placement tools.
If you are interested in learning more about FOREground, visit their website and fill out the form to express your interest in the product once it is launched.
For architects and landscape architects who use Revit, many (if not all) of these tools and workflows can be utilized to improve coordination and site model fidelity. Some involve working with other disciplines and even external consultants, others can be accomplished by the architect or landscape architect directly. While this is not an exhaustive list of the opportunities that exist in this space, they are important ones that everyone should at least be aware of, for when the right project comes along.
 Daniel John Stine AIA, CSI, CDT, is a registered architect with over twenty years of experience in the field of architecture. He is the Director of Design Technology at the top ranked architecture firm Lake|Flato in San Antonio, Texas. Dan implemented BIM-based lighting analysis using ElumTools, early energy modeling using Autodesk Insight, virtual reality (VR) using the HTC Vive/Oculus Rift along with Fuzor & Enscape, Augmented Reality (AR) using the Microsoft HoloLens 2, and the Electrical Productivity Pack for Revit (sold by ATG under the CTC Software brand). Dell, the world-renowned computer company, created a video highlighting his implementation of VR at LHB.
Dan has presented internationally on BIM in the USA, Canada, Scotland, Ireland, Denmark, Slovenia, Australia and Singapore. He was ranked multiple times as a top-ten speaker by attendees at Autodesk University, RTC/BILT, Midwest University, AUGI CAD Camp, NVIDIA GPU Technology Conference, Lightfair, and AIA-MN Convention. By invitation, he spent a week at Autodesk’s largest R&D facility in Shanghai, China, to beta test and brainstorm new Revit features in 2016.
Committed to furthering the design profession, Dan teaches graduate architecture students at North Dakota State University (NDSU) and has lectured for interior design programs at NDSU, Northern Iowa State, and University of Minnesota, as well as Dunwoody’s new School of Architecture in Minneapolis. As an adjunct instructor, Dan previously taught AutoCAD and Revit for twelve years at Lake Superior College. Dan is a member of the American Institute of Architects (AIA), Construction Specifications Institute (CSI), and Autodesk Developer Network (ADN), and is a Construction Document Technician (issued by CSI). He has presented live webinars for ElumTools, ArchVision, Revizto and NVIDIA. Dan writes about design on his blog, BIM Chapters, and in his textbooks published by SDC Publications:
AECbytes content should not be reproduced on any other website, blog, print publication, or newsletter without permission.